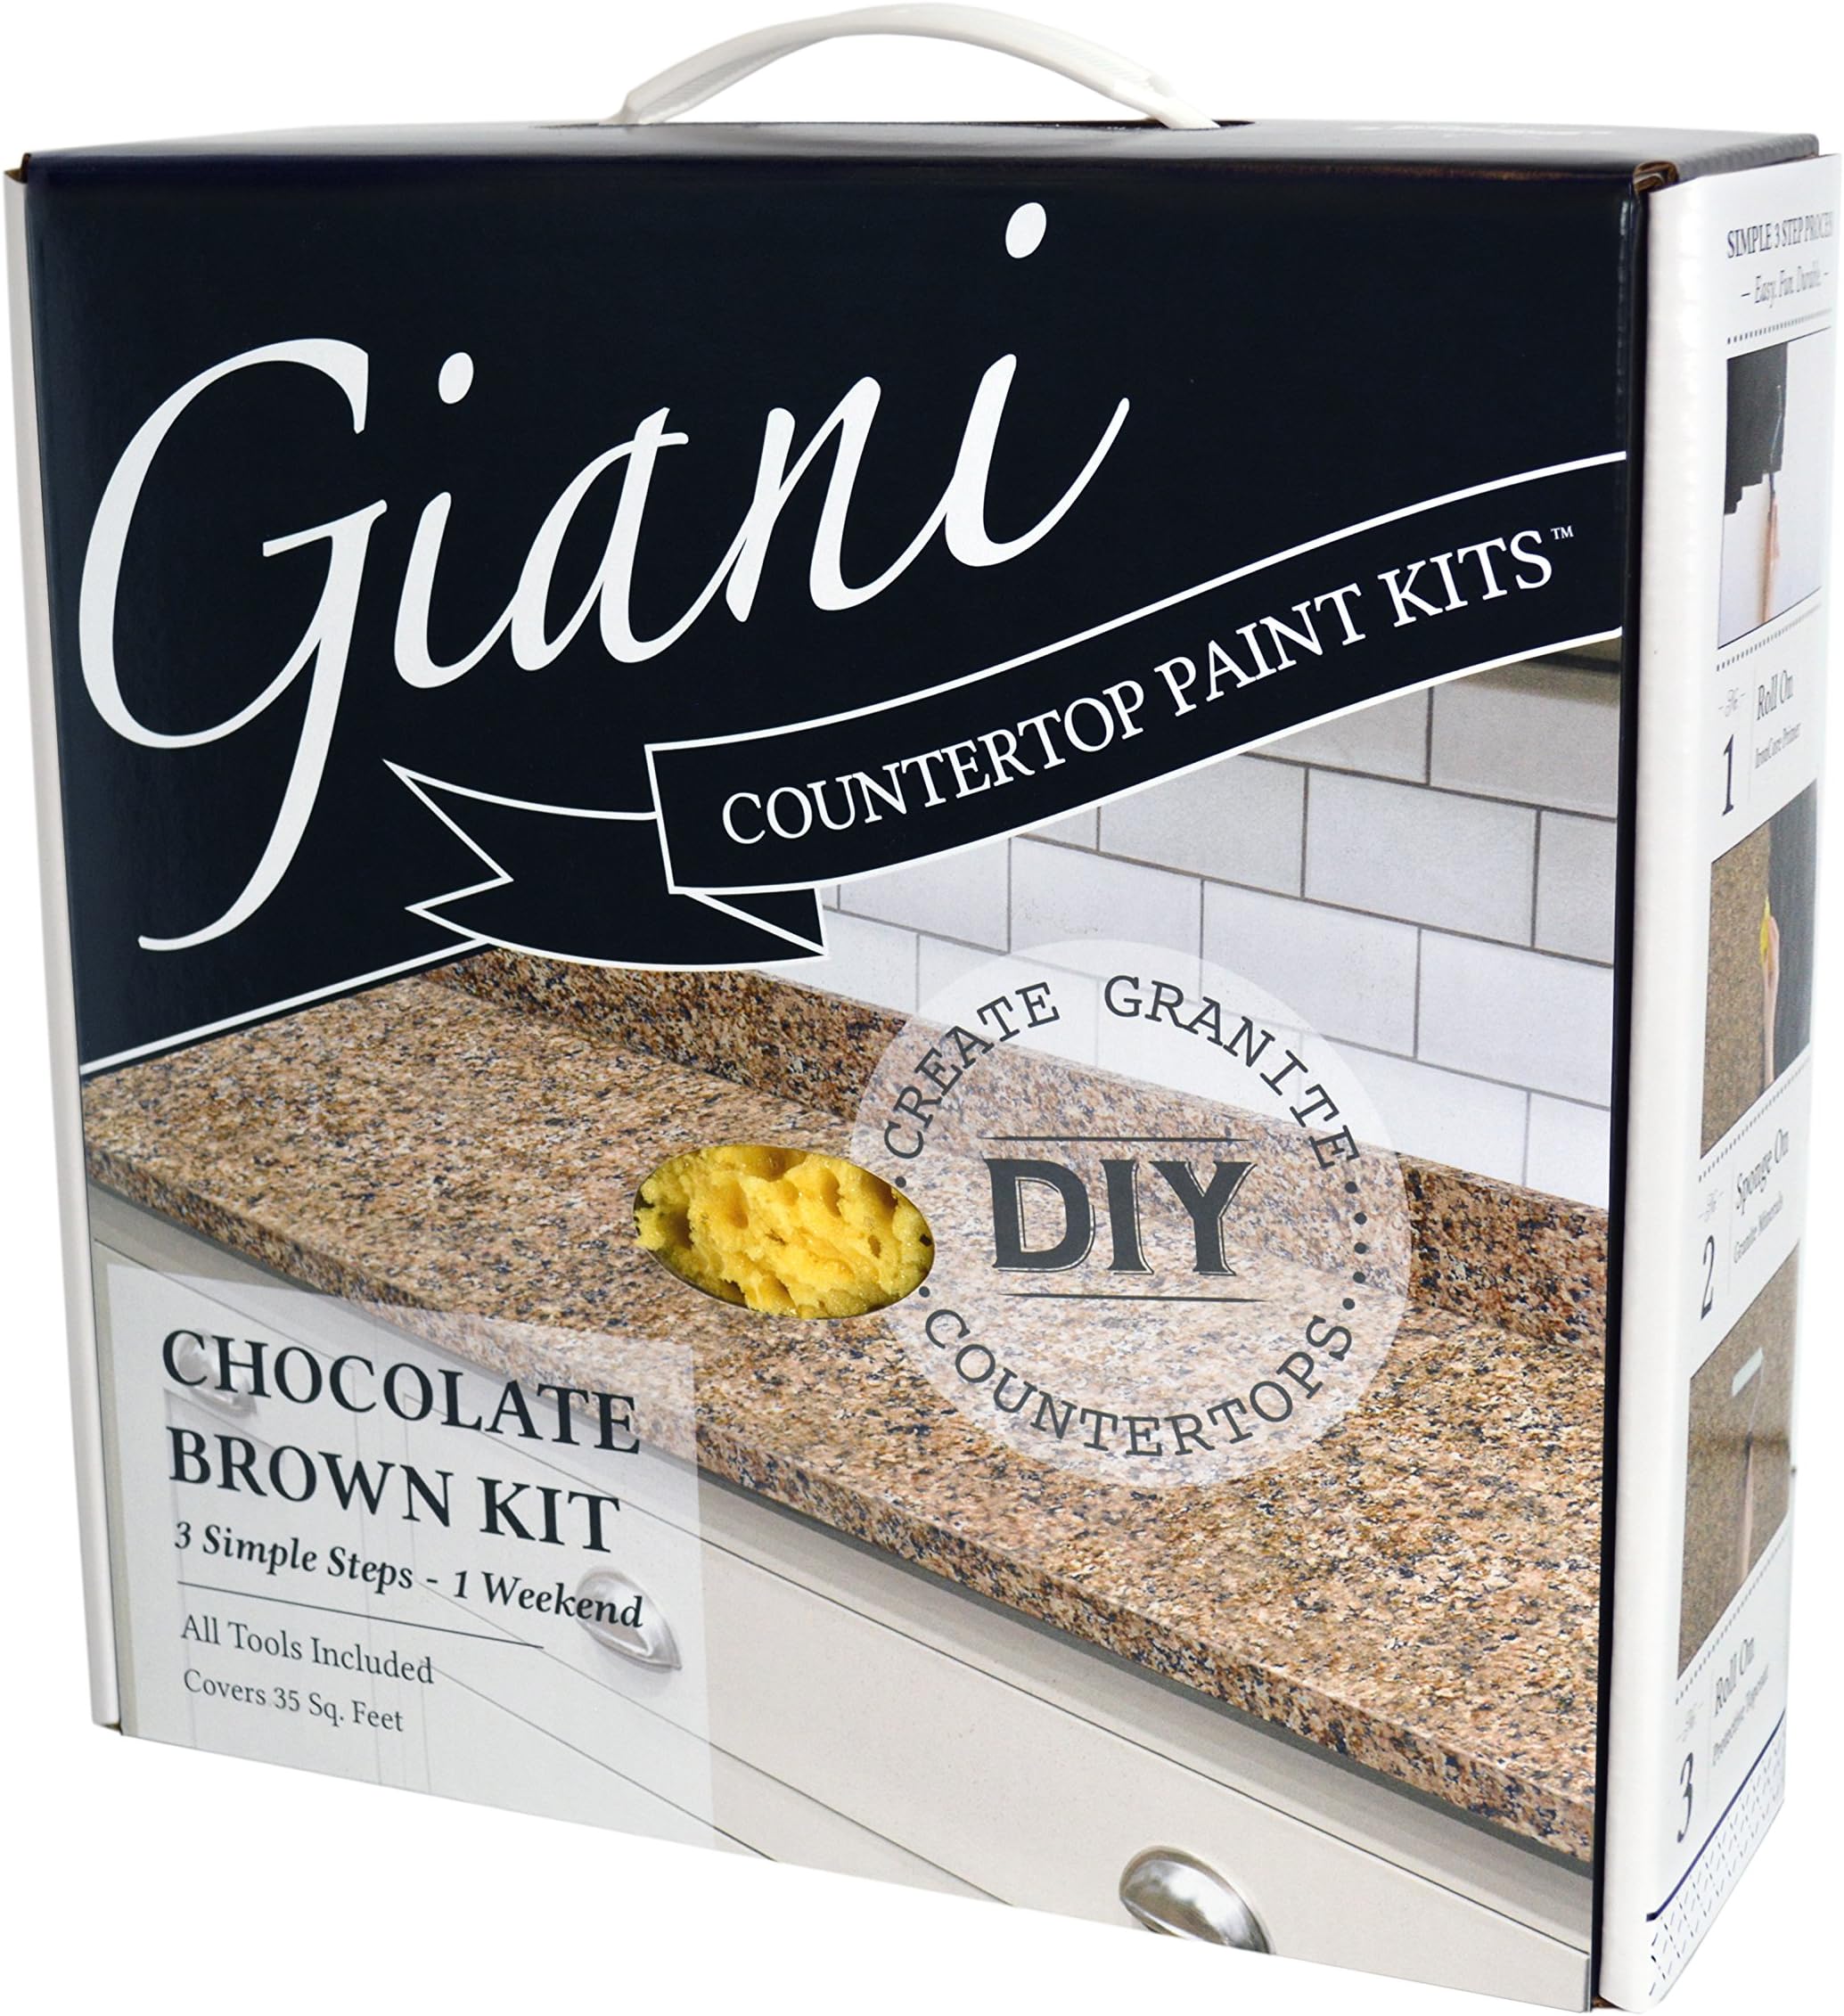


Giani Countertop Paint Kit (Chocolate Brown)
Product ID: 1321978
Giani Countertop Paint Kits are the perfect fit for budget conscious DIY kitchen makeovers. A simple 3-step process with all tools included, each kit will help you transform your existing countertops to the look of natural granite in just one weekend. Kit Includes: 12 oz. Iron Core Primer-Base Coat, 6 oz. Brown Feldspar Mineral, 6 oz. Inca Gold Mineral, 6 oz. Chocolate Brown Mineral, 16 oz. Automotive Grade Acrylic Topcoat, 6” Giani Roller Arm and 2 Roller Pads, 4” Giani Paint Sponge, 2” Foam Brush, Practice Board Typical project time is approximately 16 hours to clean and paint (including dry time). You may fully use your countertops as normal after allowing 14 days for your Giani application to cure. **If you have a one piece countertop-sink installation and would like to paint both, do not paint the sink basin with Giani. Please use XIM Tile Doc to paint the sink only. Tile Doc is a white epoxy-based aerosol spray paint designed specifically to update old ceramic and porcelain sinks. **Each kit covers up to 35 square feet of countertop surface area and provides easy cleanup with Giani Countertop Cleaner or gentle soap and water. Giani Countertop Paint is durable and will hold up under the stress of normal, everyday use. Giani is formulated to cover typical countertop materials such as Formica, Corian, laminate, ceramic tile, cultured marble, butchers block and traditional granite. Visit the manufacturer's website for live chat support and receive help with project ideas, design advice, application assistance and more! Manufactured in the USA. Review: Beautiful results, easier to do than expected! - I was a little scared to try this product; it looked so easy and actually looks like granite but is it really that easy to do?? In short, yes. I did this over two days and it turned out beautifully. There were challenges since I painted an existing bathroom vanity with two sinks and decided not to remove the sinks (just taped them up really well to prevent accidents); in hindsight, it would have been easier to move the sinks out of the way first so if you're contemplating this and have sinks in the way, my advice is to go ahead and take the time to remove them. Almost everything you need comes in the box; the only additional items you will need are either a stout Brillo pad (if doing laminate or Formica) or some fine-grit sandpaper (if painting on metal or wood), a caulk remover and denatured alcohol to scrub away the remnants of caulk (if not a new countertop), painter's tape, sponges, silicone caulk, and perhaps a small paintbrush. I used a 1" paintbrush and it worked well to get into the corners and turns around the sink and the top of backsplash. Another very useful tool is a pencil and twist tie (I'll get to that later!) The primer coat went on with no issues. I did not anticipate the long wait time for it to dry (8 hours!), so that slowed me down just a bit. Not really a problem, just a delay I didn't anticipate. Keep your brush and roller handy (wrapping in a plastic bag and sticking them in the refrigerator to prevent them drying out really helps) because no matter how carefully you paint the first coat, there will be spots that need touching up! I checked the countertop after it was dry to the touch and touched up a few spots, then allowed to dry the remainder of the recommended time. The directions advise cutting the included sponge into 4 pieces, but I would recommend also cutting 2-3 small thumbnail sized pieces off to use to get into the small places the bigger sponge won't reach, such as the crease between the countertop and the backsplash and the top of backsplash close to the wall behind. I used the small pieces of sponge and wrapped them around the end of a pencil, and secured with a twist tie (bread tie), and it worked beautifully to give an even coverage. There are 3 colors to be sponged onto the black primer. One mistake I made initially was not covering the countertop with enough "sponging", especially in the first color. It's a matter of personal taste, of course, but I would recommend sponging well so that only very minimal black shows through the base color for the most realistic look. The additional colors should be used in gradually- reducing amounts, as they are more highlight colors and are sponged on top of both the primer and first "sponge" color. After all the colors are sponged on to your liking, use the left-over 4th sponge to dry-sponge over the entire surface to blend the colors a bit. Don't oversponge... it's harder to fix (learned that the hard way!) than doing minimal sponging and working up to how you'd like it to look. Again, this is personal preference but over-sponging will give a blurred look. If this is what you're after, sponge away! If not, I would suggest dry-sponging a bit then taking a step back to get an overall view of how it looks. After another 4-hour dry time, the clear topcoat goes on. It's amazing how realistic that sheen makes the countertop look! The directions recommend 2 topcoats with a 4-hour dry time in between. I am considering also putting a clear epoxy marine coating on top as well, to help protect against scratches and water splashes. All in all, it was very easy to do and turned out really well. I highly recommend if you want the look of granite without the weight and the expense. Review: Countertops look great after one month! - I spent a long time debating about painting my laminate countertops. They were grayish marble colored and had a texture to them and I just wasn't sure if I was making a huge mistake. So far, I think it turned out better than I expected. First of all, I chose the Bombay Black. This is a paint-only version of the countertop paint - there are other versions with little chips and flecks to sprinkle on it. I decided that there was too much risk of a large mess with those versions, and they seemed to have many more steps than the paint-only version. Here's what I did... 1. Watched the DVD three times and tried doing some practice painting on the included black paper and then my own black paper to perfect my technique. Later I wished I had done less practicing because I used up a lot of paint doing that. 2. Removed the caulk, taped off the sink, walls, and cabinets, and other general paint prep. 3. Cleaned the countertops down with soap and water and rinsed them off three times as suggested. Then I followed that with a wipedown with rubbing alcohol as recommended somewhere online - I have no idea if that helped, actually. 4. Painted the primer coat and let it dry. You will notice I did not say I sanded it first - I did not. I did not sand it after the primer coat either. 5. I started dabbing on the white pearl paint with the sponge. I thought I would get creative and also use some silver acrylic paint as a second color rather than the included bronze but to be honest the pearl and the silver spots look just alike in the end - the pearl paint is very shiny. 6. Then I dabbed on the Onyx paint. This was the hard part for me because I was trying to get roughly the same look on all the countertops in my kitchen but because some were deeper than others it was hard to reach everything equally - I found I dabbed more where it was easier to reach. All the practicing did not really pay off because in the end, reaching across three feet of countertop is very different than a 8" sheet of paper. 7. Again being creative I blew some fine silver glitter on mine in some places while the paint was still wet. I think this turned out very nice and you can definitely see the sparkle. 8. After that was dry I put on the Polyurethane coat. I had sort of expected that most of my texture would be eliminated by the Polyurethane and I would end up with a fairly smooth finish. This was not the case. I ended up using up my whole can of Polyurethane and a second can I ordered separately AND a third, larger size can of "one coat polyurethane" I bought at the hardware store... allowing four hours minimum drying time in between coats... but I ultimately ended up with a shiny mirror finish which was the goal. I did not sand at any time. I found the paint to be easy to apply and I did not make a mess. I was EXTREMELY gentle on the countertop for about the first three days after the last coat of polyurethane. I did not set anything cold, hot, wet, sharp, or heavy on it during that time. After that I was fairly gentle for another week - I did get it wet sometimes but wiped it up quickly and I was careful not to set anything sharp on it. A word of warning - when it gets wet the poly will cloud up, but that will go away once it is dry for a few minutes. This is normal while the polyurethane cures, which can take up to 30 days. Now, you don't have to baby the countertops that whole time, just be aware that it might get cloudy when it is wet until it fully cures. I did my final coat about 36 days ago and the beginning of this week I noticed it was no longer getting cloudy if I left a wet dishrag on it. Now of course, how it looks is important but it is not the main thing - it has to be durable. Before writing this review I scanned the countertop with a flashlight and confirmed there are no scratches - not even small ones. It seems to be holding up very well. I think I have successfully postponed buying new countertops for at least another few years.
| ASIN | B003RX791U |
| Age Range Description | Adult |
| Best Sellers Rank | #435,395 in Tools & Home Improvement ( See Top 100 in Tools & Home Improvement ) #964 in Interior & Exterior House Paint |
| Brand | Giani |
| Brand Name | Giani |
| Color | Chocolate Brown |
| Color Code | #4A2C2A |
| Container Type | Can |
| Coverage | 35 square feet |
| Customer Reviews | 4.5 out of 5 stars 8,698 Reviews |
| Finish Type | Finished |
| Full Cure Time | 16 hours |
| Global Trade Identification Number | 00891056001406 |
| Included Components | 12 oz. IronCore Primer-Base Coat, 16 oz. Automotive Grade Acrylic Topcoat, 4" Giani Paint Sponge, 6 oz. Brown Feldspar Mineral, 6 oz. Chocolate Brown Mineral, 6 oz. Inca Gold Mineral, 6" Giani Roller Arm and 2 Roller Pads, Brush, Canvas Board |
| Indoor Outdoor Usage | Indoor |
| Is Waterproof | True |
| Item Form | Aerosol |
| Item Type Name | Giani Countertop Paint Kit, Chocolate Brown |
| Item Volume | 1360 ml |
| Item Weight | 5.3 pounds |
| Manufacturer | Giani |
| Model Number | FG-GI CH BR KIT |
| Paint Type | Acrylic |
| Part Number | FG-GI CH BR KIT |
| Size | 1 Count (Pack of 1) |
| Special Feature | Low Odor |
| Special Features | Low Odor |
| Specific Uses For Product | Countertop |
| Surface Recommendation | Tile |
| UPC | 891056001406 |
| Unit Count | 1 Count |
| Water Resistance Level | Water Resistant |
M**R
Beautiful results, easier to do than expected!
I was a little scared to try this product; it looked so easy and actually looks like granite but is it really that easy to do?? In short, yes. I did this over two days and it turned out beautifully. There were challenges since I painted an existing bathroom vanity with two sinks and decided not to remove the sinks (just taped them up really well to prevent accidents); in hindsight, it would have been easier to move the sinks out of the way first so if you're contemplating this and have sinks in the way, my advice is to go ahead and take the time to remove them. Almost everything you need comes in the box; the only additional items you will need are either a stout Brillo pad (if doing laminate or Formica) or some fine-grit sandpaper (if painting on metal or wood), a caulk remover and denatured alcohol to scrub away the remnants of caulk (if not a new countertop), painter's tape, sponges, silicone caulk, and perhaps a small paintbrush. I used a 1" paintbrush and it worked well to get into the corners and turns around the sink and the top of backsplash. Another very useful tool is a pencil and twist tie (I'll get to that later!) The primer coat went on with no issues. I did not anticipate the long wait time for it to dry (8 hours!), so that slowed me down just a bit. Not really a problem, just a delay I didn't anticipate. Keep your brush and roller handy (wrapping in a plastic bag and sticking them in the refrigerator to prevent them drying out really helps) because no matter how carefully you paint the first coat, there will be spots that need touching up! I checked the countertop after it was dry to the touch and touched up a few spots, then allowed to dry the remainder of the recommended time. The directions advise cutting the included sponge into 4 pieces, but I would recommend also cutting 2-3 small thumbnail sized pieces off to use to get into the small places the bigger sponge won't reach, such as the crease between the countertop and the backsplash and the top of backsplash close to the wall behind. I used the small pieces of sponge and wrapped them around the end of a pencil, and secured with a twist tie (bread tie), and it worked beautifully to give an even coverage. There are 3 colors to be sponged onto the black primer. One mistake I made initially was not covering the countertop with enough "sponging", especially in the first color. It's a matter of personal taste, of course, but I would recommend sponging well so that only very minimal black shows through the base color for the most realistic look. The additional colors should be used in gradually- reducing amounts, as they are more highlight colors and are sponged on top of both the primer and first "sponge" color. After all the colors are sponged on to your liking, use the left-over 4th sponge to dry-sponge over the entire surface to blend the colors a bit. Don't oversponge... it's harder to fix (learned that the hard way!) than doing minimal sponging and working up to how you'd like it to look. Again, this is personal preference but over-sponging will give a blurred look. If this is what you're after, sponge away! If not, I would suggest dry-sponging a bit then taking a step back to get an overall view of how it looks. After another 4-hour dry time, the clear topcoat goes on. It's amazing how realistic that sheen makes the countertop look! The directions recommend 2 topcoats with a 4-hour dry time in between. I am considering also putting a clear epoxy marine coating on top as well, to help protect against scratches and water splashes. All in all, it was very easy to do and turned out really well. I highly recommend if you want the look of granite without the weight and the expense.
D**L
Countertops look great after one month!
I spent a long time debating about painting my laminate countertops. They were grayish marble colored and had a texture to them and I just wasn't sure if I was making a huge mistake. So far, I think it turned out better than I expected. First of all, I chose the Bombay Black. This is a paint-only version of the countertop paint - there are other versions with little chips and flecks to sprinkle on it. I decided that there was too much risk of a large mess with those versions, and they seemed to have many more steps than the paint-only version. Here's what I did... 1. Watched the DVD three times and tried doing some practice painting on the included black paper and then my own black paper to perfect my technique. Later I wished I had done less practicing because I used up a lot of paint doing that. 2. Removed the caulk, taped off the sink, walls, and cabinets, and other general paint prep. 3. Cleaned the countertops down with soap and water and rinsed them off three times as suggested. Then I followed that with a wipedown with rubbing alcohol as recommended somewhere online - I have no idea if that helped, actually. 4. Painted the primer coat and let it dry. You will notice I did not say I sanded it first - I did not. I did not sand it after the primer coat either. 5. I started dabbing on the white pearl paint with the sponge. I thought I would get creative and also use some silver acrylic paint as a second color rather than the included bronze but to be honest the pearl and the silver spots look just alike in the end - the pearl paint is very shiny. 6. Then I dabbed on the Onyx paint. This was the hard part for me because I was trying to get roughly the same look on all the countertops in my kitchen but because some were deeper than others it was hard to reach everything equally - I found I dabbed more where it was easier to reach. All the practicing did not really pay off because in the end, reaching across three feet of countertop is very different than a 8" sheet of paper. 7. Again being creative I blew some fine silver glitter on mine in some places while the paint was still wet. I think this turned out very nice and you can definitely see the sparkle. 8. After that was dry I put on the Polyurethane coat. I had sort of expected that most of my texture would be eliminated by the Polyurethane and I would end up with a fairly smooth finish. This was not the case. I ended up using up my whole can of Polyurethane and a second can I ordered separately AND a third, larger size can of "one coat polyurethane" I bought at the hardware store... allowing four hours minimum drying time in between coats... but I ultimately ended up with a shiny mirror finish which was the goal. I did not sand at any time. I found the paint to be easy to apply and I did not make a mess. I was EXTREMELY gentle on the countertop for about the first three days after the last coat of polyurethane. I did not set anything cold, hot, wet, sharp, or heavy on it during that time. After that I was fairly gentle for another week - I did get it wet sometimes but wiped it up quickly and I was careful not to set anything sharp on it. A word of warning - when it gets wet the poly will cloud up, but that will go away once it is dry for a few minutes. This is normal while the polyurethane cures, which can take up to 30 days. Now, you don't have to baby the countertops that whole time, just be aware that it might get cloudy when it is wet until it fully cures. I did my final coat about 36 days ago and the beginning of this week I noticed it was no longer getting cloudy if I left a wet dishrag on it. Now of course, how it looks is important but it is not the main thing - it has to be durable. Before writing this review I scanned the countertop with a flashlight and confirmed there are no scratches - not even small ones. It seems to be holding up very well. I think I have successfully postponed buying new countertops for at least another few years.
S**Y
A great product and at a great price.
It will be a while before I could remodel my whole entire kitchen so I wanted to make it feel like home. The counter tops were sand color with the flecks in it, nothing eye sore about it, just blah. I like doing projects around the house and we've been in our house well over 3 1/2 years and with only updating with paint on the walls. I researched the Rustoleum product for the counter tops and I was planning on going with that until I heard that it left a horrible after smell because that's how the product worked. Not what I was wanting with 3 kids in the house. Then I came across the Giani products and researched it online before purchasing. It seemed like a good candidate and so I purchased it. I got this shipment pretty quickly and in great condition. I watched the dvd at least 3 times to ensure I was going to do it right. And sometimes found myself referring back to it when I got to each phase I was at. It does only take a whole weekends worth of time (most of it for drying time) but it is well worth the effort. I painted my primer on the night before since that takes at least 4 hours to dry but I figured, I'd give it a little extra over night. It couldn't hurt. I was going to take my entire sink out to do this but my husband, well, didn't want to. So I worked with the sink in, no big deal. The minerals itself take 4 hours to dry, total time. You have to do each mineral separately so that they do not blend into each other. You have the option to use what mineral colors to your liking. I did choose to use the bronze but very seldom and randomly. I figured it gave it a little more depth. If you are a perfectionist or OCD about things, then this will probably give you a hard time. Although, the minerals are suppose to be random, you feel the need that it's just not right. That was my case. I started with the black mineral (per instructions) then the pearl and stopped there. I wanted to make sure that's how I liked it. So I slept on it. It's a good thing I did because I felt I over did it with the pearl so I went back over with more black. You just have to lightly and I emphasize, "lightly" sponge on the minerals. The harder you dab, the more the shape of the sponge you'll see in your finished product. But all in all, this product has great coverage. I don't know what real granite looks like and highly doubt it looks like my counter tops, although I had a friend said that they did. I, do however, enjoy my counter tops now than before. It's a quick and simple project that is super affordable and a temporary fix. I have left over product to do more, if needed. On the durability of the product - I waited at least 14 days (as recommended) to lay anything on the counter. I had a folding table to do my cooking, chopping...etc temporarily. I've had this product on my counter tops for about a month now and felt it was a good time to do a review on it. Sometimes, people jump the gun, you know what I mean. Whatever dishes I have left over that doesn't fit in my dishwasher, I normally do them by hand and set them on a kitchen towel on the counter. Thinking that the counter top was at it's total dry time, I figured it should be good to keep it on there. Well, I ended up running out somewhere and it stayed on my counter for a few hours, maybe more. I took the towel off and like a previous reviewer said, it caused a blotchy spot and little tiny bubbles. I was totally bummed and was about to scrape it up and fix it. Good thing was, it was close to bed time and well, I didn't want to embark on that at that moment. So I slept on it. Went to check it the next morning and it was gone!! Bubbles and blotchy marks! I was so relieved since I really didn't want to re-do it. And I have to be honest, I'm always leaving water all over the counters and don't wipe them up right away and most of the time does it. The blotchy spots, if you can imagine when you leave a hot pot on the table and it leaves the heat spot. It's kind of like that on these counters. But don't touch or start to re-fix them!! They will go away in a couple hours of drying, trust me!!! It's a weekly thing with me :) I beat my counter tops up and I've had not one scratch on them or peeling up anywhere. I didn't even put back the caulk around the sink like you're suppose to after you're done painting and nothing has lifted. All in all, if you read the directions and follow each step as instructed, you'll have no problem. I highly recommend this product for anyone looking for a new look. :) This counter top color also looks great with grey tones (like how I did with my cabinets).
A**C
Love it!
We could not be happier with how this turned out. It really looks amazing! It was easy to do and we had no problems, and trust me I'm no artist! I did have to abandon trying to do some veining though because as much as I practiced I couldn't make the veining look natural, but it still looks great. We have about 50 feet of counter space and bought two kits but only needed one. We had plenty of everything and only came close to running out of the first mineral. The only reason I didn't give this five stars is because my roller kept sticking and not rolling. They note in the instructions not to push the roller on too hard so it doesn't stick while rolling, but no matter where I positioned it, it kept happening but didn't affect the final outcome. I did follow one tip I read in the reviews to add two tablespoons of cold water to the polyurethane so it wouldn't dry too quickly while rolling it on. We didn't have any problems with it drying too soon so it may have helped but I don't have any experience with how it goes on without the added water to know for sure. I would recommend this to anyone looking for a make over without spending thousands of dollars. This project is able to be done over a weekend, but I would start Friday night doing the prep work. The actual work doesn't take too long but there are significant drying times to fit in there. Eight hours after the primer, four after the minerals and primer coats. I did the prep work Friday night, primer Saturday morning, waited eight hours, did the minerals, left it overnight, and then did the sanding and primer coats Sunday. I'm so glad we did this! Love it! Next are Cabinet Transformations by Rustoleum which we have used in our other home and already know we love.
T**E
AMAZING PRODUCT!
The Giani Granite Finish is an amazing product. If applied correctly, to a clean surface, it is also very durable. Even though the instructions say that sanding between applications is not necessary, you should always lightly sand between coats, when painting just about anything. This ensures that the top coat will adhere to the layer beneath it. The top layer is not going to stick to a glossy undercoat, and will eventually just chip, and peel away. I think this is the biggest cause of the "peeling" that some people claim they are experiencing. I followed all of the drying times between coats, per the instructions, but also lightly sanded with very fine grit sandpaper between all coats ( including primer, paint and clear). I also allowed for the full 14 day curing period before setting ANYTHING on the counter top. The paint, and clear coat both need plenty of time to cure, and harden, in order to be durable, so don't be impatient with this final step. It is important. I used 3 coats of clear coat (sanding in between each coat), and it dried smooth, and hard as a rock. Also make sure you seal all of the gaps, and edges with Silicone, so that water does not get underneath the surface, and lift the finish. I used a lot of the white color in my counter design, and feathered the edges, so the countertop came out looking more like cut marble, or quartz, than granite. It looks incredible. I also purchased some extra bright metallic gold paint to make veins with, which added to the realism. The project takes some time, and patience, to do correctly. Do not rush it. With the application, and drying times in between coats, plan on spending an entire weekend on this project. Starting on a Friday night, and just letting the primer set up all night is your best bet, since that requires the longest dry time. I have had my Giani countertop for about 6 months now with no issues at all. I make sure to not let water puddle on the counter, and wipe up spills right away. I only use dish soap, and water for everyday cleaning, and I also use the Giani Countertop cleaner about once a week, or so. It keeps the counter looking shiny, and new. Also keep any hot pans away from the countertop, as it will soften, and melt, the new surface. I did drop a very heavy pointed object on the counter, and made a very small chip (my fault, not Giani's). I filled in the chip with some left over paint, and covered that with clear fingernail polish (my girlfriend's, not mine). You cannot even tell that there was ever even any damage at all. I learned the fingernail polish trick from years of working on cars. The stuff is very durable. Overall I am very please with how the counter turned out. Along with the Giani Coountertop, I used Vinyl, peel and stick, SMART TILES for the backsplash. They look just like Mosaic Glass tiles. I have had many people come in my kitchen now, and ask, " WOW, how much did you pay for all of that?" due to the fact that it looks so much like real marble/granite, and glass. The only difference is that I paid about $350 for the entire project, and not the $3,500+ that we were quoted for the "real thing." If you are not so vein, that you need the real granite, and glass, then these 2 products together are just amazing. We will see how durability is over the long run, but so-far-so-good. A little common sense goes a long way in taking care of the countertop. Just treat it as you would any other expensive granite, quartz, or Corian type countertop, and you will be fine. I would definitely recommend purchasing this product, and trying it out. If you have a little patience, and artistic flair, the results will be amazing, and so will the money that you save!
K**S
The nitty-gritty truth about this A+ product :)
I did a ton of comparison shopping and product research before deciding on this purchase. I've just gotta say WOW! I'm very pleased with my purchase :) It's only been on my countertops for 3 weeks, so of course brand new is beautiful. I understand that this particular product tends to wear quickly and easily BUT my ultimate goal is to get some two part epoxy and make this more permanent. In terms of artistry, it's so easy literally anyone could do it. WARNING: it is down right scary throughout the entire process. These are my kitchen counters!! Lol. That being said, I decided not to try to get fancy to stay on the safe side. I took pictures throughout the process and told my husband after applying the primer that if I royally screw up, at least we know that they look good black, which would've been easy enough to do if needed. The final results were beautiful and everyone loves them, thought it was genuine granite, and asked me what my trick was when I admitted it was paint (insert product recommendation). What they look like and what the finished product feels like is two different stories, however. The final coat is essentially the same thing as Minwax Polycrylic. It has it's place, but not so much on a counter. It leaves the gloss streaky no matter how closely I followed directions and let out my inner OCD. It's not horrible, and wouldn't dissuade me from purchase. Also the texture is kinda like orange peel, but maybe my fault for not sending down enough. As stated, a nice thick glossy coat of self leveling epoxy and I'm good to go. Still cheaper than the competitors that have lower product reviews. Without the extra epoxy top coat I'd give these counters just a couple years of heavy use before needing a good touch-up. We're a family of 5, so I'll definitely be stepping it up a notch. The kit is very versatile and comes with a generous enough amount to fix any errors, but that part will take a bit more creativity :) I try to remain cautious about doing any damage to the surface before I epoxy coat them, so I don't leave standing water on it, set hot things down, clean with harsh chemicals, etc. I did a live chat with a rep and asked what the difference between light and heavy use was. Aside from the above stated care, during the 14 day cure time you really don't want to put anything on it that's heavier than a small toaster. Not a big deal for us, we had a small outdoor table that we just set up in a corner for the microwave, same with our coffee maker. But keep in mind the slight inconvenience for about 16 days (2 days for prep and painting, 14 days cure time). Speaking of prep, don't take any shortcuts, be thorough and follow instructions...it's a very important step of the process, and my counters took about 3 hours of prep. Mine started out laminate with a wood trim, so that did add to the prep time, but if you happen to have wood trim, I highly recommend just paint over it! The edge ends up looking amazing 😍 (see photos and note that I didn't re-caulk the sink because we plan on replacing it soon) Overall, the end results were fantastic and I would definitely use this product again despite it's setbacks. There are many others that are a bit more handy and artistic than me, but even my experience was great! Watch YouTube videos for inspiration, and have fun!!
S**I
Turned out GREAT!!!!
My fiancé and I just bought our first house in July, but were delayed for months with the pandemic. During that time, I did my research and felt fairly confident that I could transform the red Formica counter into something more my taste. And for under $100, if it didn’t work out, it didn’t work out. I watched video after video, perused reviews on here, and bought the kit long before we had the house keys. I could not wait! but when it finally came time, I had some doubts in myself. I am fairly artistic, but I honestly don’t think one could mess this up. What I would recommend doing, however, is taking a picture of each section after each color so that you can mimic the amount of each color used in the next section. For my first two sections, I didn’t do that. They both came out beautifully, but they didn’t look like the same counter. Luckily with some sanding and priming again, I was able to redo those two sections. By the end, it felt seamless. I think the photos speak for themselves. My kitchen looks brand new and I am sooo happy with it. I also feel a sense of accomplishment and pride, which may be the best part of it all. To make it exactly what I wanted, I bought new Amazon Basics hardware, which is absolutely beautiful as well as affordable. My ONE regret is that, in my months of research, I read a lot on here about using epoxy for extra shine. I read on various websites and message boards about how tricky epoxy can be to use. You have to be very accurate with your measurements and mixing, your surface has to be level, you have to work very quickly before it hardens, and you have to cover everything because it is “self leveling” and drips right off your surface. So for the countertops, I had to put painters tape on the sides, which I later gave a layer of the Giani top coat. I also had to use Giani for the backsplash because the Epoxy would have just dripped down the vertical surface. I tested the epoxy out on an old piece of wood with a squeegee as the instructions said and was happy with the results- smooth and shiny. Unfortunately, for whatever reason, it was not smooth whatsoever on my countertops. In fact, it’s very bumpy. I was sooo upset at first, but it isn’t that noticeable with my appliances on the counter. If you go up close though, it looks terrible. I wish I had just used the Giani topcoat. It is not super shiny but it still looks great. I eventually plan to do the flat surfaces over, but for now, it is a big improvement from what was there before. So to summarize, I would definitely recommend this product as is. It is easy to do and looks authentic. There’s no need to take a chance and mess with any other top coats in my opinion.
J**E
Does what it says it will, but do not recommend for those with a low threshold for frustration
Like everyone else who orders this product, I was looking for an inexpensive way to change the look of our perfectly fine, but outdated, countertops. I had considered using Giani for a couple of years, but had always been too nervous to try because I was afraid I'd mess it up. I thought probably just purchasing new counters would be the safer route, but the idea of saving hundreds or thousands of dollars was appealing. Finally, I decided to go ahead and give this kit a try - I figured the worst that could happen was that I'd mess it up, and have to buy new counters anyway. Ultimately I'd only be out $80 and some time. What I didn't realize until I went to order was that the total cure time was 14 days. I had an event planned in just under 3 weeks, so knew I'd need to start immediately. I ordered the kit on a Monday and received it on a Wednesday afternoon. The first step was easy - I taped and primed the counters on a Thursday. On Friday, I started the mineral paint. This went fairly easily on the larger, horizontal surfaces. I was careful to make patterns that looked natural across the tops. Where I ran into difficulty was in the corners and seams where the backsplash piece meets the counters. Ours are at 90 degree angles, and it is impossible to work a sponge into them, and also difficult to run along the top. I kept cutting smaller and smaller pieces, but ultimately had to use a brush. I didn't have the best type on hand (because I didn't realize I'd need them or that the type mattered all that much). This was VERY tedious, and I am not 100% happy with how those areas look, because using a brush does not create the same texture/pattern as a sponge, even with blending. It looks inconsistent with the look of the counter surfaces. And trying to work natural looking patterns in went out the window here. Perhaps others won't notice, but I do. The area between the sink/faucet and the backsplash was also extremely difficult to get to with either a sponge or a brush. It would be nice if the kit included some sort of small space tool to help with these areas. Anyway, after nine hours of working with the mineral paints on Friday, and another 3 hours of touch ups on Saturday morning, I still wasn't satisfied with those areas, but had to move on as I was running out of time against the 14 day cure period. It was never going to be perfect, and I figured most of the backsplash is not visible as it is blocked by appliances, etc., anyway. I don't like it, but will live with it. I moved on to the clear coat. This is where things really started to go south. I waited four hours for the paint touch ups to dry, and started the clear coat late on Saturday afternoon. I sanded and wiped everything down. I watched the videos several times, but still managed to screw this up. We have a large peninsula, and this area was the worst. It was streaky and there were dry spots even though I tried to be careful with rolling. I am not experienced with applying clear coats to anything, which didn't help. It isn't like paint. I was annoyed, but figured I'd just have to sand it down and try again. I waited another four hours and started sanding in prep for doing another clear coat on Saturday evening. Unfortunately the sanding, even with a very fine sandpaper, took some of the paint off. So instead of applying a clear coat, I had to touch paint up, and then wait overnight. So I am behind my deadline. On Sunday morning, I realized that I apparently didn't rinse the roller out enough, and there are hardened areas. This obviously isn't going to work, so now I have to get new rollers and am wasting more time. I am about at my patience limit. The irony is that I don't even care about a glossy finish; I just wanted a color/pattern change. I don't need it to look like "authentic" glossy granite, and would have been fine with a more matte look, but that isn't how it comes. Ultimately, I give this product 3 stars. It does what it is supposed to do. My 90s counters are updated and for the most part look good pattern-wise. However, this has been the MOST FRUSTRATING DIY project I've ever worked on. I am unhappy with the back splashes and seams. And the clear coat still isn't done. Some of it is user error as I am not experienced in working with this sort of thing and didn't always have the right tools on hand. Unless you are experienced, or unless you have a high threshold for imperfections and frustration, and a lot of time and patience, think hard before using this product. UPDATE: Three days later - after sanding and recoating the peninsula a couple more times, and being very, VERY careful, it still looked uneven, with lap lines and dry spots. I had to order more clear coat. Sanded again, touched up paint again, recoated again a little thicker this time. There is a slight improvement, but I can still see lap lines and spots. I do not have any more time to waste on this. After nearly a week, my family is tired of not having kitchen counters to use. Giani needs to consider changing the clear coat formula to make it easier to apply to large areas. Perhaps it just dries too quickly. I will just have to live with the streaks. My review remind three stars.
L**E
Easy
So good so easy to use good instructions everything you need
M**D
Overall good product
The product was easy to use but did require some skill when applying the second stage. The worktops look great but will take 14 days to cure fully which is problematic for a functioning kitchen. The paint goes a long way, the tina looked really small so initially I was concerned but still have enough left to do my friends kitchen. Don’t waste money getting vinyls as they are not as good as this product.
D**T
Looks good
looks like a painted surface but quality of paint was good. there are good tps on application on videos that i suggest reviewing first.
P**G
Absolutely Amazing!!!
After doing loads of research, reading tons of reviews and watching other people's experiences on YouTube, I decided to give this a go. Even though it had lots of rave reviews and had seemingly worked well for other people, I was still very skeptical about how it would turn out for me, as I am useless at anything remotely creative. However, I hated my work tops so much that I figured I couldn't hate them any more, even if I totally messed them up so, last weekend I took the plunge, and oh my goodness, I am so glad that I did! The results were way beyond my expectations and my husband couldn't believe how great the worktops looked once I'd finished them (and he used to run a kitchen business). If you decide to give it a go, some tips from my experience are: - Follow the instructions to the letter, and watch the Giani tutorial videos on YouTube before you start. The videos give additional really useful information and application tips which aren't on the written instructions. - You don't necessarily need to use Frog brand masking tape but do use a really good quality precision masking tape. - I didn't do any sanding between top coats because I couldn't get any fine enough sanding paper. They say you need number 600 which is US standard. This is equivalent to about number 1000+ European standard and I couldn't get it in our local Homebase. If you can't get it, then I wouldn't recommend using any standard fine sanding paper as it will take the paint off. - The top coat is trickier to put on than the primer and coloured minerals because it is very slippery and I found that the roller sometimes slipped and dragged over the surface instead of rolling, but when it did this I just picked the roller off the surface and out it back down again until it rolled nicely. Also, don't panic when you're applying the top coat as it goes on with a kind of ultra violet blue tinge to it, and looks all ripply and uneven, but it kind of self-levels and dries crystal clear. I thought I'd ruined the whole thing with the top coat, but it dried beautifully. There is a separate tutorial video on YouTube on how to apply the top coat - definitely watch that one. - There are also separate videos on how to apply the minerals for whichever colour you choose. You can get a bit creative with how you want it to look though. I didn't use the bronze colour mineral from my kit as I didn't think it would go with the colour scheme we are going for with the cupboards, so I just wanted the black with the silvery white flecks. - Give yourself a whole clear weekend to do the project. It took me from midday on Saturday right up to 1.30am Monday morning, with all the correct drying times. However it did take me 6 hours to put the minerals on, as I'm a bit of a perfectionist and I probably faffed about with it longer than most people would, plus we have got a lot of work surface in our kitchen. - Measure your work surface to see how much paint you'll need. They do give you plenty though - I bought two kits, as we have lots of work surface, but there is still loads left over of the second kit - I only needed extra primer and top coat. - And finally, I've posted some before and after pictures as I'm so proud of my efforts! Obviously, I can't comment on the durability of this product as I only did it a week ago, but it has dried rock hard and I am quietly optimistic that it will fare well if we treat it kindly and follow the Giani recommendations for cleaning it etc. In summary, if you're in two minds about whether to go for this or not, just do it - you honestly won't be sorry.
A**R
Love it!
This was so easy to do. I was really thorough with preparation- masking off, removing silicone, using a blade to scrape joins and around sink and cooker. It’s lasted really well (applied it 5 months ago. We have had some damages but so easy to touch up spots, not needed to sand back large areas, just the tiny area of damage and it’s not taken long. Every stage looked so good that I was tempted to keep each one as I was scared that I would mess up the next stage!! I am so glad that I went through to the last stage. Photos do it no justice. Every visitor couldn’t believe it was a paint effect. I’d definitely buy it again. I don’t think it looks like real granite but it definitely looks like a good quality granite effect worktop. Very happy
Trustpilot
1 month ago
1 day ago