Desertcart purchases this item on your behalf and handles shipping, customs, and support to Romania.
📐 Elevate your precision game — because every micron counts!
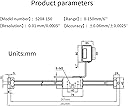
The SHAHE Digital LCD Linear Readout Scale offers a 0-150mm (0-6 inch) measuring range with a high accuracy of ±0.06mm and a fine resolution of 0.01mm. Featuring a large remote LCD display, it supports inch, fractional, and metric units, making it ideal for upgrading milling machines, lathes, routers, and planers. The aluminum construction ensures durability, and the package includes all necessary installation hardware and batteries for immediate use.


| ASIN | B089ZSG84J |
| Best Sellers Rank | #36,079 in Industrial & Scientific ( See Top 100 in Industrial & Scientific ) #46 in Digital Calipers |
| Brand | SHAHE |
| Brand Name | SHAHE |
| Customer Reviews | 4.3 out of 5 stars 206 Reviews |
| Included Components | calipers/pakcage box |
| Item Weight | 7.02 ounces |
| Manufacturer | Wenzhou Sanhe Measuring Instrument Co.,LTD |
| Material | Aluminum |
| Material Type | Aluminum |
| Measurement Accuracy | ±0.06mm |
| Model | 0-150mm |
| Number of Batteries | 2 CR2 batteries required. (included) |
| Number of Items | 1 |
| Part Number | 5403F |
| Range | 1.5E+2 millimeters |
| UPC | 385606582205 |
J**Y
Great digital readout for jointer
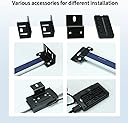
I bought this hoping to add a digital readout to a standard 6" jointer, and it worked far more easily than I anticipated. The photos show the DRO attached to the jointer (an older Bridgewood model fitted with a helical cutterhead). The steps to fit it to the jointer were: 1. Determine where the end brackets need to be so the guide bar is parallel to the infeed table ways, and drill and tap 8-32 holes in the jointer base for the mounting screws. 2. Attach the end brackets, and use these to determine how long the bar needs to be, and cut the bar to this length (mine came out to exactly 6" - who'd have thought...). Since the bar is aluminum, it's easily cut with a hacksaw and cleaned up with a file. 3. Place the guide bar and carriage into the brackets, and measure the distance from the bottom of the carriage to the side of the infeed table to determine the carriage attachment bracket depth. 4. Adjust the supplied carriage attachment bracket to provide the necessary depth for attachment as measured in the previous step. This may involve adding spacers, or as in my case flattening out the "z" in the bracket to reduce the depth. 5. Remove the guide bar assembly, attach the bracket to the carriage, re-attach the guide bar to the end brackets, and determine where to drill and tap a hole for the screw to fasten the carriage bracket to the infeed table (mine landed exactly on the hole from the original arrow indicator, so just needed to be enlarged and tapped - as they say, it's better to be lucky than to be good), and attach to the infeed table 6. Adjust the table to give a 0 depth of cut, and use the zero-set button to calibrate the gauge The whole process took just about an hour, and initial testing seems to indicate it's quite accurate. A couple of caveats: - Put the batteries in first and see which orientation of the carriage gives positive versus negative measurements - you really want to have positive measurements increasing as you lower the infeed table, i.e., as the carriage moves to the left. For me, this meant orienting the carriage with the output wire on top - The measurements given by the DRO need to be scaled by some factor to get the actual depth of cut, since the DRO measures the travel along the angled ways. You can determine this by using the existing scale along the infeed table, which will show how far the infeed table needs to be slid down to get a desired depth of cut. In my case, the factor was exactly 2, so the depth of cut is exactly half of what the DRO shows - i.e., if the DRO shows .050", the depth of cut is .025". I don't know if this is the standard angle used for jointers, or specific to my machine, so you might have a different factor. (It would be great if the manufacturers provided a mechanism to set a scale factor to make it ideal for applications like these.)
K**Y
Really nice for the money,
good device, 10-24 bolts fit the slots. The bracket that mounts on the back of the sensor has to point to the back, not wide enough to wrap around the side, so I had to reverise the bar mountung brackets so the back of the sensor faces out. Overall happy with the price, resolution and the sytem overall. Mounted on a planer, very nice addition.
S**Z
Ya gotta know what you're doing, but a very nice piece if you do
Must have addition to the planer, but there are some things you need to know. First of all, and most importantly, this isn't the kind of DRO where you can wind the planer to 2" (or whatever number you like) and then punch in 2" to "set" the DRO to match reality. You can run things up and down and then ZERO the readout but that is challenging with a planer because they don't wind all the way down to zero. Getting to a correct absolute reading IS doable but it takes some effort and you'll need to build some adjustability into the sensor mounting point to get it done. Second, the instructions are worthless so don't even waste your time with them. I mean unless you're into instructions like "install the bracket in an appropriate position". This DRO is more of a generic "one sizes fits whatever you can figure out a way to screw it to" kind of piece, so that's to be expected, just don't expect any help on the install. Finally, and this is only applicable to my planer model (the Dewalt DW735)...SUPER easy install. I simply attached the slide bar directly to the face of the factory scale bar (drill and tap two 5mm bolts, one top and one bottom) and then used the factory bright red pointer as the mounting plate for the sensor pack. It was my intention to drill through the pointer for two M3 screws into the back of the sensor pack, but I used a Command Strip to hold it in place temporarily to find the right alignment and found that that held more than adequately. So, in fact, I didn't even end up using any of the supplied brackets. Still waiting on a print off of the 3D printer to mount the readout, but you can put that piece anywhere convenient (has a nice long cord). Which is nice because bending down to read little screens sucks. Anyway, 1 star off for the crappy instructions and the drama getting zero'd out, but a nice piece of gear otherwise. I was able to tune the system to get a 1" thick planed board to 3 digit accuracy (checked with calipers), which is ridiculous with wood carpentry. Better than you'll ever need.
B**Y
Fairly Accurate
I am not sure if these would be accurate enough for a milling machine or lathe work, However, I have bought 3 of them. Most drill presses don't have any decent depth gauge or stop on them. Let alone any kit to do so. So, DIY in what I need. These can be cut and shorten if the length is to long and does not effect operation of them. Cutting is tricky due to glass glue to aluminum bar - die cut-off wheels doesn't hack it. the mounting hdwe is easy to modify. Wish there was a way to shorten the wire cable to display. The display work in metric or inches {I still do both}. I like the zeroing out feature, allowing me to set my own zero reference point and drill to my require depth for that hole and reset it for something else. There really isn't any hdwe out there that a person can buy to attach the drill's spindle and to the digital slide assy. Mine our all hand crafted.
M**E
Lathe trave
Attached to lathe to measure travel
W**S
Takes a ton of skill to mount, but wanna hear a killer hack?
This doesn’t just drop in. You have to disassemble your cross slide, create mount points with a tap and dye, likely trim the scale, find a way to mount the unnecessarily large reader to the scale in a way that doesn’t interfere with your cross slide, run an obscenely long wire close to the moving parts of your lathe to the display box and hope it all pans out when you put it all back together. Do this instead - get digital calipers and mount that to your cross slide. They operate almost exactly the same way. Adapting one of THOSE with a smaller reader and no wires is actually far easier than making loads of weird contortions to get this to fit the setup. This item is best suited for a larger lathe, but if you’re running one of those you should get a higher quality CNC grade DRO.
C**S
Accurate and Easy to install
I fitted this DRO to my desktop planer machine to give me repeatable accurate results. Installation was very easy and straightforward using the supplied brackets. Calibration of the unit was done by first planing a piece of wood and measuring it accurately, then installing the DRO so that its readout matched the measured thickness of the planed wood. This ensured accuracy, and repeatability of the planing process.
E**L
Doesn’t work on Motorized equipment
My experience was installed on a bench top planer. it worked great on initial use. But after two or three sessions on the planer the readings went crazy. I returned the first one. The second unit acted the same way. It was like it was possibly that interference from the motor on the planer caused the digital readout to go wacky. M
G**S
Worthy...
Accurate and good quality for this price...
Trustpilot
3 weeks ago
2 weeks ago