Desertcart purchases this item on your behalf and handles shipping, customs, and support to Romania.
๐ช Elevate your workspaceโupgrade your chair, upgrade your game!
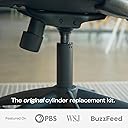
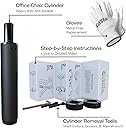
The Office Oasis Heavy Duty Pneumatic Gas Lift Cylinder Replacement kit offers a universal, durable Class 4 cylinder compatible with most office and gaming chairs, including Herman Miller Aeron. It features a patented removal tool for easy installation, supports up to 1000 lbs, and comes with a lifetime warranty, making it the smart, cost-effective solution to revive your chair and avoid costly replacements.


| ASIN | B01FGLVD6M |
| Auto Part Position | Bottom |
| Best Sellers Rank | #8,845 in Office Products ( See Top 100 in Office Products ) #177 in Office Furniture Accessories |
| Brand | The Office Oasis |
| Brand Name | The Office Oasis |
| Color | Black |
| Customer Reviews | 4.6 out of 5 stars 8,028 Reviews |
| Extended Length | 4.75 inches |
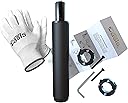
| Included Components | Chair Cylinder, Cylinder Removal Tool, Gloves, Installation Instructions |
| Item Weight | 2.5 pounds |
| Manufacturer | The Office Oasis |
| Material | Alloy Steel |
| Material Type | Alloy Steel |
| Model | OAS-2010 |
| Number of Items | 1 |
| Part Number | OAS-2010 |
| UPC | 760842156357 |
| Unit Count | 1 Count |
| Warranty Description | Lifetime Warranty |
P**B
A new life for my chair
I'm incredibly lazy about writing reviews. It's a testament to how much I enjoyed this product that I am writing this review within 24 hours of the item being delivered and installed! The piston of my 10+ year old office chair was on the decline. Coming from a country where everything can be repaired, I was determined to repair my chair, but this is America, where everything is disposable. Not wanting to bite the bullet on a new chair, I was trying to make the chair last longer, which gave me more time to search, and I ran into this product. I bought it immediately; it arrived the next day with an upcoming delivery. I had already watched the installation video by Kevin Lehoe online, so I got working. With my OCD, I lined up the two collars perfectly, resulting in the screw holes to line up perfectly! The printed instructions included in the box, clearly tell you NOT to align them, but well, I was too excited to fix my chair! I should mention here that the instructions are printed on quality paper! I'm impressed, while also, could be a cost saving for a young company to go with flimsy recycled paper? The engineering to simplify the piston removal was ingenious - it's a joy when the chair top frees itself. I did have to take the base outside to hammer out the piston, as I didn't want to disturb my neighbors at 9pm! Installing the new piston took less than 30 seconds! Just drop it in the base, drop the top over, and it's done! It is a much cleaner design than the original with the telescopic plastic cups. The up/down action is sturdy, it rises to a good height, and I now have a functioning chair for a fraction of the cost of a new chair! This product reduces waste and increases the lifecycle. I was also immediately drawn to the rollerblade wheels, and ordered them without hesitation. I am excited to swap out the wheels when they arrive. Also went down the rabbit hole and found the PBS coverage of the startup! It's so cool that a small business came up with this amazing product line!
A**R
Good replacement for Herman Miller Aeron cylinder
My 2002 Aeron cylinder blew (not bad since I sit in it every day and weigh 220, working from home for the past 2 years) so I was looking for a good replacement that didn't require ordering one through the local HM dealer. After evaluating many options I selected the Oasis kit - I looked at some two stage cylinders closer to the OEM but due to either shipment times or functional need (I don't need to go lower) this seemed like a good and affordable option. And the removal kit bits seemed like a good option after watching the numerous videos and reading plenty of forum posts about the difficulty removing old cylinders. Mine has been installed for 20 years, the past two with relatively hard use so I anticipated a challenge and it did not disappoint in terms of difficulty. I'll comment on the cylinder itself, and removal of the old cylinder as separate (but related) issues. The cylinder itself has worked great - as others have noted it does not sit in the base of the Aeron as deeply as the OEM cylinder, thus it does raise the maximum chair height by an inch or two. If this matters depends on the user - for me I wished for maybe another inch with the OEM fully extended - worked fine but the perfect height for my "desk" (a repurposed drop leaf table) would have been a bit higher. So this replacement works well - I have it lowered just a hair as the highest setting is a bit high for my situation but the flexibility is nice. Do note the instructions online for adjusting the lever screw that presses against the cylinder button - I did have to tweak mine a bit as the prior setting for the OEM cylinder was too long and resulted in the replacement not holding the height when seated but it's a quick and easy adjustment - works perfectly now. The button on the OEM part is shorter than the replacement so this was expected - but for anyone wondering the taller button on the Oasis does work with the Aeron! Removal of the old cylinder... I don't have a 12 or 14" pipe wrench and while I have a good assortment of tools wasn't that driven to get one for this project alone (since I've never needed one otherwise in 20 years of home maintenance). Prior to receiving this new cylinder I'd given removal of the old one a go using 10" slip joint pliers, vise grips, with no success. Soaked the joint with liquid wrench penetrating oil and was getting no result whatsoever. Not a budge. Again my old cylinder was well and truly lodged. So I was anxious to try the removal tool included with this kit and using it I was able to dislodge the seat from the post! So it does work - here are some tips for use: first my cylinder had spewed grease/oil when it blew so I found that just wiping the post with a dry paper towel/cloth did not get the post clean enough for the removal tool part that you clamp down to gain a solid grip. I used some simple green degreaser, then a run of rubbing alcohol to insure the post was really clean. Once I did that I was able to clamp down the collar (and do clamp it down tight!) and it held. At that point it was just a matter of slowly turning the "pressure" screws through the collar - 1/4 to 1/2 turn on one, then the other. I did find steady pressure on both sides worked well. If you go in smaller turns alternating each side you'll not need to apply a ton of torque to the allen wrench to achieve a result. I heard a fairly distinct pop when it first started to loosen and then it went pretty quickly - a few more turns and the seat detached from the post. So the removal tool does work with some patience and materials preparation. I've saved it for future use if needed. I do think it was easier than trying to torque it off with a wrench unless you already own a pretty long and heavy duty pipe wrench. Even then the screw pressure requires less oomph overall than even a pipe wrench I would think. Note that the removal tool gets the seat off but does not remove the old cylinder from the wheel base. Given the ability to use a mallet or dead weight hammer on the base (unlike the seat) it probably isn't needed but do expect to spend some effort getting the base removed as well. I used penetrating oil and a rubber mallet with little success. Here are my tips on that part of the job if yours is stuck. First expect to take some whacks at it - like maybe not 2 or 3 ;) I used the edge of my lower deck (around 2 feet off the ground) with some padding to make sure when it released it hit the ground and didn't take off a toe. You'll need a stable surface for sure. I decided to leave mine outside for an hour or two in 40s temps to shrink the metal and that seemed to help. I also alternated hitting the bottom of the cylinder with sitting the cylinder bottom on the deck and alternating hitting the base with a rubber mallet on opposing legs (which gets the benefit of the longer leg leverage, as well as some offset pressure to eventually break the seating). It did eventually release but it does take some time. Have patience! New cylinder install is super easy - I did put some "no seize" lubricant on each end of the cylinder to give some minor aid if I ever need to replace this again - whether it will help I don't know but can't hurt anything.
D**F
As easy as can be, replace your busted chair lift with this unit.
I replaced my office chair lift tube with this unit. Directions were clear, and followed to the letter. The replacement tube came with everything described in the ad, and I had the tube replaced in about 30 minutes. I am thankful that it came with the removal tool, otherwise, I would not have even tried to do this. I would of just gotten rid of my perfectly good office chair with a bad lift tube and bought a new chair. After installation report, the chair is stable, fully functional, and is adjustable for my needs. I highly recommend this unit if you have to replace your chair lift tube. You won't go wrong.
C**S
Perfect Office Chair Replacement Cylinder! Don't Hesitate to Buy!
Perfect Office Chair Replacement Cylinder! I have an old, but still very nice, OFM Inc. office chair. It's been slowly slipping down and not staying back up for far too long. I'd finally had enough and decided to do something about it and bought this kit! I'm a small-sized 72 year-old woman and, I tell you, it was amazingly easy to install this new cylinder! The kit came with everything you need, and detailed, easy-to-understand instructions. The two removal collars make removal of the old cylinder a breeze. Two things I'd recommend: prior to installing the removal collars, wipe the old piston with a wet-ones prior to drying with paper towel or an old rag - this really helps to remove any grease. Also, when the instructions tell you to hit the bottom of the cylinder to remove it from the chair base (meaning hit the inner part with the retaining clip, not the whole round sleeve on the bottom), put a 3/4 inch socket over just that part to be hit, and hit that with your hammer. That lined up perfectly on mine, no block of wood required. After completion, my chair now works like new! Many thanks to this small American company for developing and producing such a great product!
C**E
Great value, pretty easy to install once you "get it," would definitely recommend
I bought this product with the hope it would fit and I would be able to do it. I'm not mechanically inclined at all so I didn't replace my chair part right away. That was a mistake, I wish I had done it as soon as this one arrived. My old chair cylinder was worn out and would "fall" on its own occasionally. Instead of buying a new chair, I decided to try replacing the cylinder. I inspected the old one to see if I could get some idea of what I would need or how it would work and I hadn't a clue. I decided to just give it a shot and made the purchase. Essentially, I chose this product because it was a standard size and included the needed tools. The price seemed reasonable too. The package looked a little beat up upon arrival but not so much that I thought there would be missing parts. Once I finally committed to doing the work, I read the instructions twice and gathered my materials. The company did send me a copy of the instructions through email which is what I read. When I opened the box, the instructions inside seemed to be exactly the same so I used the email copy. They were not exactly the same... It's important to note that the shaft collars are installed on the new cylinder for shipping. They have to be disassembled for use before starting step 1 of the instructions. (The printed copy of the instructions does state they are on the new cylinder.) Additionally, the instructions reference a shorter set of screws vs a longer set of screws but only shows that one set is provided. The shorter set are the ones that are already in the shaft collars. I would recommend that the company changes the wording to reflect this instead of making it seem as though there should be another set in parts bag. And, the emailed instructions should be updated to exactly the same as the printed instructions. Ok, on to the actual work. The instructions sound pretty easy. And, if it's working right, they are. It wasn't too difficult to attach the shaft collars to the old cylinder. The hardest part there is figuring out how to position the chair and collars to get a good angle to maneuver the allen wrench. Once they are on an in position against the chair base, I would recommend making a mark on the cylinder with a marker. This will show whether the collars are working properly. What's supposed to happen is that the bottom collar holds on to the cylinder while the screws are tightened. This pushes up on the top collar separating the chair base from the cylinder. When I started tightening the screws, I could see the two collars pulling away from each other as expected. However, I couldn't tell if this was because the chair base was pulling up or the bottom collar was sliding down the cylinder. It turned out to be the latter. Making sure the bottom collar is as tight as it can possibly be is imperative. When I started over and tightened it again, I continued tightening until I thought I was going to break the wrench. (Probably not, I'm not actually that strong. That's just what it takes for me to get something as tight as my husband can get it...) Then, I started tightening the screws that separate the collars again. This time, I could tell it was working. And it was actually easier to tighten the screws. The attached photo shows why. The first time, the collar was gouging the metal as it slid down the cylinder. Obviously, the collar was tight but, not tight enough. It also shows the marks I made. The bottom mark is from the first attempt. That is where the collar was when I wasn't sure if it was working correctly. As I tightened the screws, the collar slid down over the mark and I knew I had to start over. Also, once I got to the end of this process, I expected the chair to kind of pop or fall off the cylinder. That didn't happen. Instead, the top shaft just sorta shifted instead of separating more. At that point, I easily pulled them apart. Then, it was time to remove the chair base. The instructions said patience and persistence is key. I AM persistent. Patient? Not so much. I got out hubby's small sledgehammer and a wooden block. I figured the extra weight would be helpful. It was. The block was not helpful. The point of that is to avoid damaging anything but, it requires an extra hand to use. At first, I tried using the edge of my stairs but, that didn't really work. I decided I was just going to have to hold the chair base and therefore could not hold the block. But, this wasn't really a problem in the end. Since I was using a sledgehammer, the only damage was going to be to the bottom of the cylinder. And since that was headed for the trash, I figured it didn't matter if it was damaged. The first strike didn't do anything. The force of the second strike popped one of the wheels out of the base. Surprise! (No biggie, it's just a caster wheel that pops back in.) The third strike didn't do much either. The fourth strike sent the cylinder skittering across the floor! Success! Ok, now I just have to put the new one in. I took a deep breath and read the instructions again. Wait, what? This turned out to be even easier than one can imagine. Just set the chair base upright, sit the new cylinder in the hole and line up the seat over the cylinder. Sit on it and adjust it with the chair's lever. That's it! It's like I have a brand new chair! I am very happy that this cylinder lifts higher than the old one. That one was a little short for my posture. In the end, as long as this holds up, it turned out to be an excellent purchase. I only marked off one star because the instructions could have been a little clearer for those of us who don't already understand this stuff.
L**.
Works great with my office chair from Staples, easy install
Install was easy with simple hand tools. I have a mesh office chair from Staples, and the piston and tool fit my chair perfectly. The included piston pulling tool works to remove the chair from the cylinder, but a deadblow mallet or 4# sledge would be needed to tap the cylinder from the chair base. My original cylinder was pretty tight in the base, and required some convincing to come free. The new piston is slightly taller than my original one, but my comfortable desk height was at the top of the piston's travel previously, so it's nice to be in the middle of the range now. Holds its height fine, and works with the original controls with no problems. Install was as simple as removing the old cylinder and dropping in the new one. This cylinder saved me the hundreds of dollars it'd have cost to buy a new chair, when my only issue was the old cylinder didn't hold height anymore.
A**1
Great product but make sure you tough it out for the removal first :)
My chair has been sinking so I finally decided to do something. I didn't want to buy a new one as nothing else is wrong with it. After some research online, I found out one way is to replace the gas cylinder. I viewed several Youtube videos showing people taking it apart with ease: knocking it from the bottom and then twisting it from the top. Little did I know that my chair would require a *LOT* more effort than that. I decided on The Office Oasis' Replacement Gas Cylinder because it also included tools and instructions to help remove the old cylinder that I didn't see in other products. I know I could have saved some money and just buy the replacement gas cylinder only. However I have never done this before so I decided to go with The Office Oasis. I also thought if a company has created a complete solution I would give my business to them. After I made my purchase but before receiving the product, I received an email from the company by the name of Meredith, who I later found out is the owner, with instructions in PDF to get started. I was surprised by her email but was still thankful for receiving the instructions ahead of time. I thanked her and noted that this lets me know that her company is very efficient and dedicated to product quality. After removing my chair's old gas cylinder, which I like to describe later, the new cylinder was installed very easily. I just slide it into the bottom of the seat and also into the wheel base. After so much effort in removing the old cylinder, I forgot to adjust my chair's cylinder adjustment screw and sat on the chair immediately after installing the new cylinder. My chair started sinking again. I realized what I forgot to do. So far the new cylinder works great. I also bought The Office Oasis' clear caster wheels to go with my chair and both the cylinder and the wheels have given my chair new life. Thanks The Office Oasis and Meredith for selling these products. Your company is fantastic. Now I like to describe my journey removing the old cylinder which was spread out over several weeks. I'm not disappointed by it or anything. I didn't mind how long it took as I was determined to see this to the end. My chair is very old such that the cylinder is so deep into the wheel base that it almost touches the floor. Every time I see it I wonder if it was ever like that to begin with. My first problem was removing the bottom cylinder from the wheel base. No matter how hard I hammered away from the bottom, the cylinder just wouldn't budge. I sprayed WD40 at the bottom of the wheel base and waited more than the recommended time before hammering and still couldn't hammer it out. I eventually solved this by first separating the cylinder by removing the metal tab, which I ended up destroying because I didn't know how they work, located at the bottom of the cylinder and then spraying lots of WD40 at the top of the wheel base and letting it sit overnight for a few nights. Then I started hammering from the bottom with a piece of wood between. I wasn't successful on the first try but I reasoned the more I hammer it even if spread out over multiple days it should eventually come out. Also in between my unsuccessful attempts I would apply more WD40 and let sit overnight again. The last knock to get the cylinder out was very satisfying. I noticed the area where the cylinder sat inside the wheel base was full of WD40! Before I did this, I thought I ask my local mechanic for help, even offering to pay for the service, as I don't have a sledge hammer but unfortunately he couldn't help me. He tried to knock it from the other direction but luckily I stopped him and said to hammer from the bottom of the wheel base. He looked at it again and came to the conclusion that something is stuck and didn't want to do it without risking breaking either my wheel base or the cylinder. I tried to explain how those two parts are put together but he had already made up his mind so I figure it was my problem to solve. My second problem was removing the top cylinder from the seat. Actually the provided shaft collars were meant for this but my chair's cylinder simply didn't have room for the collars. Technically my chair's cylinder does have a thin enough shaft cylinder for the collars to hold on to. The problem was there was an external shaft cylinder with a larger diameter that went almost all the way up to the bottom of the seat. It covered a lot of the thin internal shaft cylinder. I tried pulling it down but it was uneventful. I researched online and one good result I found was a Youtube video by Ed Ng that highly recommended taking apart the seat and knocking it out from the top. I wanted to try this but I didn't have the tools to take the seat apart. I decided to contact Meredith for any advice on fitting the shaft collars as I wasn't very knowledgeable in how gas cylinders work and I was surprised to get not only an immediate response but also the responses carried over into the weekend. I'm sorry I didn't get to mention this but I apologize to take up your weekend time. I think Meredith and The Office Oasis are professionals and a quality company! Meredith suggested I use a pipe wrench to hopefully pull the external shaft collar down and if that didn't work to try knocking it out from the top. She also offered to refund me if I'm still having difficulty. I was just amazed at her professionalism. I thanked her for the advice and proceeded to try pulling the shaft with a pipe wrench. I did get a better hold than with gloved hands but it was still uneventful. I finally got the tools to take apart my seat and once I saw the top of the cylinder I proceeded to hammer it down with a long socket in between. Nothing happened as the cylinder was still very stuck. I actually solved this problem first. So to help me hammer it down, I doubled or maybe more than quadrupled down on the instructions' advice of using WD40 to help loosen the friction hold. I poured down a cup of used WD40 into the top of the cylinder. The used WD40 was from spraying the bottom of the wheel base which most of it collected in the crevices. Again I solved this problem first and after waiting a few days, I proceeded to hammer away and the last one was like sweet chin music when HBK knocks down his opponent. So when I knocked out the cylinder from the wheel base, it was HBK all over again! Although I didn't get a chance to use the shaft collars, I like it and am saving it for whatever future use that comes to mind. Thank you Meredith and The Office Oasis for creating complete and quality products and backing it up with professional service. I wish your company continued success.
T**I
Cylinder worked as intended. Tool did not work for me.
Wife's chair was constantly squeaking when she would turn and no matter what we did, it would continue to squeak. After the last attempt to oil it to see if it would stop, I thought that maybe replacing the cylinder would help as there was nothing wrong with the rest of the chair. In fact, there was nothing wrong with the cylinder itself as it would hold up and twist just fine with a person sitting in it. It was just that unbearable squeak that was driving us crazy. This kit came the next day and then I set on getting the replacement taken care of. The night before, I oiled the cylinder where it met the seat of the chair in hopes that it would help with making the task easier. The chair is 6 years old and I'm sure that cylinder was well seated in there. I wiped down the cylinder with some paper towels so the removal tool would be able to grip the piston better. Unfortunately, the removal tool did not work no matter how tight I tightened it. I thought for sure I was going to strip those rings if I tried to tighten them any more so I gave up on the tool that came with the cylinder. I then proceeded to bang the hell out of the cylinder with my mallet and try the pipe wrench trick. That sucker would still not budge. I banged on it some more and then the wrench again. No luck. I took a bit of a break and came back to it one more time. I must of banged on that cylinder for five minutes in all kinds of directions hoping it would help. I grabbed the pipe wrench and gave it one more try. After pulling on it with all my might, it finally broke the seal it had and I was able to pull the old cylinder out. The installation of the new cylinder was easy. I cleaned out the insertion point and gave it a fresh coat of lubricant. I then put the cylinder in the base of the chair and reinserted the other end into the chair. I sat on it and gave it a twist. Yay!!!! No more squeaking. While the tool that came with the kit did not help, I liked the idea on how it worked. It just did not work for me. The tightened end would slide no matter how much I cleaned the cylinder. Overall it was worth it as we now have a quiet chair for my wife.
S**N
Premium Feeling Cylinder with Easy to use Tools
The included removal tools worked like a charm. Hardest part of the installation process was honestly getting the old cylinder separated from the base of the chair. Do note that due to how this cylinder fits, you might find your minimum chair height considerably taller than what it used to be. Though your experience may be different depending on the dimensions of your chair base. The entire chair feels much sturdier now and there's barely any side wobble or play if at all. Only time will tell if the gas cylinder replacement holds up, but until then, thanks Office Oasis for the quality replacement!
R**B
Brilliant
even if you dont need a cylinder..get it :) ..the tool removal is ingenious. Such a great package ..seriously though, the chair is as good as new.
A**N
Does not work properly
The cylinder is broken. Goes down once seated and up an hour after getting off.
R**P
The Jack works a treat.
Great product well made and easy installation and delivered on time.
M**.
I knew that replacing a gas lift in an office chair was not going to be an easy task.......
I knew that replacing a gas lift in an office chair was not going to be an easy task. The removal kit I purchased with the replacement gaslift made the removal of the seat from the lift possible. The removal of the old lift from the base was also difficult and I had to convince myself that attacking the old lift with a heavy hammer and chisel would be OK as it was the only way to remove it - and it was - eventually! Installation of the new gaslift was very straightforward having removed the old one and the chair is as good as new again. Thank you.
Trustpilot
3 weeks ago
5 days ago