


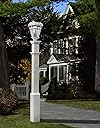


Sturbridge 5"x5" Vinyl Lamp Post
Product ID: 4152696
🌟maintenance-free
📏5x5 size
🛡️20-year warranty
Desertcart purchases this item on your behalf and handles shipping, customs, and support to Romania.
Illuminate Your Outdoors! 💡
The Sturbridge 5"x5" Vinyl Lamp Post stands 72 inches tall and is designed for durability and aesthetic appeal. With a maintenance-free structure and a 20-year warranty, it offers a stylish solution for enhancing your outdoor environment.
C**R
A great looking light post
I absolutely LOVE this. I had talked my husband into letting me replace our existing light. This is a very sturdy product. Much better than I expected. I put in a 4 x 4 x 8 redwood post 2 feet into the ground with cement (leaving 6' above ground). I glued all the decorative pieces into place and pre-drilled the holes for the light fixture. I had existing power controlled by a switch inside going to the old light that I again will use to power the light fixture. The people we hired to put in our first post didn't encase the entire electrical wire coming from the ground in a conduit. So I had to add an elbow and a 4' extension. The conduit went up about 3 feet into the PVC sleeve. I used 3/4" diameter conduit so it could fit into the extra space you have in the PVC cover. I drilled a hole into the side of the 5 x 5 PVC post just above the bottom decorative sleeve far enough above to clear so the electrical box would screw flush. I ran electrical wire from above to get power to the light fixture and fished it through the hole for the outlet. Then I slid the sleeve over the post looking for the electrical wire from below and positioning the conduit into the inside corner of the sleeve. I attached a outdoor metal electrical box for the WEATHER RESISTANT GFCI (make sure it has WR stamped on the outlet, this is code as well as the right way to do it). Pack around the hole with plumbers putty where the electrical wires come out of PVC into the electrical box. Also, use outdoor caulk to seal the space between the PVC and the electrical box. I also put a plastic see-through plug cover that will protect the electrical plugs from the sprinklers, rain and snow. I used electrical tape over the wire nuts when I installed the light fixture. This is an impressive looking light post. An attractive addition to your property.
J**G
Looks amazing!
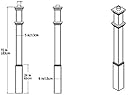
The post is a fantastic idea and it didn't take long to put it together. I don't know why so many people went glue crazy with it I had plenty of glue plus some. I was confused when reading other reviews when people said they had to glue it together. I pictured having to glue the four sides together which would have sucked but since it had such good reviews I figured I'd give it a shot. I tried to take pics so you can see how it comes. I had to cut 5 and a half inches off the main pole to get it the right height which was easy enough. The other reviewer was right about the static cling. My wife gave it a good once over with a few dryer sheets and it seemed to work for now. The only reason I gave it 4 stars was because there were a few scratches around the pole and the coupling that is the decorative piece under the light flange had jagged edges that didn't quite fit around the pole. I applied medium pressure on one side at a time at the little bastard split on the corner. It was mostly due to the poor finishing of the mold the use or they don't clean the edge straight. Hopefully this helps. Says it won't crack and has a lifetime warranty but I had everything ready to go and couldn't postpone for next week plus I had to glue the top on. Other than that I would def buy one of these again. I'd just dry fit everything first and send it back if I have the same issue.
F**D
Great light post project.
Great Product. Well made and well packaged for shipping. Assembly was straightforward. There is more than enough adhesive provided in the single tube to do the job. My install was complicated because of the existing traditional black post which was slid over a thinner steel post which housed the power cable. The steel post was mounted in concrete. I screwed the black post, which was unsecured, to the steel post. Then added plastic shims on 3 sides to make it east to screw the new post on at the bottom. At the top I used a piece of the thick styrofoam from the packaging to fill the inner gap from the new white post to the old black post, set the plumb and level, then screwed the new post to the inner post on 2 sides. Worked great . Post is solid, straight and steady. We added a 18W (100w equiv) LED, omni-directional bulb, TCP RLAO1850D LED OMNI A21, and it looks awesome at night. Bought the post lamp from HD just in case we didn't love it we could do a quick return and replace. But Amazon had the same light for a similar price. Although there is a 3 in collar to hold the 3 screws from the lamp by friction, I opted to drill holes for the lamps mounting screws into the collar. I did need to extend the power cable to connect to the new lamp as this post was taller than the old post. If you need to do this be sure the power is off, the new wire nuts are secure and black tape it all to keep it secure.The entire project took about 3-4 hours only because of the old post complications. I used a helper to hold the step stool so I could finish off the top and mount the lamp
K**J
Bought the first to make sure, and the 2nd because it looks great
I bought the first one because I wasn't sure how it would really look (being PVC), how it would fit together, and whether it could be painted. The first unit fit snugly together when dry, which made gluing easier. Like others I used "glue generously" and ran out towards the end of assembly. I bought a PVC primer & clear PVC glue. I taped (painters tape) where required to protect it from the primer color. I did not run out on the 2nd unit I assembled as I learned where it should be glued generously and where it wasn't required... read on.Well, here's what may benefit you:1) You don't need to "glue generously" on the bottom post top/bottom pieces. Generously glue the coupler (as it tends to bend inward, not touching the inner sides of the pieces).2) If you want to paint it, use Krylon Fusion paint (specifically made for adhering to plastic). It worked great and looks great. I used an off-white satin finish. Before painting, wipe the piece down with a rag dampened with paint thinner. I painted mine before mounting it on the 4x4.3) Make sure the wires on your 4x4 are stapled (insulated) as you only have 1" clearance between the 4x4 and the post interior (5x5) and they may snag on the lamp post.4) Before sliding the lamp post over the 4x4, note the inside of the post and the direction/position of the coupler. The coupler has 2 edges that may catch on the 4x4 or wires
W**R
Nice looking when done
Assembly is not as easy as it looks the parts need coaxing to go together due to the close tolerances and slight distortion of the square tubes.
G**A
Excellent Lamp Post
This lamp is stunning if you like that New England look, however, I found it quite difficult to find a light that would fit ie. 3" post cap. I got in touch with the seller who were very helpful, they directed me to a lamp on Amazon "Fudsey" which fitted perfectly, although choice does seem to be limited. The glue that comes with the kit is a waste of time as it was well past it's sell by date. But overall, I would recomend the lamp post.
J**T
Overall good but...
This thing is wierd, some corner have been cut round some are square and the material is kind of mhe...I wish that the material would be more solid ? It's seem to be somewhat fragil to stain...It is a really good idea, but lack of finition.
S**O
comunicazione
comunicazione non facile non c'è un numero telefonico per chiamare e cercare di evitare inutili resi, arriva solo il palo senza lampione portalampada, quindi inutilizzabileoltretutto arrivano tutti rotti
M**Y
Light post.
Love it . Bought 2. I am using them in my gardens.
L**S
Five Stars
very nice looking post. Very well made
Trustpilot
1 week ago
1 month ago