


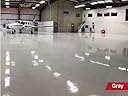


Epoxy Concrete Coating - Up to 500 sg ft Coverage - Gray Base with Gray Blend Flakes
Product ID: 565988596
💪10X durability
🏗️500 sq ft coverage
🛡️Lifetime guarantee
🛠️ Revamp Your Floors, Elevate Your Life!
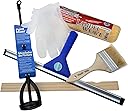
The Epoxy Concrete Coating offers up to 500 square feet of coverage with a durable gray base and stylish gray blend flakes. This all-in-one kit includes everything you need for a seamless application, backed by a lifetime guarantee. Made in the USA, it boasts 10X more durability than typical big box store brands, is slip-resistant, and has no odor, making it the perfect choice for any home improvement project.
| Brand | EPOXY-COAT |
| Material | 100% Solids Cycloaliphatic Epoxy |
| Special Feature | One Coat Coverage |
| Colour | Gray |
| Item Package Quantity | 1 |
| Item Volume | 3 Gallons |
| Manufacturer | Performance Industries, LLC. |
| Item part number | SK0311 |
| Item Weight | 18.14 Kilograms |
| ASIN | B00BAZTVVS |
K**N
Good product
I used this product for my garage floor and bought the taupe color which came out great. It really adheres to the floor really well and is non slip, non skid and is water resistant. This kit has everything you need but the only thing I wish would be able to choose different flake colors. Overall good product.
J**N
Looks great and has totally transformed our very drab garage
This looks great and has totally transformed our very drab garage. The finish is shiny and slightly textured by the added paint chips. Seems to be very durable (so far) with no noticeable defects. We used the tan color for a "warm" look. Good results depend on the prep. We started with a 9 year old concrete floor that had never been sealed, and had numerous cracks, small holes (divots), grease spots and various stains. It was a mess. Our steps:- watch the instruction video and read the online instructions a few times (done before receiving product)- clean out garage and sweep and vacuum entire floor- pressure wash entire floor using light-medium pressure- (optional then we painted the walls and ceiling a complementary color)- using a flat razor, scrape off any remaining paint & glue & whatever junk still stuck to concrete- with garden sprayer applied a strong mixture of "simply green" cleaner & warm water to the greasiest areas, then with a hand drill and a nylon bristle attachment, scrub these spots, repeat for the worse area using a wire attachment (skip if no grease spots)- added TSP to the garden sprayer & 2 gallons warm water and let it sit, then pressure washed everything out (if the concrete is already clean this step can be skipped or shortened),- applied the etch product from the epoxy-coat kit per the instructions, spray on, let sit a few mins, then rinse off twice. Squeegee out water.- wait at least a day for the floor to be reasonably dry, then caulk any cracks or holes you don't want to show. We used a high quality latex caulk rated for exterior use (you can buy anywhere)- next day caulk anything you missed. Some caulk will likely have shrunk from the day before. If any sports still look slightly greasy (or discolored) grind these with the drill and wire brush attachment again. Just being sure (our concrete had many grease spots)- important! leave the garage door open and wait enough days for floor to be completely dry. In our case, in 70-80 weather with average humidity (HI "winter") this took 4 days. We ran some fans for an entire day to be sure.- we had a corded drill specifically for mixing (a strong battery drill would likely be OK). I purchased extra matching paint chips from HD (we used about 50% more chips then came with EC package). Got some additional cheap paint brushes for the cut in. We had two pair of spike shoes (one surprisingly came with the kit). Don't go cheap - you need the spikes. Lots of cardboard so we could lay down messy roller etc. We had a two extendable handles for the roller and the squeegee. We only needed the one squeegee and the roller that came with the kit, though we had extras on hand just in case.- Our garage is roughly 400 sq ft (19 x 21) and we marked into four equal areas (pencil line on floor). We used duct tape and a string (as a straight guide) to mask off the garage opening such that the coating ended exactly where the door touched the floor.- properly mixing A (base) with B (hardener) is the most important part of the job.I don't advise using the very hard to see lines on the wood "dip" stick that comes with the kit. I had two small plastic pails which we used instead for measuring. I poured 28 oz of water into the smaller pail and marked the level both inside and outside with a sharpie. The inside line will become covered with hardener/base and partly erased, so make sure the outside line is visible from within. Tape on the outside would also work as a level marker. Do the same for the larger A pail, except use 68 oz of water. It is very important not to confuse the A and the B pails when mixing, which is why I used different sizes and colors and marked both (A vs B). After marking the appropriate levels dry the A and B measuring pails.- These mix at 28 oz for B to 68 oz for A **exactly**, and you will get exactly four mixes out of the kit. We had barely a few drops left over when done, so it worked out perfect. Also a good idea to have several paint mixing sticks on hand to help get stuff out of pails.- ready to mix and apply, we both put on spike shoes. Make sure all the nuts on the spikes are tightened (a few of ours came off). I found that duck tape wrapped around the entire spike / shoe combo worked better then the straps that come with the spike shoes (straps broke when tightened hard). I ran a timing app on my phone so we could hear the 3 minute mix time and the 10 minute roll time. Put on gloves.- I poured B into the B pail up to the line, then poured that into the big black mixing bucket that comes with the kit. Then did same for A. Use the sticks to help get out A or B. Do not confuse the A vs B sticks! (B is clear which helps) Start the 3 minute timer. Mix for three minutes.- pour mix out about 2' from a wall in one area, then start the 10 min timer and start to squeegee it out. We had one guy squeegee and when halfway done the other guy started to cut in while we kept spreading with squeegee. You don't have to be very neat or even with the squeegee, just spread the entire area. After the first guy was done cutting in and everything squeegeed, he started rolling the area. After 10 mins the entire area was rolled and we started mixing the next batch with the 3 in timer. Meanwhile one guy kept rolling. Be sure to put wet tools and buckets on cardboard not bare floor!- do the same for the next area, except when done rolling, back roll first area. After all four areas and therefore the entire floor is rolled, back roll everything again starting with first area. Be sure to back roll over any small bubbles that tended to appear 20 mins after first roll. Usually one or two back rolls took care of this (we figured the last back roll should be about 45 mins after an area was first rolled). We also popped a few random late bubbles using our extension poll. By the time we started spreading the chips we had no bubbles (one or two showed up right after the chips but we were still able to pop with the pole).- we divided all the chips into eight almost full dixie cups (again we purchased extra chips), so we spread two cups per area. We pretty much threw to the ceiling (9 ft in this case) and let spread naturally, though we tossed some more or less directly into corners. We were going for a random effect with some slightly more densely chipped areas, and it came out looking great.- about 30 mins after we finished the chip spreading, we carefully removed the duct tape masking the garage door entrance.- we finished the job around 4 in the afternoon and by 7am the next day I could walk on the floor. By the afternoon of the next day we were moving back furniture. I waited three full days before driving the car into the garage. Did I mention the floor looks awesome!
K**T
It seems 2 part epoxy is the best way to cover a concrete floor, but this was DIFFICULT...
After getting all prepared and ready to begin, I had to run get a neighbor to open the big container which I could not manage. He left and I easily opened and stirred bucket A. For all my effort I could not open bucket B. Frantically punched holes in the lid with a screwdriver and tried to get the contents to drip into the large bucket. This attempt was extremely messy and difficult. (Must state, I had a broken arm at the time so was not able to handle things at my best.) Anyway, covering the floor was easy and looks beautiful. BUT now I fear it may not dry properly because the mixture was not perfectly prepared. Will put on the spiked shoes today and check it.
M**Y
Trying to pass on what I know so far.
I am in the process of still applying so I can not attest to durability issues and, of course, they are quite important. I can say this so far: My less than 400 sf garage is 2/3 coated and I am out of material which they said would cover 500 sf. Still. I realize that how you apply it, especially using a squeegee makes a big difference and apparently i applied it heavily. The squeegee is too small and there is no handle supplied for it. But, it works. I have ordered another half kit and spent an additional two hundred dollars. I was quite concerned before application that the tools would be unusable after applying the first section, since they say you have 20 minutes to work, but for whatever reason the brush (very cheap) and other tools keep working. I think the directions are intimidating although I can see the obvious attempt to make the user aware of how important the prep and mixing are. Reading the warrantee I can see that they are pretty much saying just about every problem that may arise will not be the fault of the product. Customer service is a lady who seems annoyed when you call. I think she may be the entire "tech support" department. Bubbles have started to form as I watch it dry. They say use a blower to remove bubbles, but of course they didn't form until I was too far away to reach them with a blower. Hope it lasts but I have always had this feeling that concrete wasn't really made to be coated with anything, except maybe a clear sealer of some sort, unless it is interior, and then you don't really need epoxy. Hope this product proves me wrong, at least for my garage. Update: Still waiting for additional product and they say it will be picked up by UPS today, three days after ordering, so I don't think they have their act together. Meanwhile my garage is in disarray waiting to be finished. On a positive note, the part I already applied looks pretty good. It dried well and really covered a lot of imperfections, so the heavy application surely helped with that. It is a dramatic difference. Still, the measuring stick is inadequate. The instructions are incomplete. I have created my own measuring apparatus for the second batch. The aluminum oxide is very hard to disperse with any accuracy and is a real challenge to gauge how much to toss and where is has landed. I'm glad it is a garage floor and I don't plan to entertain there. I will try to update after some time to address durability issues. Longest review I have written.Update redux: 2nd batch arrived and was plenty to cover the balance with some left for touch up. It matched the first batch almost perfectly and I may be the only one who knows where the two applications come together. Bottom line: My floor was really rough and I had patched it repeatedly. The extra heavy application I used cost me coverage but it also did an amazing job of covering imperfections. Bubbles were the the most troubling part in the end as they cannot be prevented and cannot be controlled. There were too many to sand and touch up, BUT it is a garage floor and it still looks 100 times better than it did before. One last note: I don 't know how you sand an epoxy floor with aluminum oxide embedded in it. It is tougher than the sand paper. Grinding would be the only way. The end. (I hope)
C**Y
Top notch quality!!
Did quite a bit of research and this epoxy brand, not only appeared to be of a higher quality but it was also the best bang for your buck. The kit came in exactly as described and with just about everything you need to complete the project. The only issue I had was a put it down to late in the day when it was almost 103 degrees and it dried up fast than I expected so I couldn’t pour it all down. Luckily they also sell smaller patch kits should you need it.
Trustpilot
3 weeks ago
3 weeks ago