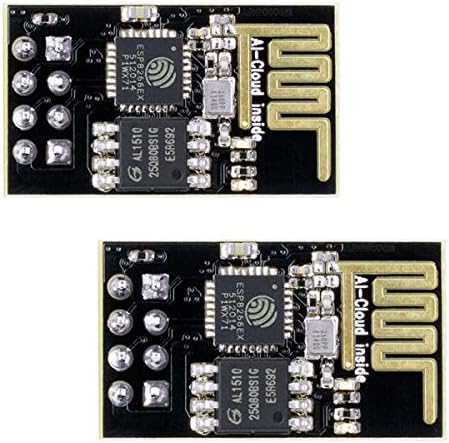
Addicore 2 Pack ESP8266 ESP-01 WiFi Wireless Tranceiver Module 1MB Flash in Antistatic Foam Arduino Compatible
Product ID: 10680981
Description: - These modules include 1MB (8Mbit) of flash memory, twice the size of the older blue colored ESP-01 module - The ESP8266 Serial/UART to WiFi module is a great way to connect your Arduino or other microcontroller projects to a WiFi network - Create your next internet of things (IOT) project with affordable network connectivity by implementing this module into your design - The module has the ability to run independent of a host controller - The eight pin header includes two GPIO pins that allow for direct connection of the module to sensors, peripherals, or host controller Product Contents: - 2 ESP8266 ESP-01 WiFi Tranceiver Modules (version V090) with baud rate set at 115200 bps - 1 piece pink anti-static foam protecting pins of modules - 1 Addicore ESP8266 info card (includes pinout diagram) - 1 4mil thick reclosable clear plastic bag Specifications: - 802.11 b/g/n - Serial/UART baud rate: 115200 bps - Integrated TCP/IP protocol stack - Input power: 3.3V - I/O voltage tolerance: 3.6V Max - Regular operation current draw: ~70mA - Peak operating current draw: ~300mA - Power down leakage current: <10µA - +19.5dBm output in 802.11b mode - Flash Memory Size: 1MB (8Mbit) - WiFi security modes: WPA, WPA2 - Module's dimensions: 24.75mm x 14.5mm (0.974" x 0.571")
L**O
Great and cheap WiFi module for microcontrolers and DIY projects
I Got this few days ago and couple of hours later I had it connected to my Wireless network.With the popularity of Internet of Things devices, ESP8266 Serial to WiFi has become an easy-to-use and a low-cost WiFi SoC. As advertised, pins are protected in anti-static foam and comes in a resealable packaging with a small information card; it works with some basic AT commands.I Tested mine with an Arduino USB Serial Light Adapter (works at 5v), a Logic Level Converter for the Tx/Rx pins (ESP8266 works at 3.3V) and a 3.3v voltage regulator to power it. I used the Arduino Software serial monitor for the communication at a 115200 baud rate and "both NL & CR" as the line termination characters.To get the ESP8266 to work, these were the minimum connections I made:- VCC/GND connected to the VCC/GND pins of the 3.3v voltage regulator.- Tx, Rx pins connected to the Rx, Tx pin of the Serial Adapter. (Rx -> Tx, Tx -> Rx)- CH_PD pin pulled-up to VCC (3.3v)If everything is correct you should see the "OK" message once the ESP8266 is up and running.Below few AT commands I used:AT : displays the status (it should respond "OK").AT+GMR : display the firmware versionAT+CIOBAUD? : displays the baud rateAT+CIOBAUD=9600 : sets the baud rate to 9600AT+CWLAP : list the available networksAT+CWJAP="ssid","password" : connect (SSID, password)AT+CWJAP? : show the current wireless networkAT+CIFSR : show the current IP addressOverall I think the ESP8266 is a very nice WiFi alternative for microcontrolers like Arduino.
S**1
and they are great! If you're familiar with electronics at all
I got two of these to test out, and they are great! If you're familiar with electronics at all, you should be able to get these up and running pretty quickly. In the past year these things have become quite popular, and there are a few custom firmwares you can load onto them.I loaded one of the lua firmware packages on there, and it's really surprising what these things can do. I have one now hosting a web page on my network that allows me to check to see if a lamp is on, and turn it off if necessary. just this module and a relay. Granted, that's a pretty silly task for it to do, but it was a fun test to build.Basically, once the firmware is updated they become pretty capable microcontrollers as well as wifi devices.I have found these much cheaper on other sites, but to get one or two to play with $7 with prime shipping isn't a bad deal.This is the ESP-01 model, and as such it only has two GPIO pins on it. One of which cannot be pulled low on startup or it will go into flash mode. It won't do any damage, but it renders the module useless until rebooted.There are other models out there with many more GPIO for the same price, but most will require some soldering to attach pins or wires so you can use them. I'm still glad I went with the ESP-01 one as a first test because the pins are already connected (use female jumper wires. It is not breadboard friendly). I had a little trouble getting started, and the last thing I needed was to worry if it wasn't working because of my soldering. Turns out the Rx and Tx pins were labeled backwards on the USB to serial converter I got to use with it.It will work with most serial devices, but bear in mind it is 3.3v, and a lot of devices are 5v. A lot of people have had no trouble using it with a 5v device, but it may be worth stepping down the voltage if you use one with certain arduino or other 5v devices.
M**H
These worked straight out of the packaging. I bought ...
These worked straight out of the packaging.I bought a 4 pack from another vendor, though they 'worked' I never got the same results two times in a row. These are the bomb. I will be buying these from Addicore again, in fact if I have to buy anything and Addicore supplies it I will purchase it from them. A dollar more but an ulcer cheaper.FYI: I use these in conjunction with a 3.3 Voltage regulator and FTDI Usb to TTL Serial Adapter Module with a 3.3v select so that I would'nt need to logic shift 3.3V to 5V and back.
R**S
3.3v or 5v???
This wireless adapter was a little tricky to get working.It seems that the one I received must be 5v. If I use 3.3v I cannot get it to function properly. It spits out random code in a serial monitor at 3.3v after a reset, But at 5v, It works as it should.now that I have it connected to my wifi, It works as it should, As long as I use the 5v for the VCC pin.
T**S
Straight forward and easy to use- Even for a novice.
Simple easy to use once you get the baud rates all setup correctly. My setup was a little hacky and was using SoftwareSerial to communicate and it won't work over 119200. Using the AT+CIOBAUD=<Desired Baud Rate> command I was able to slow the thing down a bit :) Documentation for this is all over the net. I'm new to this stuff and I was able to get it working fairly quickly. Also, Addicore includes a fantastic pin-out card in it's packaging. NOTE: You'll need to use a 3k pull-up resistor on pin 3 (CH_PD) to communicate with this board..
D**L
Very pleased!
Works awesomely with my Arduino UNO! Baud rates suck, tho! It was giving me garbage characters, even tho I set the baud rate to 115200 in both the code and the Arduino IDE's serial monitor. I finally had the epiphany and checked the baud rate setting of the serial interface (COM4 in my case) to the Arduino... of course it was incorrect! After I set it to 115200 also, everything worked peachy!
B**9
Addicore 2 Pack ESP8266 ESP-01 WiFi Wireless
I was never able to get these to work, and I think I bough these right when they were obsoleting them. I have found very little support for these on the web and there are many people out there that have problems getting these to work as well. I would recommend other WiFi boards with better support.
E**T
Super cheap and very versatile
These little wonders are great for DIY projects needing wifi access. Well documented and lots of help available online. Only 2 gpio's however so if you need more i/o, consider going with the ESP12E or NodeMCU development board (v 1.0).
Trustpilot
2 weeks ago
2 weeks ago