✨ Elevate your art with flawless, food-safe shine!
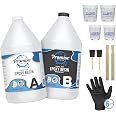
This 2-gallon Table Top Epoxy Resin Kit features a 1:1 mix ratio self-leveling formula that delivers a smooth, crystal-clear, UV-resistant finish. FDA food-safe when cured, it’s ideal for coating tables, countertops, and art projects. The kit includes all essential tools—measuring cups, gloves, brushes, and stir sticks—ensuring a seamless DIY experience backed by over 40 years of American-made epoxy expertise.


D**I
Perfect
Perfect
B**N
Awesome results! READ INSTRUCTIONS
READ INSTRUCTIONS... like at least 3 times. This product has a website with instructional videos- I would highly recommend finding those. They gave me directions I wasn’t expecting right at the last minute and they really saved me. The pictures show the plywood desk I built and coated with colored epoxy (this is a clear product you can color).This product is great! But this is NOT for someone who has never done any kind of project before and thinks they can just throw it together and BOOM magic table. For ease of use- this is not an easy task, but I don’t believe any epoxy is ‘easy’. It takes a lot of time and effort to get it right and make sure it is in the right environment to cure correctly. I am not an experienced epoxy pourer but an avid carpenter and residential contractor and build a lot of furniture- the two pours alone took me about 8 hoursFor the basics- yes, it’s a 1:1 ratio so hard to mess that up. If you are just wanting a clear coat on something simple and don’t care about edges... this is actually fairly simple.My complications came from making two separate pieces at the same time (for a desk) and also wanting to color my epoxy.I did this simply with acrylic paint, but where it really got hairy was in trying to divide proportions between my two colors and the two tops- so I had 4 different mixes I needed to account for, plus the seal coat, plus just a little extra for error. TOUGH. Just make sure you enlist all your greatest mathematicians and chemists to help you out with this.. my team of 3 (architect, accountant, and surgeon) took hours to come up with our final numbers... haha so good luck!If anyone is curious, I used a 1:10 ratio of paint to final mix and it worked amazingly. There is a very slight amount of transparency where the warmth of the plywood can be seen through my white epoxy, and I think if you wanted it more opaque a slightly higher ratio of paint would still be acceptable, just keep in mind if you make it too thick it will be very difficult to pour.The other pain point- the edges. If you want your table/desk to look the same on the edges as you do the top... good luck. I would say that if I tried this again, I would allow less time between my seal coat and my pour coat so that the edges were still very tacky, allowing the pour to bond better on the edge. I spent HOURS between my two pieces painting that crap on the edges over and over and over and over again. Overall- I am happy with the result and learned to love that I could see the ‘stripes’ from the layers of plywood and actually think it looks awesome- but definitely not what I intended. I would also recommend that if you don’t want any transparency, paint would have solved this issue. Had I just put a white base coat down before the epoxy (thought about it, decided not to) it would not have mattered as much how clear the pour was bc you would have just seen the white below. I might try paint next time.Cure time: this is so important. The temperature of your space needs to be WARM. I hooked up my spot with a space heater and heated the room to 75-80 degrees for 3 whole days. That’s a long time to sanction a space (in my case the dining room/home office at my parents place) filled with fumes and heat. Yikes. But it was winter and my garage/workshop was impossible to get to that temperature.I would definitely use this product for future projects but this is by no means simple!Anyway- hope all of that helps!
B**S
Works great
Works great
R**N
Not buying again.
The media could not be loaded. Update: tons of bubbles but it did help to place the hardener and resin separately in warm water for a few minutes and work in a warm room. Still don’t have 45 minutes to work with but more than 20. You need to be prepared with all your colors before mixing. My coasters did come out good so I will try again. Not impressed with the amount of bubbles but using a heat gun as you work vs at the end helps a bit. And check them once finished every few minutes to catch a few that came to the top before it’s too hard. The price is great just seems finicky.Original:Got hard extremely fast. TONS of bubbles even when gently stirred and super hard to get out. With my other resin I pour the extra into another mold like keychains or something small yet this resin was thick by the time I finished pouring my set of coasters maybe 20 mins. You better have exact measurements otherwise you will waste resin. I always keep some extra clear in case I need it to finish my coasters but can’t to that with this one. Not happy at all with this one. Won’t be buying again. Bought because it was cheaper but I can see I’ll be wasting resin with this one because of how fast it hardens. Also got really hot. My other one was only slightly warm. Actually waiting for it to cool down before trashing the cups. 40 mins later and they are still hot. Hopefully the coasters are decent. They look ok minus the ripple I’ll have to cover tomorrow from trying to pop some bubbles on one of the coasters. I said it already but omg sooooo many bubbles. And some rise when it’s too late to pop them.
C**E
Great for my Castings!
I have purchased this brand a few times now. I’ve also purchased other brands. I ONLY do casting.I usually get the 1 gallon but decided to start getting the 2 gallon. I have not noticed a yellow tint to any of the bottles I have received.I do notice bubbles, but I don’t see any more than in other brands I’ve purchased. With this brand, I am able to take a little bit longer to do what I do than when I’ve used other brands....not sure why.I live in Texas where it’s always warm or hot- but because of medical reasons...my house temperature is *never* over 68 degrees. Never.I do mix in a slightly different manner than I’ve read how others do, and from what is suggested.I mix my resin epoxy in 10 ounce cups. I’ve used larger but I feel the 10 ounce or smaller cups work better, even if I have to use 3 or 4 cups for a larger project. I stir with a tongue depressor for 5 minutes, then I let it sit for 5-10 minutes. During that 5-10 minutes...I torch the bubbles, usually 3 times, sometimes just 2. Right before I go to pour- I torch it again. This is when I add colorant (mica and/or alcohol ink) and/or glitter - or other cool things. I lightly torch one more time and I do hold the torch about 6 inches above the cup so the cup doesn’t melt. When I start pouring...the resin is clear and there are hardly any bubbles.After pouring is done- IF there are any bubbles, I use an acupuncture needle to pop them. I very rarely use a torch once the resin is in the mold. I’ve ruined a few molds doing so, (when I first began casting) so I stopped.I check my molds every 30 minutes and if there are no bubbles or any dust dropping in, after 2 hours...I cover and let it cure.My items are usually hard within 8 hours. When I make my candle panels- I take it out of the mold then because it is hard enough that it doesn’t lose its shape, and nothing is ‘drippy’, and is pliable enough for me to put a curved shape to it. My husband and I made something that I use to shape my panels.My only “complaint” is this stuff smells like stinky feet. 😳 seriously, I double mask, I open windows and have fans going near where I work. My husband says I have a sensitive sense of smell because he can’t smell it...but you can never be too careful using resin epoxy. I like that the Hardener is like water and the resin is super thick...it helps me make sure I don’t use double of one, which I have done before.My experience with this particular brand is great. I’ve not had any negative issues. I feel like the price for a 2 gallon kit is worth it.I’ll post some photos in a few days of things I’ve made (I had to put everything away as we had our windows replaced).
J**S
Top quality products
Great product will definitely use again
Trustpilot
2 months ago
1 month ago