


🎨 Capture True Colors with Confidence!
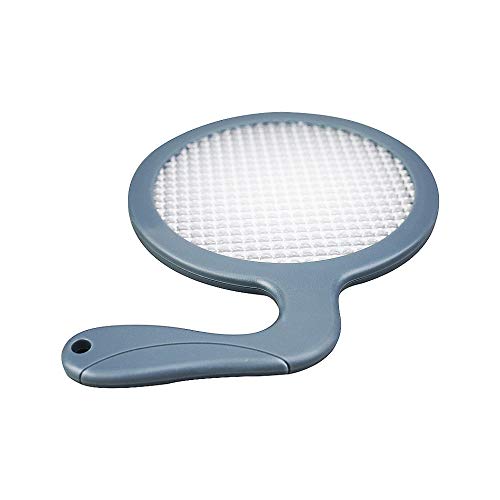
The Fotasy JJC WB-F1 Universal White Balance Handheld Filter Disc is a precision tool designed for digital photographers, offering a quick and effective way to set accurate custom white balance. With its 18% light transmission and certified neutrality, this filter eliminates common color casts and simplifies the white balance process, making it an essential accessory for both in-camera adjustments and post-production editing.


U**S
Setting White balance is a breeze
This product does its job pretty efficiently and helps you record accurate colours under most lighting conditions. Its a must have if you're very particular about accurate colour rendition.
S**Y
not upto the expectations
it did not as it is supposed to perform. each time is shown different results
T**O
Grey card is better..
Does not give a proper wb as much as a grey card.
P**T
great to get your colors as real as possible
If used properly its a great helper to get your colors as real as possible
B**Y
This device "competes" with the better known and more widely-reviewed Expodisc
This device "competes" with the better known and more widely-reviewed Expodisc. Because I've not used the Expodisc, I can't compare the two products, but I CAN say that this JJC White Balance Filter works, works well, works simply, and, at least so far in my experience with it, works every time. Though I can't compare it to its $50 competition, I can say that I can't imagine any product product could work so much better than this one as to merit its costing an additional $35.In advance of receiving the JJC Filter, I viewed several YouTube videos and read a half dozen "how to" articles, all under the impression that using such an accessory would be complicated.... It isn't.Here's how I use the device to set white balance in my Nikon D7200:1) I identify the main source of light that will fall on the subject(s) of the image(s) I'm about to take. That source might be the sun, or a cloudy sky, or a combination of light bulbs, or the light flowing in a window, or anything else.2) I turn on my camera, and navigate to the white balance setting screen, on which I choose "Pre," then press and hold the WB button til the letters "Pre" blink. The camera is now ready to receive a custom WB via the JJC Filter.3) I set my camera to "A," or Aperture Priority, hold the the JJC filter against the front of the lens, direct the lens toward the light source identified in step #1, then click the shutter. If on the LCD screen on top of the camera, the word "Good" appears, I have successfully set a custom WB. If "No Good" appears, then it's likely I need to change a camera setting (ISO or aperture) to allow more or less light in when I press the shutter. This happened once when I aimed the filtered lens at the sun - I had to reduce the aperture setting because too much light was coming in.4) I am now ready to shoot IN THAT LIGHTING, for as long as that lighting is dominant on my subject. As the lighting changes - for example, the sun begins to set, changing the hue of available sun light - I have to repeat steps 1-3.Some Q&A:- Do you have to stand where you subject is?Not necessarily. I shoot nature pics a lot - trees, the Mississippi River, for example - so I just need to capture the light that's in play on the subjects I intend to shoot. For portraits, of course, standing next to your subject would give a more accurate picture of the light on your subject.- Do you point the filtered lens at the light source or back to where your camera will be when you take the shot?I've read various points of view on this, but aiming at the light source works well for me.- Is it hard to juggle the camera in one hand and the filter (against the lens) in the other?Once I got used to it, not at all. Remember that focus is not an issue in this process, so you don't have to hold the camera still as you take the WB shot.- What about setting the camera to manual focus?Nikon cameras turn auto focusing off during the setting of a custom white balance, then turn it back on when the setting is completed, so I don't have to bother with focus settings. However, not all cameras do what Nikon does, so you might have to disable auto focus for the process, then turn it back on before your next image.- How long does the WB setting process take?Once I have the JJC Filter in hand, it takes me 25-30 seconds. I'm sure I'll get more efficient, the more I use it.- What about the filter's build quality?To me, it looks and feels like it will last for years and years.- Do I recommend the JJC White Balance Filter?Unconditionally.
B**L
Great Value
It works. I've used it a few times indoors pointed at a white card placed in front of my subjects when several light sources were contributing to the mix and have been really happy with the results, and I've used it a couple times pointed directly AT light sources of questionable color. Equally happy. But I was really impressed with it in helping me to set a custom color balance outside with sodium vapor lights. And in working through the problem, I learned a LOT about color balancing.The attached before/after images show the exact "before" shot with the camera set to Auto White Balance. Seeing the horrorshow color in the resulting image, I then put the filter in front of the lens, zoomed-in, shot the light source, and used that shot to set a custom color balance -- the typical way you do it. The "after" shot is also after a TINY bit more manual hue correction in Photoshop since the camera's "lowest" color temp setting is 2500°K and the sodium vapor output is closer to 2000°K, I've since learned. Sure, you may be able to just set your camera to its lowest numerical value in this extreme situation and do the rest in post, but most color correction problems are going to be with a light source that's within your camera's normal range, thus the filter will provide you with great results that won't need tweaking in post.
J**Y
Simple But Effective Device Allows Quick Setting of a Custom White Balance
This is an incredibly easy-to-use gadget to help set a custom white balance. I have used a gray card when shooting portraits, but asking the subject to hold it is awkward and then if you move to another location outdoors, you need to do it all over again. It really slows down the session. Once you've rehearsed the steps using this filter to set the white balance takes less than 1 minute:1) Change focus mode on lens to manual2) Change White Balance mode to Custom on the camera's menu (I can do it 2 different ways via the menu of the top control panel on the Canon 5D)3) Shoot one image with the JJC Filter close to the lens, filling the frame with the filter.4) Select this image as the Custom White Balance image on the WB menu5) Change lens back to Auto Focus and start shooting.I do need to remember to change back to AWB after the shoot or I will end up with a weird color in later images. I do shoot in RAW, so it's easy enough to adjust in ACR, but I'm trying to eliminate that step whenever possible.The JJC WB Filter is sturdy yet lightweight (all plastic) and includes a hole at the end of the handle so that you can thread a string or cord to it to hang it from your camera bag or tripod. The surface appears to be many tiny lenses that bend and refract the light. I don't understand the light theory behind the design, but it definitely seems to work. I have tried it in several lighting conditions, one of which was a mixture of tungsten light bulbs of various colors, and it definitely improved the overall color of the scene.
Trustpilot
1 month ago
1 day ago

![Lightdow 12 x 12 Inch (30 x 30 cm) White Balance 18% Gray Reference Reflector Grey Card with Carry Bag [Folded Version]](https://images-na.ssl-images-amazon.com/images/I/616NhxHaV1L._AC_UL116_SR116,116_.jpg)
