🌱 Composting made chic and easy!
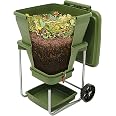
The Hungry Bin is a large-capacity worm composter designed for both indoor and outdoor use, processing up to 4.4 lbs of organic waste daily without odor. Its innovative design allows for effortless composting, producing premium worm castings and nutrient-rich tea, all while being eco-friendly and backed by a lifetime guarantee.


| Material Type | Plastic |
| Shape | Cylindrical |
| Color | Green |
| Item Weight | 12.28 Kilograms |
| Item Dimensions L x W x H | 24"L x 26"W x 37"H |
| Capacity | 20 Gallons |
T**N
Solid construction. Lid can be problematic.
NOTE: photo shows a modification I made to the product to let light into the top. IT IS NOT PART OF THE STANDARD PRODUCT.The extra light keeps worms in the material and discourages them from climbing up sides.Pros:- Easy to set up- Solid construction- Can be easily moved. Which is important because when fill it gets HEAVY.- Been using for 6 months and it's holding up well. Bottom latch works once you learn how to use it.- Continuous feed system works surprisingly well. You can take off the bottom and only SOME finished material falls through.Cons:- Lid is problematic when kept closed:- Worms tend to crawl up sides because it's dark (I experimented with transparent window on top to fix this, but too much moisture STILL an issue)- Too much moisture is retained and can lead to mites.- Internal heat build-up can be an issue.- Worms love to congregate in the bottom, so separating them from the finished castings is a bit of work.Misc recommendations:- Get a cheap "Duel, wired Digital Thermometer" (e.g. B0957XFHCK www.amazon.com/gp/product/B0957XFHCK) put one end into the middle of the bin and make sure the temperature doesn't get too high. If it starts to get a heat spike from decomposition, I use as broom handle to create "columns" all the way to the bottom to allow air to pass through.- I initially modified my bin to add a "window" in the lid using an old security cam dome to allow light in (this keeps the worms from climbing up sides). But I still struggled with too much moisture which lead to compost mites (NOT a health risk but ewww). SOLUTION: just put some screen material (like what is used for a screen window or door) over the top and leave the lid open. Controls the moisture, keeps pests out like fruit flies.- Buy and use Food Grade Diatomaceous Earth. This controls insect pests and does not hurt worms. In fact, it serves as grit to aid in their digestion!- If you use coffee grounds, buy and use Oyster Shell Flour to balance out pH levels. Also serves as grit.- Use a paper shredder to shred cardboard boxes. Just make sure to NOT shred labels or tape. Soak cardboard in water and wring out before using. Worms LOVE pizza boxes.Manufacturer recommendation if they read this:Include some kind of secure screen lid that fits security. It would be used when the lid is open to control moisture. And when the lid is closed, it would just to keep worms better contained.
L**I
Instructions were easy to follow unless you are like me who likes ...
Ordered mine on Sunday and arrived yesterday and I assembled it today. The parts look and feel very well made. Instructions were easy to follow unless you are like me who likes to jump ahead. I put the latches front and back instead of on the sides so I had to remove the top from the bottom part and the bottom part from the stands. The whole thing is easy to disassemble if you have to. I bought the worms from a local seller and picked up a bag of compost from Home Depot today which I mixed with coir and my compost is up and running. I put it under our covered patio which gets sun in late afternoon. To protect it from the sun and prevent heat build up, I used the box it came in to cover the bin around and the top and bottom loose cardboard went on the lid. I can't wait to harvest my first compost.7/16/2018. Update: It has been four months since I started using my bin. It has been very useful in that it's big enough for the kitchen scrap we have. My worms have multiplied a lot. My only complaint is that when I collect compost that falls underneath, which is mostly the compost that I first put in at the start, there are worms in it. I don't know why. I thought red worms stay only at the top. The way I separate the worms from the compost is to put the compost in one of the composting trays that I have (similar to worm factory) with holes on the bottom. I put a bunch of kitchen scrap on top of the bin and then put the tray on top of that. I keep the lid open to let light in. Since the worms don't like light, the worms in my collected compost go down to the scraps. The collected compost also doesn't have food for them so they go after the scraps underneath the tray. This might be a bit of extra work but it's worth the effort and it's not really a big deal to me.7/20/2018 Update: Just collected today a lot of compost that finally looks like has a lot more worm compost in it than the ones I collected before. I can tell because it has crushed eggshells in it which means it’s the layer with kitchen scraps, not the store bought bagged compost. As you can see, there are worms in it. As I explained in my first update, with light (lid opened) and fresh kitchen scraps underneath the tray, the worms will work their way down. When all the worms are gone, I can use the compost.12/9/2018: This past summer, when it got hot, I relocated the bin under our covered patio where the sun doesn't hit it. When it got really hot, I kept the lid opened for a while and a rat was able to get inside. I think it ate a lot of worms (I read that rats do eat worms) because I noticed that there were less of them. So I took a metal window screen and covered the opening with it and placed a piece of heavy wood 24 inches long by 6 inches wide and one inch thick on front of the opening to make sure a rat doesn't try to go inside. Then I put the lid down. I noticed then that when I removed the wood, some worms were still crawling to the screen and lid. I was thinking that maybe they were trying to escape because they needed more air. When I placed the wood back, no worms were trying to escape. Now my worms are very happy and growing fast that I see clumps of them.7/25/2019 Update: It has been over a year since I bought my Hungry Bin and I'm still loving it. Tried all other compost bins and this is the best. The bin has so many worms that they crawl all the way down to the collection tray. I remove them by exposing them in the light forcing them to crawl on the bottom of the pile and then scrape off the top which is free of worms. The collected worms go back in the pile. I stopped using the tray to separate the worms (I sold my vermihut). I still put a metal screen on the opening to give the worms ventilation and put the lid partway down. When it's too hot, I keep the door all the way up and placed boards on top (with gaps in between) to keep rodents from lifting up the screen. To keep the compost odorless, I keep a balance mix of green and brown waste by mixing in some dry brown leaves once in a while.
Trustpilot
1 month ago
1 month ago