🔌 Power Your Life with Kastar!
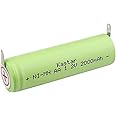
The Kastar 2-Pack 1.2V Ni-MH AAA 1000mAh Rechargeable Batteries are designed for high-performance applications, including electric razors and toothbrushes. With a compact size and eco-friendly rechargeable technology, these batteries provide reliable power for various devices, ensuring you stay connected and ready for anything.
| Item Dimensions | 1.75 x 0.4 x 0.4 inches |
| Item Weight | 1.12 ounces |
| Unit Count | 2.0 Count |
| Battery Cell Type | NiMH |
| Recommended Uses For Product | Digital |
| Reusability | Rechargeable |
| Battery Capacity | 1000 Milliampere Hour (mAh) |
| Voltage | 1.2 Volts |
J**4
Nice upgrade
I bought these batteries to replace the ones in my 2-year-old Remington PF7200. The original batteries were getting tired. I replaced the original 600 mAh batteries with these 1000 mAh batteries. It's like night and day the performance of the shaver. Tons of power now. Probably better than when the shaver was new. So the batteries work great. I would say however that it's not easy to remove/replace the batteries. It requires some experience with soldering and a good soldering setup. But $42 for a new shaver vs. $9 for new batteries is a great deal. I also replace the foil cutters every 6 months so there's no need to buy a new shaver.
L**K
They work well!
I used these to replace the factory rechargeable batteries in my Braun trimmer. Easy to install if you have basic soldering skills. So far, I haven't had to charge my trimmer in about three weeks. I use it every couple days to neaten and trim my mustache and beard. They are holding up very well since the initial charge. Great deal. For about nine dollars and a little bit of my time I saved having to buy a new trimmer. Hopefully, the batteries will hold up for a couple years. At the moment, I'm very happy with them.
S**E
Remington R3 Shaver replacement Batteries
Saved $50 replacing my worn out shaver batteries. These work great and have more amp hours storage. Great fix for the old shaver.
J**N
works better
purchased this battery to replace one in a rechargeable shaver that would no longer hold a full charge. after replacing battery and charging, the shaver WAS worse than it was with the old battery that barely held a charge. Upon further inspection I noticed the solder had separated from on of the battery leads. Additional heat and flux solved the problem, the shaver is now working. The battery leads appear to be stainless and it is difficult to get solder to properly adhere.
R**R
Great value.
Shipping was on time. The batteries are as advertised. Using a pair in my shaver. From full charge I got a full month of using it every day before needing recharged.
C**D
Stainless steel battery tabs
The tabs on these cells are stainless steel and not easily soldered which is needed for the WaterPik toothbrush to replace existing cells. The size is correct. Since I cannot solder to stainless, longevity is not known. WaterPik does not want the user to change the cells but to buy another powered toothbrush. There are other sources of this battery with easily soldered wire leads. (Walmart)
A**.
Fast Charging
As expected. Charged Very Fast.
K**N
Waterpick toothbrush fix
Used these to replace the batteries in my waterpick toothbrush.1. Use a quarter to open the bottom of the toothbrush.2. Remove the head of the toothbrush.3. Push the metal shaft into the toothbrush. All electronics will come out the bottom in 1 piece when you do this.4. Pull the old batteries out but don’t pull too hard because the will remain attached by two wires.5. Use your soldering iron to remove the wires from the top of the batteries. You need to remove the heat shrink to get to the wires.6. Remove as much of the tabs on the new batteries as you can. On one battery remove both tabs. On the other battery remove 1 tab. I was able to remove 1 with the soldering iron. The other two I just pulled off and chunks were left. Not a problem.7. With some rough grit sandpaper sand the three ends of the batteries that don’t have a tab. You can see the ends go from shinny to a dull color. Also sand the inside of the tab that is left.8. Dip the end of your soldier in some flux and dab a little on one end that does not have the tab. Heat up the surface of the battery where you put the flux and add a little solder to the end of the battery. Do this on all three open ends and inside the remaining tab.9. Put the two batteries together with the tab touching both batteries. Make sure you are attaching the tab to the opposite polarity on the second battery. I put the two batteries side by side in a vice.10. Use your iron to hold the tab down on the second battery. Once you see the solder liquify remove the iron. I used a dental pick to hold the tab in place while I did this.11. At this point I wrapped cheap Kapton tape around the two batteries to keep them together.12. Solder the two wires from the toothbrush to the opposite end of the battery pack. Make sure the black wire is to the negative end and red to the positive.13. I then wrapped the batteries longways with Kapton covering the ends.14. Put the batteries in the electronics of the toothbrush.15. Put the electronics back in the housing. Pay attention to where the lights are supposed to be to help align everything.18. Put the bottom back in.17. Put the brush head back on.These batteries are 1000mha compared to the 750mha that were removed so they will probably take a little longer to charge but should also last a little longer before needing a recharge.
Trustpilot
3 weeks ago
1 month ago