Desert Online General Trading LLC
Dubai, United Arab Emirates
Desert Online General Trading LLC
Dubai, United Arab Emirates

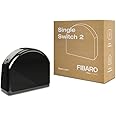
⚡ Power your smart lifestyle with the tiniest yet mightiest relay!
The Fibaro FIBEFGS-213 is the world’s smallest Z-Wave compatible electrical relay, designed for seamless smart home integration. It features an advanced microprocessor for precise control, an electromagnetic micro-gap relay for reliable switching, and real-time energy consumption monitoring—all packed into a compact form factor that fits inside standard wall switch boxes.
| Operation Mode | Automatic |
| Current Rating | 0.01 Amps |
| Operating Voltage | 500 Volts |
| Contact Type | Standby Contact |
| Connector Type | Rail |
| Brand | FIBARO |
| Terminal | Screw |
| Item dimensions L x W x H | 1.65 x 0.79 x 1.5 inches |
| Circuit Type | 2-way |
| Contact Material | Plastic |
| Number of Positions | 1 |
| Control Method | Remote |
| Connectivity Protocol | Z-Wave |
| Color | Black |
| Wattage | 2500 watts |
| Unit Count | 1.0 Count |
| Number of Items | 1 |
| Global Trade Identification Number | 05902020528722 |
| Manufacturer | FIBARO |
| Part Number | FGS-213 |
| Item Weight | 1.06 ounces |
| Product Dimensions | 1.65 x 0.79 x 1.5 inches |
| Item model number | Single Switch |
| Is Discontinued By Manufacturer | No |
| Style | Switch |
| Power Source | Default_no_selection_value |
| Item Package Quantity | 1 |
| Number Of Pieces | 1 |
| Measurement System | Metric |
| Included Components | Single Switch 2, User Manual |
| Batteries Included? | No |
| Batteries Required? | No |
| Warranty Description | 2 Year Manufacturer Warranty |
G**3
Funktioniert bei uns
Hallo zusammen, da es bisher nur eine sehr schlechte Bewertung gibt wollte ich hier mal meine Meinung einbringen.Der Roller Shutter 3 ist unser allererstes Modul dieser Art. Gekauft habe ich es aus Neugier und natürlich, um den Bedienkomfort zu nutzen. Leider haben wir unsere elektrischen Rolladenmotoren im Obergeschoss - im Gegensatz zum Erdgeschoss - damals nicht an einem Hauptschalter gekoppelt, um zum Beispiel alle Rollos im OG gleichzeitig auf oder zufahren zu lassen oder über eine Zeitschaltuhr zu steuern. Der Gedanke war, dies durch den Einbau der Roller Shutter Module via Homee Zentrale nachzurüsten.Anfangs skeptisch, ob ich den Einbau als Nicht-Elektriker, aber doch mit handwerklichem Geschick ausgestattet, hinbekommen würde, habe ich mir zunächst ein Modul zum "testen" bestellt.Der Einbau war in Ordnung, es ist zwar ein bisschen Verdrahtungsaufwand notwendig, aber nach ein wenig Einlesen in die Online(!!!) Anleitung hat es gut funktioniert. Man sollte aber unbedingt vorher prüfen, ob noch ausreichend Spielraum in der Dose vorhanden ist. Bei uns ging der Shutter gerade so wieder zu.Nachdem alles fertig installiert war habe ich das Modul problemlos mit der Homee Zentrale im EG verbinden können, obwohl offiziell nur die Versionen 1 und 2 unterstützt werden.Wir betreiben das Modul an einem Doppelkippschalter, also eine Seite nach oben, die andere nach unten. Mit Hilfe der Onlineanleitung konnte ich die Parameter zur korrekten Auswahl der Schalterart als auch die Umkehr des bei mir notwendigen Richtungstausches sehr einfach in der Homee App durchführen. Das einzige, was nicht auf Anhieb funktioniert hat war die automatische Kalibrierung. Der Rollo ging zwar immer entweder komplett hoch oder komplett runter, aber Zwischenstufen wurden nicht erkannt. Ich habe dann die Alternative Kalibrierung im Manual via Zeitvergabe versucht - also die beiden Zeiten für jeweils einmal komplett runter und einmal komplett hoch gestoppt und diese anschließend im entsprechenden Parameter hinterlegt. Und siehe da: Es klappt!! Egal ob 10, 50 oder 75 Prozent, der Rollo hält an der gewünschten Stelle korrekt an.Ich habe nun eine Routine via Homee eingerichtet, bei der der Shutter den Rollo 1 Stunde nach Sonnenuntergang schließt und 3 nach Sonnenaufgang öffnet. Klappt ausgezeichnet! Schön finde ich auch, dass nach wie vor vollumfänglich manuell über die Kippschalter gesteuert werden kann und der Shutter auch dann auslöst, wenn der Kippschalter noch in der Endlage der entgegengesetzten Richtung steht. Ich hoffe man kann sich vorstellen, was ich damit meine.Ich habe jetzt keine Foreneinträge gelesen oder Tests gelesen, hatte die Version 3 eher zufällig entdeckt vor ein paar Wochen hier auf Amazon, als ich mir die Bewertungen zur Version 2 durchgelesen hatte und habe dann auf gut Glück die neue Version bestellt, da ich gehofft habe, neu ist sicher nicht verkehrt.Ich bin ehrlich gesagt sehr zufrieden, es gibt keine Funktion, die mit dem Homee nicht funktioniert. In den nächsten Wochen werde ich noch die restlichen 5 Rollos im OG nachrüsten, damit wir die Rollos oben dann genauso komfortabel - sogar mit zusätzlichen Funktionen im Vergleich zu unserer Zeitschaltuhr unten - steuern können wie unten.Update 08.03.: Da es offensichtlich viele User mit dem Problem der Kalibrierung gibt habe ich nochmal im Manual geschaut - ich habe den Shutter 3 über den Homee mit den Parametern 156 und 157 eingestellt. Es klappt bei mir, man muss einmal die Zeit stoppen für jeweils komplett hoch und runter, dort eintragen und der Rollo lässt sich seitdem exakt ansteuern. Vorsicht: Nachdem ich zunächst versehentlich in das Manual der Roller Shutter 2 geschaut hatte ist mir aufgefallen, dass bei Version 2 anscheinend andere Parameternummern vergeben waren. Daher der Tipp für alle, die die Vorgängerversion haben: Unbedingt das neue Manual für die 3er Version downloaden!! Bisher sind noch keine Probleme aufgetreten.Hoffe, das hilft vielleicht dem ein oder anderem.
V**7
Module minuscule mais performant !
A réception du module, je suis surpris par la taille minuscule, je m'attendais à quelque chose de plus gros.Je l'ai associé à une alimentation 12Vdc ainsi que 2 sondes DS18B20, 2 interrupteurs manuels et 2 relais de puissance pour contrôler ma piscine. Le tout monté dans un coffret étanche dans le local technique.Bien sûr il faut faire un peu de câblage et de soudure mais c'est justement l'intérêt de ce module.Je l'ai intégré à Jeedom en bidouillant un peu car il n'est pas reconnu directement, la faute aux mises à jour du plugin Openzwave qui sont vraiment en retard. Mais grâce au forum Jeedom, on trouve la manip à faire et tout fonctionne parfaitement.Je peux controleur la pompe et le chauffage de ma piscine par la domotique, j'ai la vrai température de l'eau du bassin etc...La portée radio est très bonne, il est assez loin à l'extérieure et grâce au maillage du Zwave, le module s'intègre parfaitement.
S**2
Works brilliantly well.
This is brilliant it just worked out of the box.It took a bit to work out how to wire it, but I have posted a video.Works with smart things and Alexa.
S**T
Good luck if you can make it work
This device theoretically fills a large void in the market, specifically a means to acquire temperature data with a sensor probe and return it via Zwave to a controller. Too bad it doesn’t work. Except for reading the devices inner temperature and using a Dallas sensor with no cable, the unit is incapable of providing accurate readings. Using a useful cable length of even 1 meter the unit fails to return a correct value.The basic switch and binary detection functions work fine but there’s cheaper devices to do this. I have no experience with the analog voltage function so cannot comment on that. Assuming that portion works, it might by itself justify purchase of this device.Fibaro customer service is useless; they refer you to their user forum making you dependent on other end users to assist you. If they would spend as much effort to assure support as they do on a flashy, all-promising website, it might be worth buying their products. In the meantime an opportunity for a manufacturer to provide a reliable Zwave temperature measurement device still exists.
A**T
stops led ghosting with smart light switch
If you need to fix ghosting (LED lights stay slightly on) when you fit a smart dimmer, then this does the job perfectly.My living room has 14 5W LED downlights, and had a standard rotary dimmer. The downlights were fitted years ago by a previous owner, and are builders merchant cheap no-name ones which also flickered badly when dimmed. I wanted to add smart control, to integrate with my Hue bridge and other lights. Replacing all the fittings with fire rated GU10 cans and smart bulbs, or even just normal LED bulbs would cost way too much.No neutral wire at the light switch, as usual for older UK fittings.So I fitted a candeo zigbee rotary no-neutral trailing-edge dimmer switch (which looks identical to the old dimmer, so happy wife), which works fine for switch/voice/app control. However, as it still draws a little power to run the switch itself when lights are off, the only route to neutral is through the LED lights - and that means that when the switch is off, that small draw is enough to light an LED or two faintly. Better LED downlights might not have this problem, but that means replacing all the fittings and bulbs, which I'm trying to avoid.I tried a different dimmer bypass (which didn't work) but this fibaro bypass works perfectly, I just wired in parallel at the first downlight. As a bonus it also stabilises the downlights better at low power, so I was able to set the dimmer minimum level two clicks lower while still allowing all the LEDs to turn back on fully with no flicker.A few hundred pounds for 14 downlight cans and bulbs to have smart lights without ghosting, or pay an electrician to run a neutral to my dimmer switch via a tricky duct; or this £10 bypass in the ceiling inside the junction box. I know which I'm happier with! Obviously, enough knowledge (and a detector pen) to do basic DIY with mains electric wiring safely is required, and only install when the breaker is off; or get an electrician.
Trustpilot
1 month ago
2 weeks ago