✨ Peel, Stick, Impress — Marble Magic Made Simple! ✨
WESTICK Peel and Stick Floor Tiles offer 20 durable, 12" x 12" white marble vinyl tiles that cover 20 sq.ft. Designed for easy, tool-free installation, these waterproof, scratch-resistant tiles bring a modern marble look to any flat surface. Ideal for renters and DIY enthusiasts, they provide a stylish, long-lasting upgrade for kitchens, bathrooms, bedrooms, and more.
| Unit Count | 20 Sq Ft |
| Item Thickness | 0.04 Inches |
| Coverage | 20 sq.ft |
| Item Display Dimensions | 12 x 0.04 x 12 x 0.7 inches |
| Item Dimensions L x W | 12"L x 12"W |
| Item Weight | 7.7 Pounds |
| Size | 20 Tiles |
| Special Features | Water Resistant, Washable, High Temperature Resistant, Scratch Resistant, Oil Resistant |
| Form Factor | Square tile with 0.04 inches thickness |
| Material Type | Vinyl |
| Recommended Uses For Product | Bedroom, Bathroom, Study, Living Room, Kitchen, Corridor, Furniture, Cabinet, Countertop, Wall Decor, Floor Decor |
| Installation Type | Peel and Stick |
| Pattern | Faux Marble Pattern |
| Trim Color | Square Edge |
| Item Shape | Square |
| Finish Types | Glossy Marble Look |
| Style Name | Marble |
| Color | White |
J**H
Transformational!
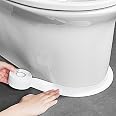
Wow! What a difference these made in my bathroom! I had an all brown marble bathroom that was dark and not my style so I gave these a try. This was my first attempt at a peel and stick floor, and I was thrilled.The vinyl tiles are flexible and easy to install…they come with a cellophane backing that just peels off. I did a dry fit first, to make sure I liked the pattern, then got to work. All the tiles are a little different, some with lots of veining, some with just a little. I liked the heavier veins, so preferentially used those from the box.After reading the comments about difficulty lining up the tiles, I decided to do a brick layout to maximize visual appeal while hiding any alignment flaws. I left a dime sized gap to mimic grout lines and to also prevent visual issues with their alignment. Hopefully that doesn’t make the tiles more likely to come up over time, but I didn’t trust my skills to align it all perfectly if all the tiles were touching edge to edge.These are STICKY, so be careful once you lay them down…moving them is not an option once stuck.For the curves around the toilet, I traced the cuts on paper first then traced them on the back of the tile, which was easy to cut with scissors. To get a perfect edge, I used a super sharp razor blade and “whittled” to fine tune…just dragged the knife carefully towards me along the curve to make a little curly cue. It worked great.I can see the ridges of the marble tile below that I stuck these to, and because the tiles are like a thick, but pliable linoleum, I anticipate some dents over time, but for now it looks great! To completely transform my bathroom for the cost of 2 boxes of this peel and stick tile was #WORTHIT!! Highly recommend!
C**O
Pedicure build
Bought to wrap a custom built pedi chair. Quality is ok. The adhesive is a bit touch and go though. If used on a horizontal surface, everything is fine. But the vertical surfaces have proven to be a bit more difficult as far as staying.Be mindful that I did prime the surface with peel and stick primer (which I recommend,) and I did add extra adhesive for the tiles to stick. Nothing really seemed to keep all the tiles (again, the vertical ones) in place. I eventually had to use plumbing adhesive to keep the tiles from peeling forward. I would use again only for a place that doesn't get heavy foot traffic. So something like my pedicure chair is good if you can get the tiles to adhere well.
W**.
sad
these do not stick well, but leave a nasty hard to remove glue film on floor after removing. every time i tried to place a piece and cut, they just tear. i just wasted so much time and effort trying to put these on my bathroom floor to no avail. they are really pretty, disappointed
E**V
Quick and Easy
We decided to replace the flooring in our two bathrooms. The aging vinyl flooring was very outdated. To enhance our daily living environment, we purchased these tiles and another set with a distinct design. Drawing upon my prior experience with home improvement projects and my love for DIY endeavors, I routinely watch instructional content such as "Handyman Tips and Tricks" on YouTube, seeking to acquire new techniques and enhance my proficiency in handling various household repairs. For those less versed in DIY work, I would strongly recommend dedicating time to familiarize themselves with several handyman tips and tricks before embarking on the installation of these Peel and Stick Floor Tiles, as this preparatory knowledge can significantly help.The installation approach I employed proved to be highly effective. Initially, I removed the baseboard trim and vertical door frames to prepare the space. Subsequently, I meticulously matched the tiles to ensure uniformity before meticulously peeling off the backing and positioning them in their designated locations. In instances necessitating intricate cuts, such as around the toilet, I opted to utilize either pre-cut tiles that seamlessly fit the designated area or employed thicker construction paper. This paper was strategically placed in a corner of the reference location, and I affixed masking tape both to the reference piece and the floor adjacent to the toilet. This method facilitated the precise cutting of tiles to accommodate the required dimensions.Following the placement of the tiles, I diligently undertook the task of cleaning and refinishing the baseboard trim. Additionally, I trimmed the bottom of the vertical door frames to ensure a seamless fit with the newly installed tiles.One noteworthy aspect of these tiles, which lead me to both appreciation and worry, was their propensity to shift slightly after installation. Particularly in areas around the toilet, shower, and bathtub, I considered it helpful to allow for a degree of movement, but it also created small gaps that could potentially permit moisture under the tiles, thereby compromising adhesive integrity over time. To address this concern effectively, I applied an adhesive to securely affix the tiles to the floor in those areas, ensuring their permanent placement and mitigating the risk of future issues related to adhesion. Hopefully some the information I have provided will you. Good luck on your project!
A**N
These vinyl floor tiles, transformed my bathroom floors!
Love these tiles my bathroom floors look amazing now!
A**R
Pretty color tile
It is a beautiful color tile but is a little flimsy not as stiff as some other tiles I have bought.
C**A
Amazing product if you want to spent the time....
The media could not be loaded. I was hesitant after reading the reviews, but I was determined to redo my bathroom. While some tiles aren’t exactly 12x12, they’re close enough! To help with sizing, I used the Astrodesigns/Creative Collection Starter Kit Cardstock (12" x 12"). Was it easy? No. Was it quick? Not at all. But the final result was absolutely worth it! If you're willing to put in the effort, go for it. If you want a flawless finish, hire a contractor—or tackle it yourself and save hundreds of dollars. I did it all on my own, and it turned out amazing!
L**L
Quality. Functionality. Style
I love these peel and stick tiles! They are perfect for DIY projects and it transformed my kitchen.
Trustpilot
1 month ago
1 month ago