🛠️ Build Time, Own Time!
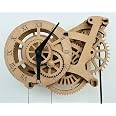
The Abong Wooden Clock Kit is a beautifully crafted mechanical clock that combines functionality with artistry. Made from high-quality wood, this kit allows you to assemble a stunning timepiece that not only tells time but also serves as a captivating interior display. With clear instructions and a focus on craftsmanship, this clock is perfect for those who appreciate the art of creation.
| Brand | ABONG |
| Model Number | K1014 |
| Color | Mechanical |
| Product Dimensions | 20 x 3.81 x 25 cm; 821 g |
| Material | Wood |
| Special Features | Pendulum |
| Item Weight | 821 g |
B**E
Fun and works great, if you take your time!
This was a really fun build! However, you have to read the directions and take your time. It took me about 20+ hours from start to finish. You really have to make sure each and every tooth of the gears are sanded well, and graphite applied well to keep the gears from binding. Also when mounting the gears onto the axels, make sure that they spin freely. It takes a lot of trial and error (read: "sanding") to make sure the gears spin well together.Additionally, make sure you carefully read each step when building the gear sets. The pinions must be installed in the correct orientation for them to work right. This means glueing them down correctly. The instructions make this clear in the text (ie: "glue marked side down") so it's essential you read and understand each step exactly.I did note that some of the thicker pinions and spacers cut did seem a bit "off", like the laser didn't cut perfectly perpendicular to the surface of the wood...however this may even be by design (not sure as I'm not a clock maker), because everything works perfectly once it's assembled.A note about the manufacturer's customer service: it's very good! My kit had was missing the pinion for the escape wheel. This appeared to be a mistake when it was packaged as they accidentally gave me a duplicate idler wheel pinion. I emailed their customer service address that was listed on manual and they quickly responded and shipped me the piece I was missing. It did take a few weeks due to snail mail and customs (Canadian company and I'm in the US), however that's not their fault.All in all, an incredibly fun build. I'm already planning on purchasing their other clock kit (David Clock) for my next build.
A**R
Product is exactly as expected, not yet assembled. ...
Product is exactly as expected, not yet assembled. Gave it to my dad for Christmas and he is excited to tackle it in the spring.
ち**ま
説明が・・・
輸入なので仕方ないけど、説明書が英語です。商品は、楽しく作ってます。
P**N
Nice n easy
This is a abong's best clock design
D**G
Requires a moderate amount of skill and lots of patience to build successfully.
SKILL LEVEL:3/5, IntermediateSUMMARY:This is not a clock kit for the beginning builder. Building a simpler clock like the Abong Crossingham would be a better introduction to building wood gear clocks. This clock requires a modest amount of tools including a small razor saw, a hobby knife, glue and several sheets of sandpaper. Additionally, you must have a fair amount of patience and the ability to pay attention to small details.PROS:1. Simple to assemble.2. Very nice printed instruction manual.3. Large gear teeth that are easy to sand.4. Error tolerant design.5. Keeps accurate time once adjusted!CONS:1. Wooden axles that, by the nature of the material, are not very accurately sized.2. Requires lots and lots of sanding of the gears and cogs to allow them to fit with as little friction as possible.3. Hardening of the gears and axles needed to reduce friction.4. Need to acquire tools if you don't have them already.5. Need to acquire material for the drive weight.6. The rewinding mechanism is awkward.BUILD TIPS:1. I used a good hobby quality cyanoacrylate (superglue) adhesive in thin and medium viscosity with a fine applicator tip throughout the build to avoid waiting for a wood glue to set. If you haven't used CA glue before, practice on some scrap bits to judge how long it takes to set.2. I hardened all the gear teeth with a drop of thin CA and then sanded each tooth until almost all the brown resin from the laser cutting process was removed. I did this before I started assembling the gear sets. This takes a fair amount of time. Hardening the teeth reduces friction and will reduce wear on the teeth.3. I hardened each axle hole in each gear with CA and then sanded it smooth with a bit of rolled up sandpaper. I used very fine 400 grit paper.4. I hardened each axle with CA, sanded it smooth, and then waxed the contact areas with candle wax. I did not use graphite anywhere for lubrication .5. I used the wooden washers to locate the gears on the axles but did not glue them in place until AFTER the clock had been fully assembled. This allowed the gears to be slid on the axle shafts to allow proper clearance between gears. Only after I was satisfied with the gear spacing did I glue the washers in place on the axles to fix the gear positions. Make sure all gears spin as freely as possible and don't wobble. Also check to ensure there us no interference between contacting gear teeth. A little clearance is ok.6. I triple checked to make sure all axles were perpendicular to the baseplate, parallel to each other and firmly glued in place.7. I used pins to hold the top brace in place instead of gluing it to the axles. This allowed me to disassemble the clock to make adjustments. I made the pins from a paper clip. (See photos.)8. Take care to reduce friction wherever possible. I was able to get my clock running as soon as I hung the drive weight filled with 4 pounds of lead. With some fine tuning, my clock will tick reliably with just 1.75 pounds of weight and run for six hours for every 10 inches of drop.9. I used a carbon fiber rod for the pendulum because I didn't like the multi-piece rod in the kit and happened to have one on hand that I stole from a kite..10. Overall, it took me about 40 hours to build this clock - 20 hours were on sanding alone, 10 hours on assembly and 10 hours tuning, remaking some parts and finishing with three types of wood stain.RATING: Four Stars.Overall it was a fun and satisfying build. I took off one star because if they had laser cut the gears slightly smaller, or spaced the axles out slightly farther apart, then you wouldn't have to do as much sanding of the gears to reduce the interference fit between gears. Also, the method of re-winding the clock could be improved.
Trustpilot
2 days ago
2 months ago