✨ Illuminate Your Ideas with OLED Magic!
The MakerFocus 4pcs OLED Display Module features a 128x64 pixel resolution, self-luminous display, and is compatible with various microcontrollers including Raspberry Pi and Arduino. It allows for customizable font creation and easy installation, making it a versatile choice for tech enthusiasts.
F**A
Works great! Great value! Tested with ESP8266 NodeMCU & Arduino IDE
Works great. Great value for money.Lack of documentation so docked one star on Ease of use.The sketch that finally made it work for me.Screen has two colors but they are fixed so it's really a monochrome screen.Small section on top is yellow and rest is blue.Need to solder the pins ... easy if you know your way around a soldering iron. Took less than 2 minutes.Adafruit library and example sketch are a great place to start. My working sketch for this OLED display is shown below. Hopefully, others find it useful.// Import the Adafruit 1306 library and select your board on the Arduino IDE// The sketch below worked for me// Minimal sketch to display "Hello World" on OLED SSD1315 working with ESP8266 NodeMCU// Sketch for Arduino or other boards would be quite similar#include <SPI.h>#include <Wire.h>#include <Adafruit_GFX.h>#include <Adafruit_SSD1306.h>#define SCREEN_WIDTH 128 /// OLED display width, in pixels#define SCREEN_HEIGHT 64 /// OLED display height, in pixels#define OLED_RESET -1 ///-1 => no reset on 4 pin SSD1315 OLEDAdafruit_SSD1306 display(SCREEN_WIDTH, SCREEN_HEIGHT, &Wire, OLED_RESET);/// define screen params#define I2C_SDA 4 /// ESP8266 NodeMCU SDA pin GPIO4 = D2#define I2C_SCL 5 /// ESP8266 NodeMCU SCL pin GPIO5 = D1#define SCREEN_ADDRESS 0x3C /// 0x3C for SSD1315 OLEDvoid setup() {Serial.begin(9600); /// for debug messages, I don't have anyWire.begin(I2C_SDA, I2C_SCL); /// #2 Identify SDA & SLC pins for your boarddisplay.begin(SSD1306_SWITCHCAPVCC, SCREEN_ADDRESS); /// Mode + Screen Addressdelay(200); /// time for board to initialize?display.clearDisplay(); ///display.setTextColor(WHITE); ///display.setTextSize(1); ///display.setCursor(10, 30); ///display.print("Hello World!"); ///display.display(); /// needed to actually display the messagedelay(1000); /// time for message to stay updisplay.clearDisplay();}void loop() {}
U**Y
Overall great
SoftwareOpened up Arduino IDE(2.3.2)Clicked Library Manager Icon(3rd down from top left)Type SSD1306 and installed Adafruit SSD1306 library by Adafruit(2.5.10)Select yes for also installing Adafruit GFX library(1.11.10) w/SSD1306 libraryRestart IDE and open example code by clicking File>Examples>Adafruit SSD1306>128x64.i2cHardwareArduino Nano ESP32Screen GND > Nano GNDScreen VCC > Nano 5VScreen SCL > Nano A5Screen SDA > Nano A4AdjustmentsThe code comments on line 35 mention a screen address of 0x3D(default) for 128x64 resolution. I had to change this address to 0x3C for my screen to come alive.Final ThoughtsNice but it seems I also didn't pay enough attention, the entire screen isn't two colors. I would say the top 3rd is yellow and the bottom 2/3rds is blue. There is a thin black line separating the two sections.
B**O
Works w std SSD1306 Driver! - Tips to avoid frustration
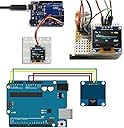
Had lots of trouble getting this to work w micropython SSD driver. Screen just stayed dark, even though i2c.scan recognized device id 0x3c. I assumed it was the SSD1315 that was incompatible with SSD1306 initialization code (read on - it wasn't!). Finally abandoned it and went with a smaller SSD1306-based display. When I finally got the ssd1306 working, switched back to this display, and it worked with the exact same code! Simple, easy, nice bright display. Yellow on top 8 pixels is a bit hard to read. Oh well. I'll but more of these, I like them. Simple script that works:from machine import Pin, I2Cfrom ssd1306 import SSD1306_I2Cdisplay = SSD1306_I2C(width=128, height=64, i2c=I2C(1, freq=100_000), addr=0x3C, external_vcc=False)display.init_display()display.contrast(255)display.poweron()display.text("Hello World", 0,0,1)display.show()
M**L
Confusing at first
I bought the Yellow & Blue variant. These screens are a bit confusing because they are two-color, *monochrome* displays. How can that be? The answer is that some of the pixels are Yellow, and some are Blue. Specifically, there are 16 rows of Yellow pixels, a 2-pixel gap, and then 48 rows of Blue pixels. This is perfect for a size-12 banner with optional solid background, followed by 3 rows of size-10 text.I used the standard U8g2lib library with the U8G2_SSD1306_128X64_NONAME_F_HW_I2C mode to drive this. Bus clocks above 200000 would sometimes result in crashes in my case. I highly recommend enabling the hardware watchdog timer because the library will stupidly cause the system to halt if it encounters a bus error for reasons such as the bus clock being too high.
R**Y
Excellent display at an affordable price.
Works great. Needs driver #included (Adafruit GFX, and Adafruit SSD1306 work fine).Fits much more text on the screen than an old LCD1602, and using a LOT less power.Overall, this this the way to go. I recommend it without reservation.
B**B
2 colors NOT configurable
The first 2 rows are yellow, then a gap and then the remainder rows are blue. You cannot choose colors. The description never says "You are stuck with 2 rows of yellow and rest are blue, not configurable!" Deceptive marketing! They work fine and I'll keep them, but I will never buy any more of these.
C**P
Seems like they sell a number of different boards
Yellow blue display works with the adafruit_ssd1306_128x64 library and exampleswith address 0x3C and reset pin kept at the default -1
Trustpilot
1 day ago
2 months ago