


Full description not available
T**S
A lot of money for a piece of pine and a flimsy bracket
I got the 24" version. First, the bracket is not long enough to mount in studs on the ends - that is, the bracket does not extend to the length of the shelf. Second, the bracket is flimsy. I see why it is designed the way it is, so that homeowners can easily drill/screw through the thin metal wherever they want, but it would have been preferable to have a stiff piece of metal with a lot of holes - so that there is greater strength yet it retains flexibility in mounting. Third, this is a lot of money for a piece of pine. Sure, it's solid wood, but it isn't THAT nice.Anyway, I mounted it with a stud screw in the middle of the bracket, and drywall anchors on the ends, as the bracket was not long enough to hit the studs on either end (BTW, as is typical with just about any such item, the drywall anchors included are substandard). I have a plant that weighs about 10 pounds on it, but I wouldn't trust it with much more. It looks fine, and it wasn't worth sending back, but it could be a lot better with a better mounting system.
C**H
Oh my... stay away
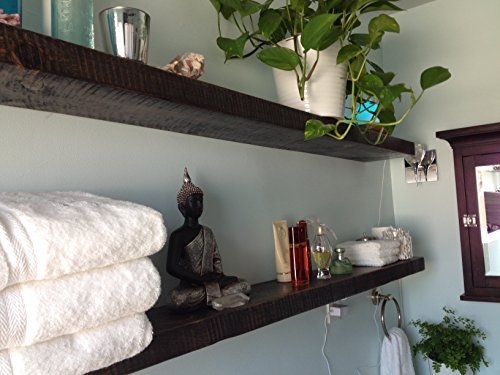
Ordered the 36" shelf. The shelf itself is quite nice and sturdy. The wall mount is a flimsy strip of metal with a 90 degree bend in it (so part of it goes flush on the wall and part of it juts straight out). The idea is that you drill through this flimsy bit of metal and screw it into studs, and the part of the strip that juts out slots into the shelf, and you screw the shelf into this bit.Well, I got two of these, and with both of them the strip was warped... too warped to level properly. This thin, flimsy, metal strip should be a sturdy piece of metal *with pre-drilled holes* similar to the wall piece on large flat screen TV mounts. As it is, it's just 100% shoddy. My husband is quite accomplished at mounting things and we've got several different varieties of floating shelves in the house. He cursed these the entire time installing (and yes, we read the instructions and watched the video).We live by the freeway, and these shelves have a... bounce to them. A wobble on account of the flimsy strip of metal. The first night after installing they chattered throughout the night from the vibration of vehicles on the freeway. The only way to stop it sans modification is to put very heavy stuff on them. I contacted the seller for advice about this, and their response was to *use some double stick tape* to attach the bottom of the shelf to the wall so it didn't jiggle. Super professional! Just what I want to secure my floating shelves with - double-stick tape =/But, lacking other options, we did just that, with the knowledge that whenever these eventually come off the wall, some of the wall is going to come off as well.So they're mounted (they are my vanity shelves), and they look nice enough, but they definitely have a slight wiggle to them still, even with the tape. As I said, the shelves are high quality, but I would NOT recommend these shelves to anyone, unless they're going to have heavy stuff on them and not be used with much regular utility. The mounting system is just flimsy and cheap and poorly thought out.This is walmart quality at fancy prices.
M**Y
Worth the money!
I ordered 1 to see if I liked it and then ordered 2 more. The install was a little complicated at first because, as a single woman, I have minimal tools so I didn’t have the bit needed to drill into the metal piece but once I had that and help with the first one I hung the other 2 by myself. The quality is superb!! I absolutely love the vintage look the stain is gorgeous! I’m extremely happy with my purchase and the completed look of my half bath.
S**N
A bit tricky to install, but it's an excellent floating shelf
If you’re looking for an eye-pleasing, oversized, wooden floating shelf that can hold some heavy objects, this is it.Application: We purchased this shelf to hold a large number of liquor bottles as part of our home bar, so sturdiness was a key factor.Aesthetic: It’s a large, square-cut, stained piece of pine. Pine grain has a large footprint and is sparse, and this is quite evident on this piece. The stain is evenly applied using what I assume is a wash technique, where the denser areas of the wood (the grain) have absorbed almost no pigment, which I think makes the grain pop in a very pleasing way. It’s a matte finish with no reflectivity whatsoever, which makes the shelf understated yet present on the wall.Mounting: This is a solid piece of pine that has been milled with a long, narrow receiver slot for its unique mounting system, which consists of a single strip of sheet metal that is bent lengthwise to form what is essentially a long, flexible L-bracket. Because sheet metal is flexible, I was concerned that this bracket would not be strong enough, but I assure you that it is if you follow the mounting instructions.The only issue I have with this mounting system is the absolute attention to detail and accuracy required. The mounting system is cleverly designed and functional, which I’m sure helps to keep the cost of the shelf down, but it does require a power drill and the skill of using it on sheet metal. If you’re not particularly handy, I recommend finding/hiring someone who is.The bracket does not have any predrilled holes. You must drill these yourself using a bit rated for sheet metal. This might seem like a pain, but it’s really a positive if the wall you plan to hang this shelf upon has non-standard stud spacing. Also, because it’s made of sheet metal, any unused predrilled holes would only weaken the bracket. The instructions indicate the minimum number of screws required for the size and weight rating of the shelf. I drilled three holes in an upside down triangle pattern at each stud location, which seemed to work very well as the shelf is quite sturdy.Depending on the size of your shelf, you’ll need to drill at least one pilot hole in each stud location as close to the bracket bend as possible in order to secure the shelf to the wall properly and retain maximum bracket strength. This is because the bracket is flexible, and drilling away from the bend will cause the bend to ripple, move and/or pull away from the wall once anything significantly weighted is placed on the shelf. The trick to drilling these pilot holes (the ones closest to the bend) is to account for the width of the head of the screw you plan to use. Ideally, you’ll want these pilot holes to be placed so that the side of the head of each screw nests snugly against the underside of the horizontal surface of the bracket. Measure carefully and mark each hole location with a center punch before you drill. This will center the bit and minimize walking.Once the pilot holes are drilled you’ll need to secure the bracket to the wall. The bracket is conveniently large enough to allow you to easily place a standard framing level on it while hanging. I recommend securing one side of the bracket first using one screw, leaving that screw somewhat loose, then placing the level on the bracket, then securing the other side in the same manner once it’s level. This part might require a helper. I was able to do this alone by clamping the level to the bracket. Be careful that you don’t over-tighten the screws because the bracket is flexible and will bend in ways you don’t want it to. If you do this properly, the horizontal part of your bracket (the part that slides into the shelf) will remain straight (or straight enough). If not, the bracket will become wavy, kind of like a strip of bacon, and you definitely don’t want this. If this happens, back the offending screws out a bit until the bracket becomes straight again and the screw is still snug. Note that another cause of this bacon effect could be that your pilot hole is actually too close to the bend, and the head of the screw is forcing displacement of the bend itself. If this is the case, I recommend expanding the size of the existing pilot hole using a larger bit, which will accommodate lower placement of the screw. You’ll probably need to use a washer if you do this, however, which could introduce a clearance issue when mounting the shelf because the head of the screw might butt up against the back of the shelf, pushing it away from the wall. Not saying this will happen, just saying it’s something to consider. If it does, you can probably solve it by drilling a shallow hole into the back of the shelf at that location to allow the head to protrude without interference.Once the bracket is mounted to the wall, you’ll want to slide the shelf onto the bracket and test it again with your level, making any needed adjustments. The shelf must be secured to the bracket by driving at least two screws through the top of the shelf and through the bracket. You should not drill pilot holes in the bracket for these screws. The mounting kit comes with the required number of screws, and pilot holes are predrilled in the top of the shelf at the proper locations. The pilot holes are countersunk to allow the mounting screws to be driven flush to the shelf surface. This is not a standard feature of most floating shelves, and I was rather disappointed that this one required the use of exposed screws. However, I can assure anyone with similar concerns that these screws are as close to invisible as possible, and you really don’t notice them at all. I also appreciate that using exposed screws in this manner really is the best solution in terms of strength and stability. This is because each screw is used to sandwich the bracket in its mounting slot, making each joint as strong as it can possibly be. Since the sturdiness of this shelf is important to me, the aesthetic sacrifice is totally worth it.The second trick to this mounting system is getting this last part right, and getting it wrong is likely the reason some people have left less than charitable reviews. So be sure to follow the instructions carefully when driving these screws into the shelf. You’ll need to slide the shelf onto the bracket and center it. Then you’ll need to raise the shelf off the wall so that the bottom edge of the wood is tipped up and away from the wall but the top edge remains in tight contact with it across its entire length. You’re basically tipping the shelf up on the fulcrum of its top edge. You’ll want to raise it by the amount stated in the instructions, and hold it in that position while driving these screws into the top of the shelf and through the bracket. This will ensure the shelf has the tightest possible fit to the wall and eliminate any possibility of sagging. Again, you'll want to be careful to not over-tighten these screws. Drive them to the point where they are flush with the shelf surface, and no further. Once you release the shelf, it will settle down flush and be tight to the wall and quite sturdy.I have to say that we absolutely love this shelf. Yes, the effort required in mounting it properly is greater than it might be with other floating shelves, but in the end, we are very pleased with every aspect of it. Highly recommended.
Trustpilot
3 weeks ago
1 month ago