
☀️ Shade Your World in Style!
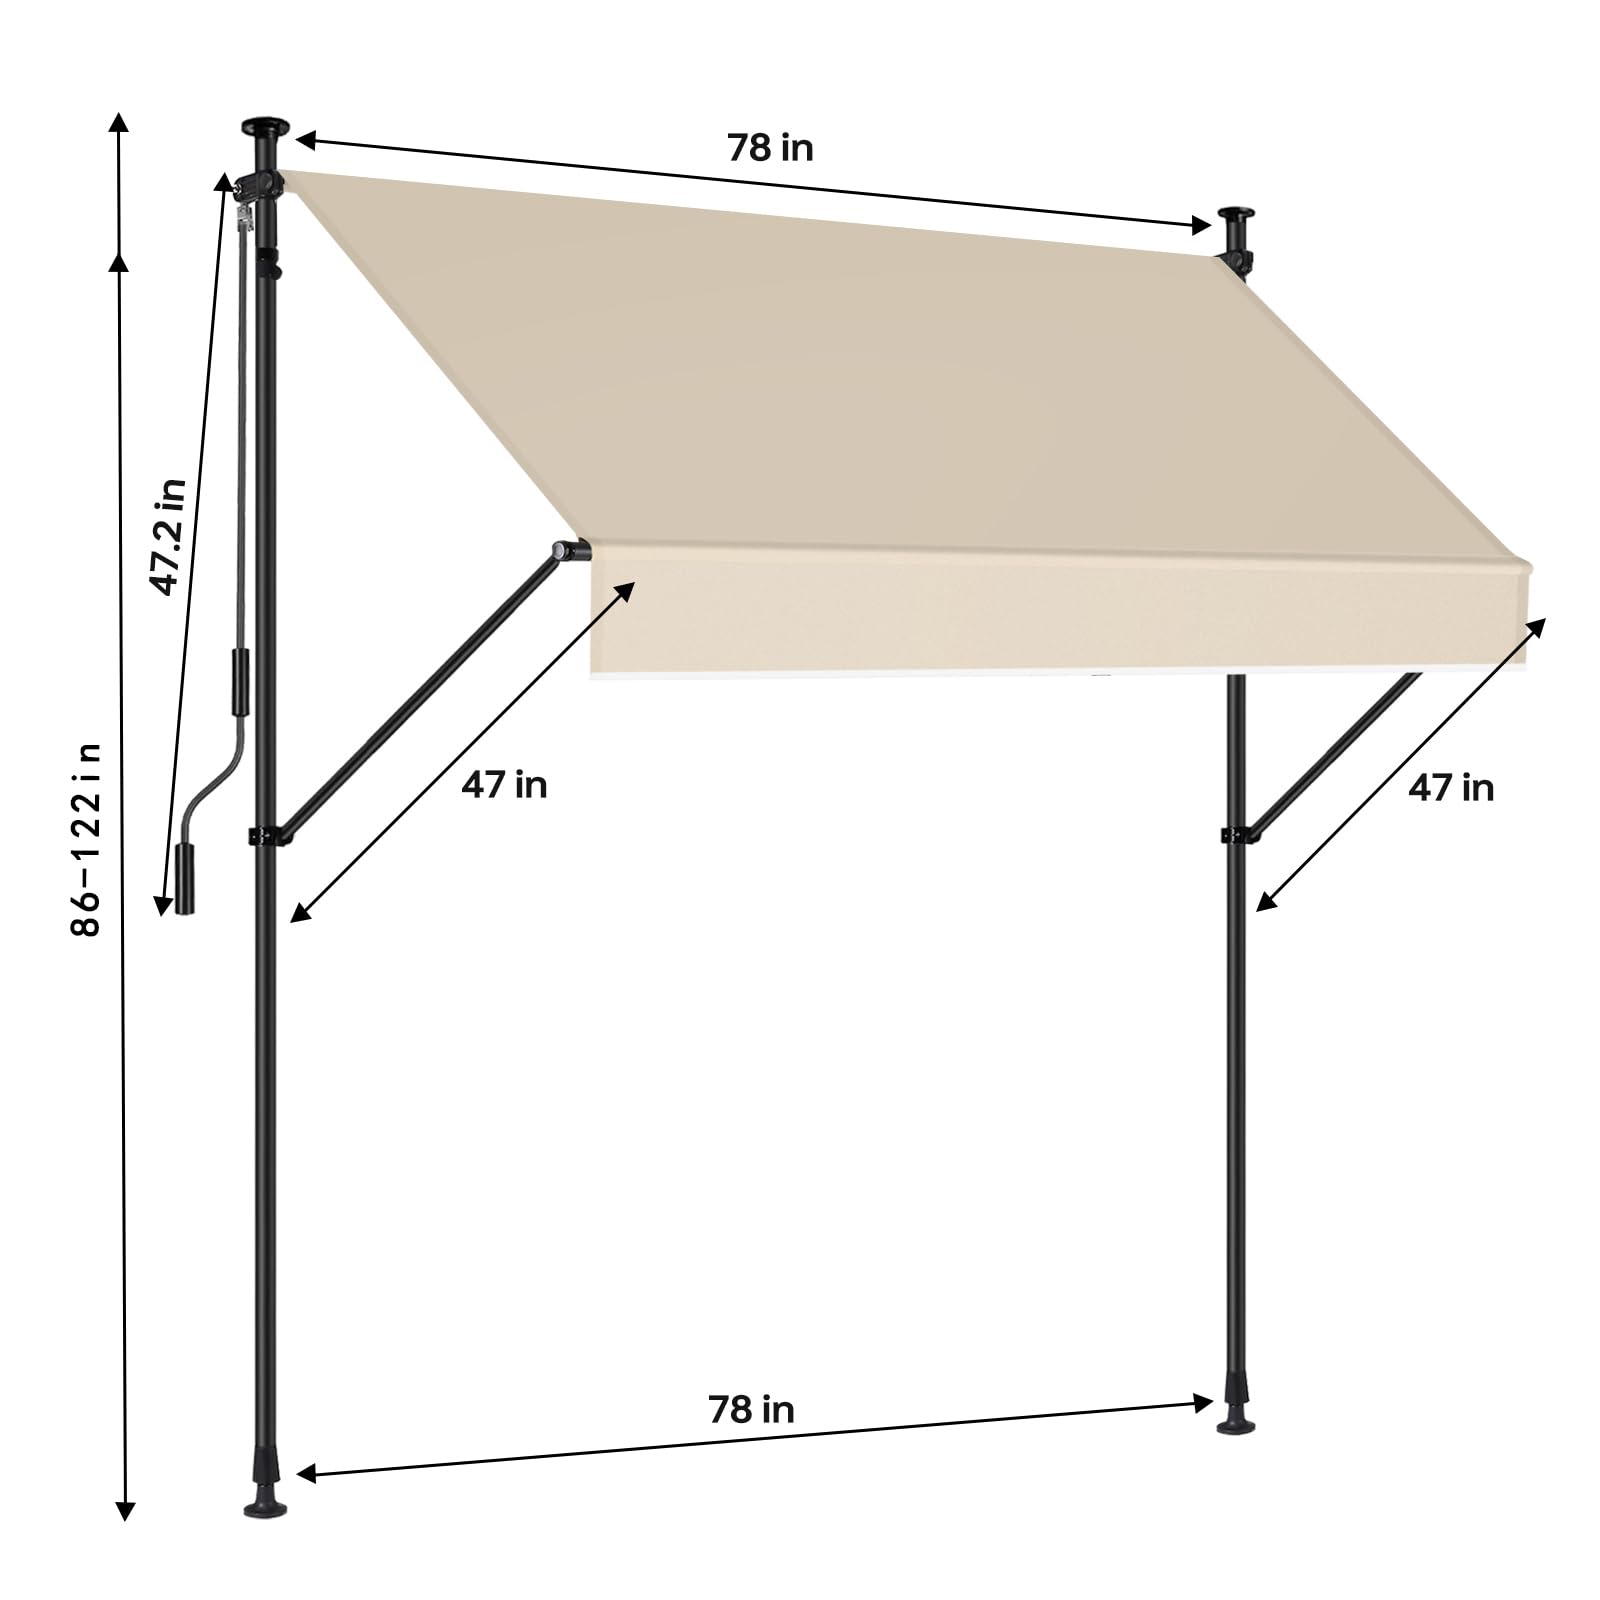
The JEKITO Manual Retractable Awning is a versatile outdoor sun shade designed for durability and ease of use. Made from high-quality polyester with a waterproof coating, it offers excellent UV protection and can withstand various weather conditions. Its sturdy aluminum and steel construction ensures long-lasting performance, while the smooth manual crank allows for easy adjustment. Ideal for both residential and commercial applications, this awning is perfect for creating a comfortable outdoor space.


| Size | large |
| Style | Modern |
| Pattern | Solid |
| Color | Cream |
| Fabric Type | Polyester |
| Material Type | Polyester,Steel |
| Required Assembly | Yes |
| Operation Mode | Manual |
M**Y
Good concept in theory...
BREAKDOWN OF INSTRUCTIONS/TIPS ON ASSEMBLY BELOW:My experience:The cloth reel tubes had misaligned screw holes, so I sent this first awning I ordered back and got a replacement. The screw holes on the replacement were still off, but less so than the first and I was able to assemble that time. That said, I never got my awning fully assembled and ended up returning instead of getting another replacement. I experienced many of the same assembly issues a lot of other reviewers did.PROS:-Good potential for renters; you don’t have to damage walls because you don’t need to screw it in to your building-reasonable price for what it isCONS: VERY DIFFICULT TO ASSEMBLE- parts have misaligned screw holes or are improperly sized to fit together without excessive force-poorly written instructions & parts did not have number stickers to correspond with instructions-no official instruction video that I could findASSEMBLY INSTRUCTIONS:I’m giving my version of the instructions from my experience trying to assemble this awning. Use mine in addition to the official manual. Their illustrations will be needed.BEFORE STARTING: This is a weekend project. Get a Phillips head screwdriver and/or power drill, some DW40 or other lubricant and scissors or a box cutter (optional: work gloves with non-slip grip). Prep a large, unobstructed area to work in. Get at least 1 other person to help, especially on the last few steps.1) Assemble the awning support rod by fitting posts 6 & 10 together. Many reviewers (myself included) had a lot of trouble with this. I had to use a lot of force and worried I was putting the wrong pieces together. Rest assured, these are the correct pieces, but I suggest using a lubricant if you’re having a hard time (I used vegetable oil). Even then, it will take some effort.2) Assemble the cloth reel by screwing together posts 11 & 12. Their illustration indicates you need 4 screws, but I only had 2 holes and 2 screws on mine. Instead of the tool they provide, use a regular Phillips screwdriver. If you find the screw holes are misaligned on these (like I did) and you’re having a hard time getting the screws in fully, use a power tool. Just be aware you could strip the screw heads if you do.3) Insert the support rod and wire into the channels of the awning cloth. The manual includes several notes with this step, which basically say not to push too hard or try to force the rod/wire if they get hung up. Be patient and go slow so you don’t accidentally tear the cloth. IMPORTANT: If you used a lubricant while assembling the support rod like I suggest, make sure to wipe off any excess before putting the rod in so it doesn’t stain the cloth. You may want to let the rod dry overnight to be safe.4) Unscrew and remove both end caps from the cloth reel. Notice the channel (or groove) running the outside length of the reel. Starting at one end, insert the part of the cloth with the wire in the channel. Gently pull both the cloth and wire through to the other end, until both sides of the cloth line up with both ends of the channel. You may need to trim excess length off the wire. Screw the end caps back on, then roll the cloth up around the reel and set the whole thing aside.5) Each leg has 3 sections: the bottom posts (18), the middle posts (20) which include the awning arms, and the top posts (17) which have multiple holes for height adjustment. You’ll also need the Hand Rocker (19), the Pipe Clamp (13) and the two Head Covers (5). You might also need lubricant for this step.CAREFUL OF SHARP EDGES. The arms on the middle posts have rubber end covers, but they may not come with the covers on. I needed to put these on myself. Best to do this first before assembling the legs.To assemble the first leg, get one of each of these parts: 18, 20, 17 & 5. Also grab 13. Attach the bottom and middle (18 & 20). Then attach the middle and top (20 & 17). Then, attach the Pipe Clamp (13) on the top. Finish by putting the head cover (5) on the top. For the second leg, use the same parts and steps, except you'll attach the Hand Rocker (19) to the top instead of a pipe clamp.6) After assembling the legs, position them where you plan to set up the awning and adjust their height. This step is very similar to what you do when you install a horizontal tension rod, like for shower curtains. Use the knobs (3) and butterfly knuts (4) to secure the legs at the desired height. Make sure the legs are spaced the correct width apart and that the pipe clamp (13) and hand rocker (19) are sitting at the same height.7) Attach the ends of the cloth reel to the hand rocker and pipe clamp by using gaskets (8) and large box nuts (7). Check that the set-up stays steady when you unroll the awning cloth.8) After fully unrolling the awning cloth, attach the arms (which swing out from the middle section of each leg) to both ends of the support rod using knobs (2). Prop the awning up and check the tension of the cloth. There shouldn’t be any sagging.9) With the awning fully assembled, make any adjustments as needed, such as the position of the legs in relation to the length of the arms/position of support rod, adjust the position of the hand rocker or pipe clamp as needed, and adjust or tighten the legs as needed, etc.To wrap this review up, please use my instructions in addition to the actual manual, not as a replacement for it. While I did try to provide better wording and description than I feel their manual gives, there are some details in the manual I did not include. Also, as I mentioned, I never got my awning fully assembled, so please take my re-writing of steps 7-9 with a grain of salt.
K**S
Great for a West Window or just for Privacy
I have a room like an oven and with this beauty installed it is now back to being a usable room. The big window is on the west side of the house and with the sun hitting it the room could not be used because it was so hot. This was easy to install but it did take some reading of the directions. Mine is attached to the house withe brackets at the top just to make it more secure but it would stand without them easily. It will not take a hurricane not will it handle snow but it is very easy to roll in and out as needed. Everything on it besides the width are adjustable so it could pretty much fit any situation.I am disabled and I can handle the two I have installed easily by myself. I will only write good reviews on things that are highly functional and well made. This is the reason for this review.
D**S
works well
It is taller than expected and a bit complicated but works ok.
P**Y
No instructions! Updated review
I ordered this and when it came it was missing pieces and there were no instructions, only a parts list. I sent it back and had another one sent. This time I did get all the parts but still no instructions. It is not easy to put it together without the instructions but I really did not want to go to the trouble of sending another one and back and sending the instructions apparently was not an option. I watched both videos that are available and that was some help. For the most part though it was trial and error. I would not recommend this product from this manufacture. However, once it is together it does do what it said it would do and I am not unhappy with the final result.UPDATE. The company contacted me and acknowledged that they had been in the process of creating new instructions. They sent me a copy of them and they are amazing, very well done. This will help greatly. They also offered me a refund. I am impressed with the company's efforts.
L**N
Assembly is a challenge, result is surprisingly good
This would have been a 4- or 5-star product if not for the awful directions. At least one person I know is buying one after seeing how mine turned out.The idea of a no-drill retractable awning seemed like a godsend for renters like me with west-facing exterior walls that get blasted with hot afternoon sun all summer. Then wind picks up in the evening, so I needed something that was easy to take down or retract.Once it’s all the put together, the end result actually feels like it lives up to the promise, but there are some caveats:—When extended, awning supports can block walkways. Highly depends on the specs of your area and the clearance you have to work with. Everything is adjustable, but you may find that the angles you need for the awning to retract and extend fully result in an obstacle that people have to walk around, rather than an overhanging shade.—Haven’t tested in rainy conditions yet, but it feels like the awning fabric will need some extra waterproofing for rain to roll off it.Other than, see my photos for notes! I’m very happy with it and may upgrade my rating if it wears well over time. I personally would not trust the wider version to be as sturdy as the narrow one I got, and might eventually get a second one to put next to the first.
Trustpilot
1 month ago
1 day ago