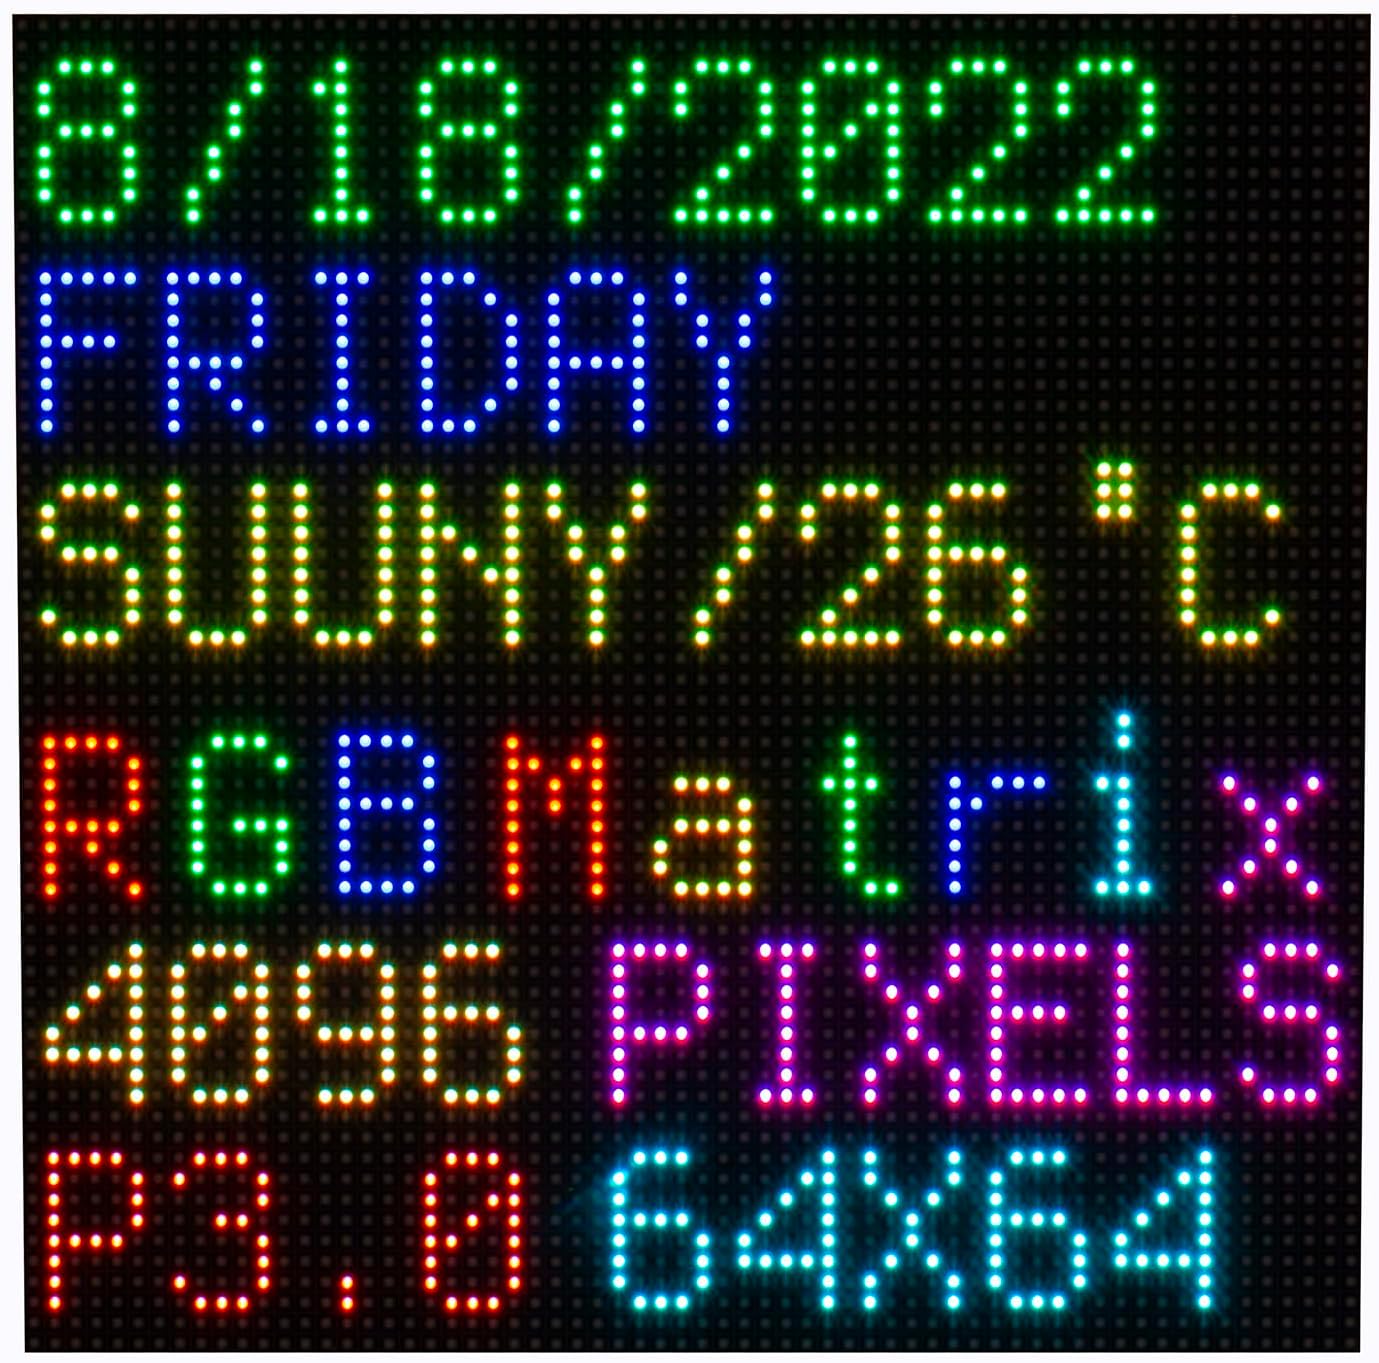
🌈 Illuminate Your Imagination!
The 64x64 RGB LED Matrix Panel is a versatile display solution featuring 4096 individual RGB LEDs, a 3mm pitch for stunning clarity, and dual HUB75 headers for easy connectivity. Ideal for DIY projects with Raspberry Pi and Arduino, this panel offers adjustable brightness and comes with comprehensive open-source resources to help you create eye-catching visuals.
B**N
Works with the Adafruit MatrixPortal
This 64x64 panel is almost plug-and-play with the MatrixPortal. There are three things you must do to get it working in an Arduino environment:1. Add a solder blob for Pin 8 for the Address E Line Jumper on the MatrixPortal board.2. Assure that the address pins array reads like this: uint8_t addrPins[] = {17, 18, 19, 20, 21};(The "21" is in the example sketches, but it's not present in the "simple" example described in the "Adafruit MatrixPortal M4" guide, as of 12 December 2024.)3. When creating the Protomatter object, the number of row-select address lines should be "5". The configuration should read:(64, 4, 1, rgbPins, 5, addrPins, clockPin, latchPin, oePin, false);
I**2
Perfect
I have 20 of these bad boys interconnected with a custom emulator.Now I can play Pac-Man on a 65k LED display, the way god intended.
R**T
Promising project material!
I'd hoped to wire mine up before review deadline, but real life intervened.The physical panel is rigid and not bendy. The provided magnetic/screws would make this easy to mount into a frame.Before this panel, I was unfamiliar with HUB75 but spent a lot of time studying the electrical and signaling protocol and other projects in this ecosystem. The interface is well documented (start at GitHub, of course) and there are provided cables both for connecting this to a micro that provides 5V TTL interface (which are pretty rare these days) as well as a 'downstream' cable that allows you to chain many of these together, just chaining the device latch strobes. Several companies like Adafruit offer interface boards that handle the 3.3V from your tiny SBC (Pi, Pine64, Star64, VisionFive, etc.) to the 5V that this device claims to need. Those "hats" or "shields" can also help shave off some of the ugly timing requirements if you're trying to feed a large quantity of these in an animated motion, panning, or scrolling.The business end of these seems to be D7258 that drives a bunch of blinkies from a low number of signals, while also handling ghosting and allowing a refresh rate beyond what you could get with just a few data bits and a strobe.Apparently, it's common wisdom with these that if you're planning a project that'll need a few of them, that you should buy the panels from the same company and try to get them matched from the same batch/datecode so that the color calibration will match.I'm granting it five stars for containing exactly what it said it'd contain, being a reasonable value when compared to comparable products on Amazon, and whetting a curiosity on how I'll control one of these (can I do it with only 3.3V outputs? Can I do it from a BluePill class CPU? Can I put one on the wall as an animated clock, perhaps feeding data from MQTT to remind us when it's late and the EV needs charged overnight?)I'm looking forward to playing with this panel more and may come back to this review with pictures of my creation later.
B**N
More work than I was expecting
Well, this was a learning experience. I'm not a hardware guy, so I got this expecting to use it like I have with smaller matrices in the past. Turns out that is not the case. I should have realized that it would be different controlling 4096 LEDs.First of all, there are a lot more wires to connect. I hope you like soldering. I'm awful at it because my hands shake, and my eyes aren't the best. There are hats/shields you can buy, but all the ones I have found also require soldering. Just not as much of it.Also, this requires a lot more power. It's 4096 LEDs after all. Make sure you have a good power supply. I'd suggest 5 amp minimum. And it also takes more processing power and memory. The panel isn't that smart, so you have to constantly refresh it in order to keep a display going. I was hoping to use my ESP32 for this, but I won’t be able to. There are some cool GitHub projects, but they either require certain ESP32 models or are more limited than I would like.I winded up connecting it to a Raspberry Pi. Adafruit's tutorials were invaluable for this BTW! And it works great. The panel looks amazing and is just what I needed for my project. I just don't know that I want to dedicate a Pi4 to it. Raspberry Pi devices are so hard to get and expensive right now.
K**H
The possibilities are endless! A must have for tinkerers.
It took me a while to work with this matrix because it took forever for me to find a Raspberry Pi. This thing is dope!I've been seeing various retro clocks or displays across Amazon, but they were all too expensive for what they did. This panel however lets you do whatever you want to the limit of your abilities to program, or at minimum finding other people's work to mess around with.My unit didn't come with documentation, I had to search for it online and I'm glad I found it before I started tinkering. It winds up that some versions of this panel have the polarity reversed in error, so make extra sure that you're connecting your power correctly.If you do a search for "64 x 64 5362 panel" you will find plenty of ideas for using the panel, and if you toss the word "git" in there, you'll also find repositories of others who made their own programs, or modified others, to work with the panel. Be warned, working with this panel will be a time suck, but it's worth it and kind of fun.
Trustpilot
1 month ago
1 week ago