
DOWNLOAD THE APP


Customer Services
Copyright © 2025 Desertcart Holdings Limited
DOWNLOAD THE APP

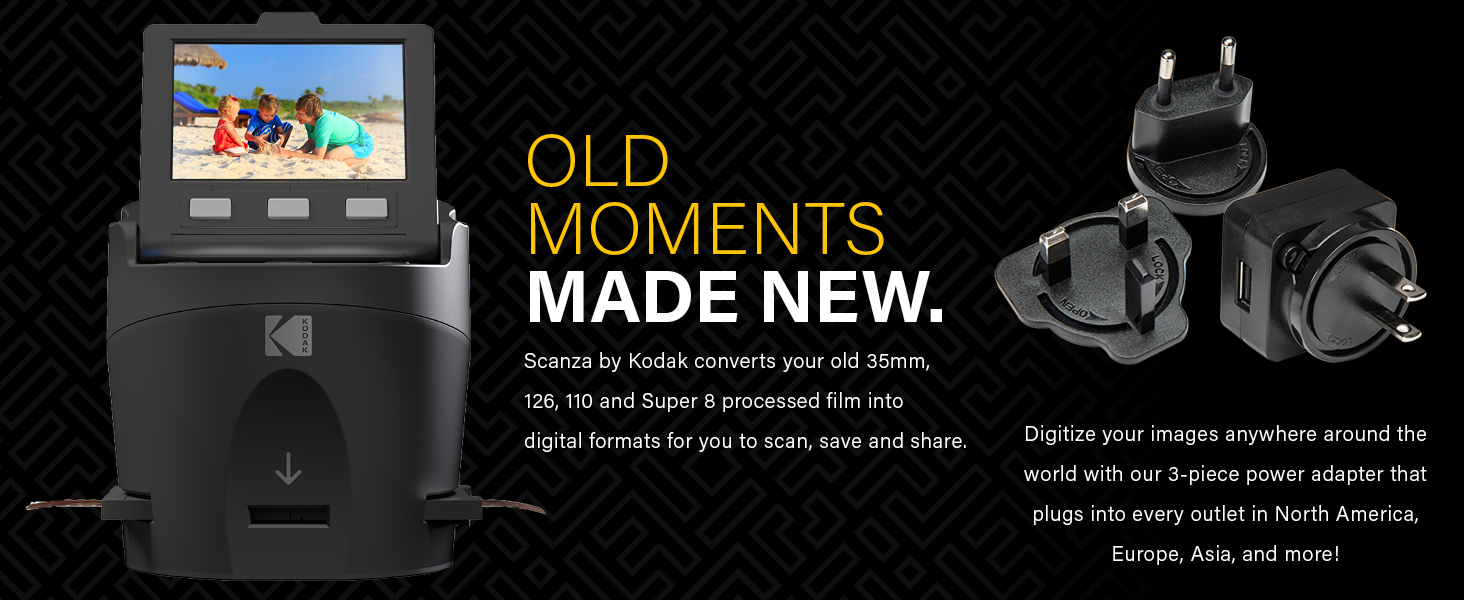
🎞️ Digitize your past, own your memories—Kodak Scanza makes nostalgia instant!
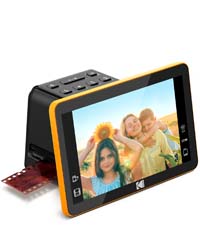
The Kodak SCANZA Digital Film & Slide Scanner is a versatile, easy-to-use device that converts multiple film formats (35mm, 126, 110, Super 8 & 8mm) into high-quality JPEG images using a powerful 14MP sensor with optional 22MP interpolation. Featuring a bright 3.5" adjustable LCD for on-device preview and editing, it includes all necessary adapters and cables for quick, flexible scanning. Ideal for professionals and enthusiasts eager to preserve vintage film memories with speed and convenience.


| ASIN | B00O2BU8PK |
| Best Sellers Rank | #16,834 in Office Products ( See Top 100 in Office Products ) #6 in Slide & Negative Scanners |
| Customer Reviews | 4.2 4.2 out of 5 stars (11,574) |
| Date First Available | November 28, 2017 |
| Is Discontinued By Manufacturer | No |
| Item Weight | 1 pounds |
| Item model number | RODFS35 |
| Manufacturer | Kodak |
| Product Dimensions | 4.72 x 4.72 x 5 inches |
M**Z
Great unit, great price
I bought this unit not expecting much, but was pleasantly very surprised with the way slides scanned and looked on my 55" television. For slides with good exposure, contrast, dye color retention, and focus the results were great and exceeded my expectations. It should be noted that slides may degrade over time and have severe color shifts if not stored correctly. I had many slides with a blue/cyan cast that were not stored correctly, and many that were outright destroyed by wet basement storage. But if your slides are good you should get very pleasing results. If your slides are in metal frames from a previous projector be sure to check for rust deposits. If deposits are visible scrape clean with a utility knife and blow off slides with a squeeze bulb puffer. I fed a few slides with rust deposits into scanner and scans became very dirty. I found unit was very easy to clean but I DID NOT use the little scrub brush supplied, I was worried hard rust particles might scratch the scanner lens. So I decided to try my squeeze bulb air puffer in the slide slot; one or two quick puffs and all dust and debris were gone! People also complained slides are a bit tricky to load, which is true. I found my slides had bowing from being stored in the metal projector frames, and that if I manually bent them straighter they fed MUCH better. All I have done so far is to scan slides, but scanner is worth every penny to me. Scans are captured very quickly, and all I had to do was use default settings, a breeze to use. I think the editing scanner settings might help some in getting better scans, but I think you can do much better with computer software after capture. I purchased my Scanza from DBROTH and it arrived quickly, but unit was packed very poorly, loose, rattling around in a bigger box with no padding. I was lucky, unit was not damaged, but I would not buy from this source again. See sample scans
R**Y
Great Way to Convert Slides and Negatives to Digital Files
I inherited my father's voluminous collection of color 35mm slides which sat in the basement for 70 years. Reaching back to the early 1950's only a few years after my father returned from the war, he took up photography in the Army as part of the Signal Corps and then continued informally when he returned home. The problem? I have no slide projector to see any of these, and never really relished the idea of purchasing one (I do all my photography in digital). Thus, these pictures, with all the memories they hold, have stayed in the dark without anyone seeing them. That's where this handy little device comes in. I wanted to easily digitize these slides so at the very least I could look them over, and possibly even find some gems that I could print and share. The thought of the work involved in doing such a task kept me off from doing it for two decades until I ran into this little Kodak device. Yes, it still takes time, and will indeed take time, but once you learn how to do it, you can rip through slide digitization at a pretty good clip. You plug the device in, hinge the screen so it is at the correct angle for viewing, and pop in an SDXC card into the back slot. Turn it on, set a couple of quick settings to tell the machine what type of media you are using (35mm slides, film negatives, etc.) and you are ready to go. The unit comes with a number of plastic holders that you slip into the side of the unit and then you simply slide your slides or negatives into the device. When the image shows up on the screen correctly centered, you press one button and either a 14 or 22mp screen capture (depending on your settings) is made and automatically stored on the SDXC card. You just continue this process until you are finished or are ready for a break, etc. The image scan is pretty good and while I would not pretend to say this is a high-end professional scanner, it does a more than adequate job for tasks like I've described above. There are adjustments for color, sharpness, etc. if you wish to make them. The real benefit to this unit is the ease in which it allows you to conduct the conversion process, turning an unpleasant and lengthy task into something much easier. When you are done, you simply eject the SDXC card and insert it into your computer and copy off the scans. From there you can use any photo editing software to adjust the image (images are saved as jpg files). The quality of the device itself seems good and sturdy, and I don't expect to see any problems with its use over time. The unit makes no noise and does not seem to get warm during use (probably uses an LCD-based light for scanning) and looks nice enough that you can leave it off on the back of a shelf without it looking obnoxious. I'm glad I found the device and can easily give it five stars! Note: If you are in a situation like me, your slides or negatives will be dusty and dirty from years of sitting around. Do some online research on the correct way to clean slides and negatives because you will want to clean these before you scan. If you scan the slides in a dirty condition, all the dirt and dust will show up on your photos.
C**E
Easy to use. However, The color of the slides is slightly washed out no matter how much I tried to adjust the color.
G**.
Ho comprato il Kodak Scanza per convertire delle vecchie diapositive in formato più moderno. È facile da usare, all'interno della scatola sono presenti tutti gli inserti per convertire vecchi formati (compreso il Super8). Una volta presa la mano il processo è semplice, mettendo anche una diapositiva una dietro l'altra e premendo il tasto per catturare l'immagine su schermo. Il risultato è soddisfacente e di qualità buona. IMPORTANTE: Per salvare le fotografie convertite, è obbligatorio utilizzare una microSD. L'entrata USB presente, infatti serve soltanto per collegare il Kodak alla corrente e non può essere utilizzata per mettere una penna USB o simili.
J**D
Very simple to use - inserting slides very efficient. Gives clear pictures and colour editing simple to use at time of copying. Easy to review saved slides. A great way to digitalize hundreds of old slides.
D**.
• I had read many reviews before buying so I had a fair idea of what to expect. • As noted elsewhere, the Scanza is not a scanner. It makes a digital image of the slide. • Note that I've used it only with 35 mm slides. • It took a few seconds to figure out how to assemble the power adapter. There are outlet configurations for what I assume are various international outlets. • Other than that set up was very simple. Set it up, plug it in, and start using. • You do need an SD card. 32GB is more than enough for me. • The USB cable connects to power, or to a computer to upload pictures. When connected to a computer you cannot scan new images. You can also transfer images via the SD card. • Other reviews say the process crops the slides. I don’t see much, if any, cropping. • Quality is not great. There are colour adjustments and brightness controls, but I found it easier to tweak in the pictures Photoshop elements. With that I get adequate results. I’m making pictures to share with family, not for an art show. • I love the quick push-slides-through process. • I had a flatbed scanner with a slide adapter but it stopped working with a Windows upgrade. I like that this is independent of Windows. • To connect to a TV or monitor, it seems to work best to connect, then then power on the Scanza. • As noted in other reviews, I see no benefit to using the 22 MP format as opposed to the 14. • If you delete all the slides on the SD card, the numbering does start again at one. If you leave one image with the highest number so far, then the next scan would be that number +1.
E**N
Absolute Kaufempfehlung. Ich habe heute am Lieferungstag bereits innerhalb von 2,5 Stunden rund 700 Dias gescannt. Alles absolut selbsterklärend und leicht verständlich. Speicherkarte rein, Format und Filmtyp wählen und los geht's. Die Qualität der Scans überzeugt mich sehr. Ich habe bereits sämtliche Stärken der Diarahmen gescannt und kann die Probleme der Vor-Rezession nicht teilen, alles komplikationslos möglich, wenn man den richtigen Schubkasten wählt. Auch die Übertragung auf den PC klappt im Handumdrehen. Ich würde dieses Gerät jederzeit weiterempfehlen.
Trustpilot
1 month ago
4 days ago