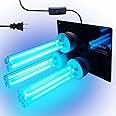
✨ Breathe Brilliance: Transform your HVAC into a germ-free sanctuary! ✨
This 90-watt UV-C lamp is designed for whole-house HVAC duct installation, delivering powerful, ozone-free germicidal light that destroys mold, odors, and airborne pathogens. Easy to install in 15 minutes with included templates, it ensures continuous purification and improved indoor air quality, certified by the EPA for trusted performance.
| Color | Black |
| Brand | BAIMNOCM |
| Product Dimensions | 9"D x 8"W x 4.6"H |
| Filter Type | UV Light |
| Controller Type | Button Control |
| Wattage | 90 watts |
| UPC | 768399366274 |
| Manufacturer | XLT |
| Part Number | Duct Light |
| Item Weight | 2.51 pounds |
| Country of Origin | China |
| Item model number | Duct Light |
| Item Package Quantity | 1 |
| Style | 90W |
| Material | Quartz |
| Included Components | UV bulb |
| Voltage | 110 Volts (AC) |
| Specific Uses | Duct sanitizer |
| Special Features | Duct uv light |
| Batteries Included? | No |
| Batteries Required? | No |
P**A
Love that the air actually smells different when it comes out the vent
I installed in my HVAC by slicing and dicing an area. Was a tad tricky figuring out where to put it exactly, but I just followed where the air left the unit (oh, those are the ducts that lead to the rooms... those are sending air out into the house... need to install the light before those ducts spread into the house, got it!).I have a small piece of tape over a hole in the area I installed it so I can barely see light through it. But seeing it helps me make sure they're still on. So that's a good thing. Supposed to last a year. Hoping they last longer.We do feel better. I believe it's doing its job. I've had very, very few sneezing attacks. It's great. Wish I found this years ago.
M**S
Does a good job. notice a difference
We have two dogs and a lot of dander/dust in our system. I change the filter out monthly but notice towards the end of each month, I can smell musty/dog smells. now with this light, significantly better.for installation, I decided to cut a big opening for all 3 lights to go in. makes it a lot easier than following the template. I think sealed up around the mounting plate with duct tape. all good.
A**S
False Advertising!
I bought this, probably like many who have, because of the advertised wattage - 90 watts, it proudly proclaims throughout its ad. I was hoping to get the strongest UV-C unit I could for a large HVAC unit prone to mold.Unfortunately, upon unpacking the bulbs from the packaging, I was dismayed to find they were only 25 watt bulbs, for a total of 75 watts.Why the need to LIE? It’s a decently made contraption for a decent price - at 75 watts. Why the need to falsify their products performance? And poorly as well - the same company sells this bulb on their website and lists it truly at 25 watts. It cost $17.So…$17 times 3 bulbs = $51, which means I paid $18 for the metal plate and light sockets.I might could purchase more of the 36w e26 bulbs I already owned and put them in the unit, making it 108 watts, but I’m not sure they will fit. They are shaped like this units bulbs, only significantly bigger.I wouldn’t trust this company after this. Says their from Massachusetts, but the box and printing on materials looks like it came from China. Probably a shell company.Beware
A**R
UV LIGHT LIFE SAVER
We have been using it since hurricane Helene flooded our home. My husband says it works great. We passed the test for air quality and mold free.
A**R
Quality product
The directions don't ell you what size hole bit to use to drill holes. When you measure the template, they're 1 1/2 inch, so that's what I used and the holes were too small. You need 1 3/4. Otherwise, no problems
C**I
Can be installed in inaccessible duct work.
1. Unless you have the right 2" hole bit, Dremel and proficiency in its use is a big plus.2. After eyeballing the center and height I wanted, I used the plate-not the paper guide (although you could use it to make it easier to find the center of your holes) and made my first pilot hole with a drill, using a 3/32 drill bit, and put my first screw in through the plate, but did not tighten it all the way.3. Then I leveled the plate and drilled the second pilot hole and then screwed in the second corner screw, again, not tight, this allowed the plate the lay flat against the ductwork.4. I drilled the three remaining pilot holes.5. Marked the center of of each circle (3 not 2) and mark a 2" circle, because the whole unit needs to clear the holes when inserted, and the light bulbs are 2" wide at the widest point of their bases.6. If you have a 2" circular hole bit for metal, this part goes real quick. I didn't, so using a Dremel circular saw bit, I roughly cut each hole.7. Using A Dremel metal grinding bit, I shaped each hole to roughly 2".8. Enlarge the viewing hole with a 3/36 drill bit.9. Insert the completed UV unit through the three holes and make any necessary adjustments.10. Screw in the four corner screws to snug--do not over tightened.11. I plan to keep the unit on 24/7 and turn it off during the warmer months, when not using the furnace, to stretch the bulbs to two years (9,000 is 375 days).
G**O
Great product
Easy to install smell different now
J**.
Good product
Good product easy to install fast response from the seller.
Trustpilot
1 month ago
2 days ago