


Full description not available
E**B
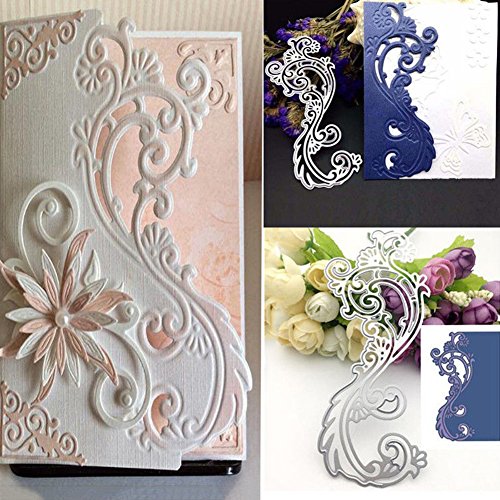
works just like the picture shows it does
This is a beautiful die if you use it properly. It is an edger die- It cuts completely out only on one side as shown so you can put a fancy edge on your piece. It is wonderful for edging fancy cards. You must emboss it after it is cut- with an embossing matt in your die cutter machine and it must still be in the die to get the embossing detail. I have never had any problems with this die and it makes lovely cards! It is disappointing that this product is getting bad reviews from people who confess they don't know how to actually use it. hydeparkhill on etsy.
J**Z
Works well on Cuttlebug or Big Shot and 80 lb cardstock!
I read all the negative reviews for this die, figured out why people were having problems with it, then ordered it - I'm so glad I did! It works beautifully on my Cuttlebug and on my Big Shot, on 65 lb and on 80 lb cardstock with no problem. This is a 2 step die - you first cut it out, then you emboss it. There are cutting ridges only along one long side of the die - the other long side is the embossing side. It only takes 1- 2 passes through the die cutting machine to cut it out. If it doesn't cut out right away, use a metal shim (Amazon sells them). My Cuttlebug sandwich for cutting: A plate, metal shim, C plate, die with cutting ridges facing up, cardstock, and B plate. Make sure the cutting ridges are exactly where you want the cut edge to be. Then change the sandwich for the embossing: make sure you leave the die in place on the cardstock! A plate, B plate, embossing mat (also found on Amazon), cardstock with the die on top of it (so the die presses the paper down into the mat), and B plate. If you use Washi tape to hold the die in place on the cardstock, use it only along the cutting edge - the die works so well that the tape is hard to remove and might tear the paper. By placing the tape where extra cardstock will be removed anyway, you won't damage the final card.
S**.
Try It with INK!
This is a beautiful die that cuts and embossed at the same time. Cutting is easy but I’d like the embossed part to be more defined. I tried shims and embossing mats but wasn’t satisfied. What I love is that if you use ink on the back of the die and then run it through the big shot machine it cuts and prints the embossed parts beautifully !
A**S
It is a really pretty die for a card
After taking a real close look at the card and die I realized that the whole die does not cut, only the top part and 2 swirls on side bottom, It is a really pretty die for a card. I used my Magnetic Platform and 2cutting plates and ran it thru my Grand Calibur .
L**S
No embossing definition!
Originally I posted there was no embossing definition...but I found out I was not completing the process. Embossing has to be done after die cutting...Now, I love it!
R**8
Makes a beautiful, intricate design on edge of a card
It took me a couple of tries to get the die image to look like the one in the photo above. Using my Cuttlebug, I added a piece of paper on top of my cutting plates to get a perfectly crisp cut. I also ran it through the machine three times. Then when I embossed it using the standard embossing plates with a rubber mat, I added two pieces of paper as shims, and ran it through twice. Doing this made a deeply embossed design that looks beautiful! I also made another one and cut the most intricate part out to use as an accent on another card. Great die!
W**O
See Creatables Dies - Anja's Border Elegant Marianne Design LR0344 on 123 stitch for a better look.
This is strictly a die cut, it does not work as a border as shown on website, it fully cuts thru the paper, i can see on my die that is has the ridge all the way around and it should not. the real product shown on other website you can see that the ridge is not there. See Creatables Dies - Anja's Border ElegantMarianne Design LR0344 on 123 stitch for a better look.
T**S
Not for beginners
I have the extra pad and plate needed to cut this die and it was difficult. The die is part die cut and part embossing tool. It also bent and will eventually break. Take a look at the pictures in the description, you can see what is cut and what is embossed. As others have mentioned it is a 2 step process.
Trustpilot
2 days ago
3 weeks ago
