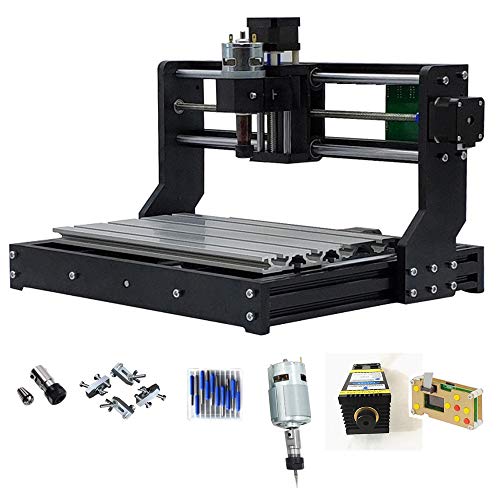

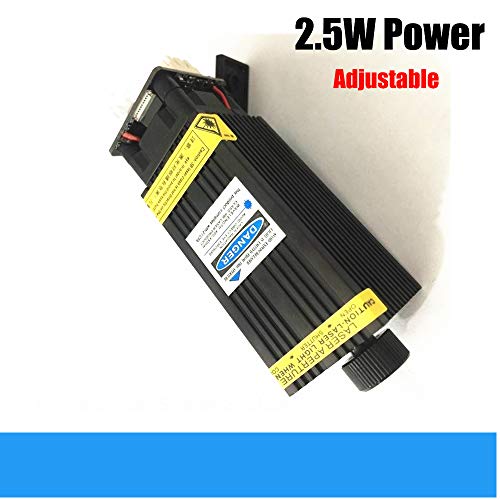

OVERVIEW [Software & Documents Download :] https://pwproducts.oss-cn-shenzhen.aliyuncs.com/CNC-3018PRO_EN_LY.rar This Kit includes all the necessary parts for you to Do It Yourself to assemble. Interesting, Joyful and Effective. Engrave both on Drill and Laser by a easy swift, managed by GRBLcontrol and laserGRBL software DO NOT regard this kit as those engraving machine for industrial use.. IMPORTANT NOTES: 1. NEVER have the laser head to point at people, nor human eyes, wear glass as working. 2. Strictly forbidden to let people's skin contact laser. 3. Children under the age of 14 are not eligible for this product. 4. Due to laser cutting, there will be sharp edges in the shell, So take it gently and prevent the scratches. 5. NOT for engraving on Metal, glass, crystal, transparent or translucent stuff.. SOFTWARE DESCRIPTION : - Control Software: GrblController (inclusive) - Laser Control Software: laserfire (inclusive) TECHNICAL DETAILS -Working area (Table size) 300 x 180 x 45mm; -Supported windows xp, win 7, win8, win10 ; -Supported graphic plt, bmp, jpg, png, tip, pcx, tga, ico, dxf ; -Drill bits: diameter 3. 17 mm, tip 0. 1mm; length 30mm, 20 degree ; -Voltage: 110v / 220v ; -Interface: USB ; -Screw: t8 t-screw stainless steel lead screw diameter 8mm ; -High quality stepper motors: 3pc two-phase step motor 1. 3a 0. 25nm ; -Power consumed: 24v 5. 6a power adapter ; -Laser spindle with diameter of 45 mm ; -Adapter for different standard ( US, Eu, UK Au) ; -Material cnc: Non-Metal as Pcb board, acrylic, plastics, woods ;. WHAT'S INCLUDED 1 x ONE SET of DIY staff for cnc router 1 x 2500mw blue light laser module 1 x google 1 x CD ROM disk for software and documents 10 x additional drill bits 1 x ER11 4 x Clamps
R**N
Very cost effective
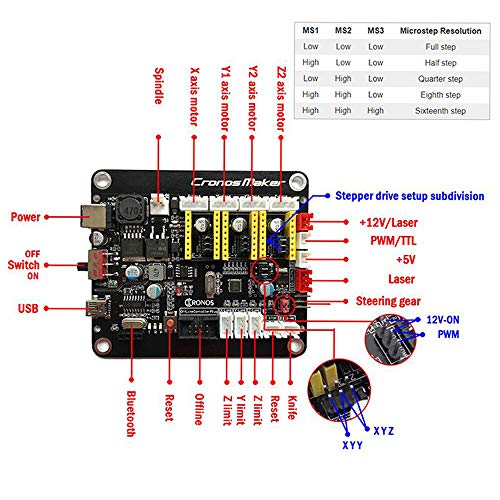
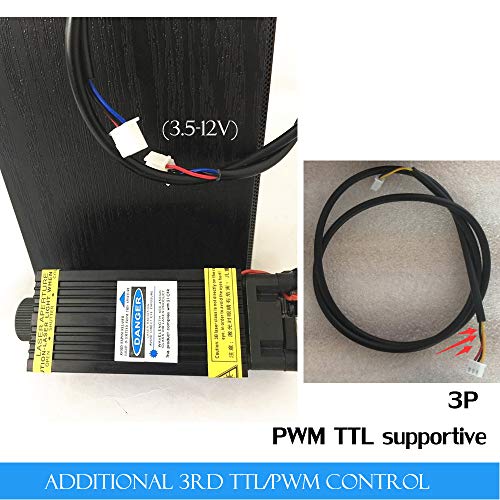
I would like to give this machine a 5 star rating but because the instructions are lacking important details I can’t.All in all the machine works very well and is a very sturdy design. It was easy to assemble despite one part substitution that had been made.Pros:The software and documentation are provided on a mini CD and on a USB drive.The ER11 collet did not require heating with a torch to install like some other CNC machines do.The X carriage, lead screw guide and linear bearing holders are all injection molded.The front and back plates as well as the X axis support columns are made of Bakelite not acrylic.Heat sinks are provided for the stepper drivers.A Bluetooth module can be added if desired (HC-05, HC-06, HC-08, etc.) I don't know if any apps exist to make use of this feature yet.Purewords was very quick to respond to my questions.Cons:It came with a European power cord. (I have a few spare US cords so this wasn’t a problem for me.)The instructions walk through the mechanical assembly but not the wiring. All that is provided is a picture of the control board with labels for the connectors. My kit included T slot nuts for the Bakelite columns and circuit board mounts that are not the style that can be inserted from the side of the slots as shown in step 3 of the instructions, this required partial disassembly of the base in order to slide the T nuts in place. This also affects installing the 20x20 rails for the X/Z carriage since the circuit board mounts to them as well.All the axis’s moved exactly 1/10 the distance they were supposed to out of the box (easy to fix though).There are no limit switches for homing the axis’s but that’s standard for all of these machines.That’s pretty much all the con’s I have.Adding wrenches for the ER11 collet would be a nice touch but I would think most people buying this machine would have wrenches.If you buy this machine verify what T slot nuts were provided and if they are not the type that can be inserted from the side of the rails they must be slid into the rails before completing the base and X carriage assemblies. This style T slot nut is not really any more difficult to use it’s just the order and method of assembly needs to be changed.I took care of the axis’s moving 1/10 the distance problem by increasing the steps per millimeter in the Engraver Master (LiteFire) software. The instructions say to set all axis’s to 80 but I had to set them to 800 which makes more sense based on the specifications of the stepper motors, stepper driver micro-step settings and lead screw. I also reduced the acceleration setting since the stepper motors would stall and make a lot of noise when I used the test size button with Engraver Master.The Y and Z axis’s moved in the opposite direction of what they are supposed to but that’s a common situation and is just a check box in the Engraver Master (LiteFire) software to reverse these. Note that the Y axis moves in the opposite direction of what you may think it should (Opposite of 3D printers anyway) think of it as the spindle moving instead of the table. All these settings are stored in the machine so using the offline controller, different software or a different computer does not require resetting these values.The missing wiring information that should be in the instructions is as follows:Run a stepper motor cable from the X axis connector on the board to the stepper motor on the right side of the machine.Connect another stepper motor cable from the Y1 axis connector to the stepper motor at the back of the machine.Connect the final stepper motor cable from the Z axis connector to the stepper motor on the X carriage.Spindle wiring is straight forward, the red wire plugs on to the motor terminal with the red dot next to it and the black wire to the other terminal, the other end of the cable plugs into the spindle connector on the control board. It may be necessary to pinch the slide on terminal with pliers as mine were very loose.Laser wiring, locate the cable with the 3 pin connector at one end and two 2 pin connectors at the other end and connect the 3 pin end to the laser. Connect the 2 pin connector with the Red and Black wires to the red connector labeled +12V/Laser and the 2 pin connector with the White and Yellow wires plugs into the white connector labeled PWM/TTL.The laser has a pushbutton switch that changes from low power only (Green LED lit) to full software control of power (Blue LED lit).The Laser and spindle cannot be connected to the control board at the same time.Attach the self adhesive heat sinks to the chips on the stepper driver boards. I recommend orienting them vertically so natural convection draws air through the fins.Note that the control board will power up via the USB connection but until the power switch is in the on position the router will not operate. In other words, if it’s not working; is it plugged in? Is the switch on?Free software that I use in addition to what is provided:Libre CAD, DesignSpark for 3D CAD stl files, 2D DXF files, jpg or png files, CAMotics simulator, dmap2gcode , Carbide Create to create G code (I used Shapeoko 3 machine selection), Paint.net, Notepad++ to view and edit g code directly.If you use DesignSpark to make DXF files make sure to orient the part as a plan view of the face of your part you want to mill.
E**E
Horrible Assembly Directions and Not Easy to Use
Had to watch 3 different YouTube videos to figure out how to assemble it. Parts went together easy enough.Still haven't figured out how to use it. Allegedy the company provides software that converts files into G-Code. Haven't been able to build a file to convert into G-Code. Contacted tech support and they said to use Inkscape whch is a program no longer supported. As it stands now, I have a neat looking desk ornament.
T**S
Can't beat the price!
The machine was easy to put together and works like a champ. If your not familiar with Cnc machines I suggest searching how to videos. It will make all the difference. For the price this machine has performed beautifully.
A**R
Not recomended for creative people
Hi! when i bout this engraver i did not expect much, it's made in Ch^#. But when stepper motors began stall random during work, it become a good doorstop after two weeks. No solution thay provide work in my case.
Trustpilot
1 month ago
1 month ago
