🛠️ Seal the Deal with Confidence!
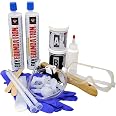
The RadonSeal Concrete Foundation Crack Repair Kit is a professional-grade solution designed for easy, drill-free application. This advanced two-component urethane foam effectively seals hairline cracks in poured concrete walls, providing a durable, waterproof barrier that accommodates natural movement. With a maximum gap fill of 0.5 inches and a tensile strength of 180 PSI, this kit ensures long-lasting protection against water and soil gases, making it the go-to choice for both DIY enthusiasts and professionals alike.
| Color | Grey |
| Brand | RadonSeal |
| Liquid Volume | 22 Fluid Ounces |
| Item Form | Foam |
| Maximum Gap Fill | 0.5 Inches |
| Surface Recommendation | Poured Concrete Walls |
| Tensile Strength | 180 PSI |
| Water Resistance Level | Waterproof |
| Number of Items | 1 |
| Manufacturer | Novion |
| UPC | 856255006058 |
| Unit Count | 1.0 Count |
| Material | 2-Part Expanding Urethane Foam |
| Part Number | 301 |
| Item model number | 301 |
| Is Discontinued By Manufacturer | No |
| Item Package Quantity | 1 |
| Included Components | repair kit |
| Batteries Included? | No |
| Batteries Required? | No |
F**4
Take the time to get it right. This stuff works! No more leaking basement.
Had a hairline crack in basement wall that seeped every time it rained--and it rains a lot in our PA location. Selected Radonseal polyurethane based on a lot of research and the recommendation of a friend who is in heavy construction (highway overpasses, bridges, etc.) He knew exactly what I told him about (Oh yea. We use that @#$% all the time!") A couple of key things I focused on prior to using the product was prepping the wall. I removed all of the material applied by the previous owner (without success), including epoxy paint, hydraulic cement, roofing tar, caulking, and whatever else--about 15 pounds of material from a bulge of repeated attempts. It looked so bad I originally thought the form blew out, only to find he just put more material on top of the old. Took it all the way down to the original poured wall which was flat, including grinding (a mess) to make sure I removed everything that was stuck on from before. I washed the,are with Dawn (a miracle product) dish soap and water, and when that dried, I washed it down with a sponge and rubbing alcohol to get it as clean as possible. In the area where it leaked the most, I took a small concrete drill bit, set the bit two inches from the crack and drilled 45 degrees every eight inches to intersect the crack (I know you don't have to do this, but I thought I could get more of the polyurethane back into the crack. Since the crack was not the entire height of the wall, I figured I would take advantage of the extra nozzles available.Before I started, I made ten 8" X8" mixing boards for the epoxy. You can only use about a 1/2 teaspoon each of the black/white epoxy before it hardens, so better to use less and mix more often. As mentioned by others, the wooden spreaders that come with the kit are too flimsy, so I used plastic knives (picnic utensils) that worked much better. Mixed it up, set the nozzles, then pasted the crack as directed. Waited a full two hours for the epoxy to set.I glued the nozzle to those ports that I had drilled over 2-1/2 feet of the crack, and placed nozzles over the crack as directed. Prior to gluing the nozzles to the wall, I washed it down again with rubbing alcohol, and used a heat gun to get it dry as possible.Used the water bottle provided, and flushed each nozzle and crack from top-to-bottom until clear water flowed. (Note, not all nozzles would communicate to the nozzle below it, but made sure every nozzle took a lot of water (the water is what causes the polyurethane to expand--so don't skimp on the water flushing). I must have used six bottles of water to get al 15 nozzles flushed. I know some people mentioned they had problems with the injection tube leaking. My set up worked flawlessly following the directions provided. Started at the bottom nozzle as directed--figuring a minimum of four (4) minutes at each nozzle. The flex tube attaches very tightly to the nozzle--so that all worked well.At each nozzle I would pump first for 30 seconds, then wait 30 seconds, then pumped again for ~15 seconds until I could no longer pump into the crack. I held constant pressure on the gun the entire time. I figured this would allow the polyurethane to penetrate and begin to set before I pumped again. In some cases I could pump after the second time. In the part of the crack that seeped the most, it took a lot of poly during the first 30 second pump. After the first 30 seconds of pumping and ten waiting 30 seconds, it surprised me at how much more material it would take (I wonder how much poly set up on the outside of the wall?). After the second 30 second pumping it began to be more difficult to pump. Pump 30-Wait 30-Pump 30....and then it tightened-up significantly. I barely got a third pump into the nozzle, and then held pressure on it for about another 2 minutes. Tried to pump again but could not do it. Moved up to the next nozzle. Same process for the next nozzle in the high seep area, but couldn't pump into it for as long as the first, and the poly fluid started to seep from the nozzle above (I considered this good). Finished up the balance of the nozzles, drained all of he hoses, cleaned-up and called it good. I had about 3/4 of a tube remaining that I decided to save in the event I need to repeat the process.Note: I had a couple of nozzles "blow out" at the edge where the nozzle is attached to the wall. Looks as if I did not get the epoxy spread thick enough. Then again, when the poly begins to expand, it's extremely dense and it has to go some where. I also had poly push out the nozzle cap on two nozzles. I thought this was a positive, in that I had enough poly in the crack that it had no where to go but out towards the nozzle (the weakest point).Next day I removed the nozzles and started to remove the epoxy from the crack as shown in the video CD. After about 15 minutes, and a lot of hammering and chiseling, I called it for the day (or life?) Stuff is damn tough to remove, a lot of work, and a huge mess. Cancelled! Done! I thought about grinding it off (for about 10 seconds) but the epoxy dust is not something I want in my home, so that won't happen either. Per the recommendations of other users on here, use the gloves and lay down a large sheet of plastic. As for the gloves. I would put two pairs on at one time, that way when the outside pair gets nasty you just peel them off and the new pair is there. I used a couple of extra sets of gloves (two pairs to apply the epoxy, another two pairs to apply the polyurethane (as you get the polyurethane on your hands when inserting the plug into the nozzle as they drip when you remove the injection tube.) Give yourself plenty of room to work, and take your time.BTW, the epoxy and hardener when mixing is extremely foul-smelling. Make sure you are in an area that is ventilated as it is pretty nauseous.Report after three weeks. We have had three major storms of 3", 2.5" and 2 inches and some minor rains of 1/2" or more. Previously, the wall would have seeped with each and every rain. Since I used the Radonseal product--nothing. No seeping, not even a sweating where the crack is. I can tell you from past experience I would have had some water puddle on the floor, or in the lighter rains some sweating on the crack --but after the treatment, nothing. The wall is completely dry from top to bottom.
M**K
Not as intimidating as you might think
Great foundation repair kit. Read the instructions a couple of times and plan ahead. Its not as intimidating as you might think. Had a crack in poured foundation about 13 years old, was there since the house was built and leaking slow. Finally got around to fixing it and the process was pretty easy. I had an 8 foot crack from floor to top of foundation from 1/16" wide to 1/4 in places near the top.Couple of tips, some others have mentioned:Wear 2 pairs of gloves its way easier to change glovesBuy more gloves - you will need themHave paper towels and old rags ready this stuff does make a messWarm up the injection foam in a tub of hot tap water for 30 mins prior to injectionUse just a little but of part A/B at a time and go slow to ensure no leaks around portsWhen placing ports start from bottom and work your way up, when pressing ports on make sure you dont clog the hole and smooth out the excess that squeezes out around the port. This makes the next step easier and prevents a lip of epoxy around the portUse a pump garden sprayer to flush the ports very well. Did not try the bottle supplied I knew it would be too challengingAfter placing ports from bottom up start covering crack and ports from bottom up as well. Dont start on the last port freshly placed because the epoxy needs a few mins to set up and moving the ports can cause them to shift, start from the bottom again on the ports that have had a few mins to set upOverall this kit worked very well and saved me some cash. Had rain a few days after completion and no leaks. I used about 75% of the epoxy and injection foam on my set up details above. Your mileage may vary.
R**G
Works! Good Results
Vertical foundation crack that (very occassionally) leaked when we had very saturated ground. Kit advertises it will handle a 10 foot crack - easily handled the 8+ feet I had to treat. Good instructions and included everything needed, except the caulk gun. Before and after photos give you a good idea. I didn't do the work myself (relied on trusted contractor), but probably could have. The "crack guys" typically charge about $500+ per 10 foot crack for pretty much the same result. Kit was about $180 and if you do it yourself, I thnk you'll be pretty darn happy.
M**Z
Works Well - But just one step to add to the directions
I used this product to seal a leaking crack in my poured concrete basement wall... During a recent 5+" rainfall, the crack leaked... Even though the repair seems intimidating to perform yourself - it was pretty straight forward and went as planned except for one caveat... The crack I had was roughly half underground (below grade) and half above ground... When I injected the expanding foam into the ports - below grade was fine, but when I got to the above ground portion of the crack - the expanding foam seeped out on the outside while I was injecting (because nothing on the exterior to hold it in)... I have attached a picture of the crack outside underneath my deck for a visual reference... If I had known - I would have placed duct tape along the crack on the outside to keep the expanding foam from seeping out while I was injecting... Because of this seepage, I ran out of the expanding foam - yet still had last couple of feet or so to go... Other than that - it works well and not hard at all to perform... One last note - even though it is low VOC - it does stink - so knowing this from reading the reviews prior to installing - I rented an air scrubber and ran it during the install and the following day to mitigate the smell from infiltrating the rest of the house and worked out extremely well... I would recommend this product...
Trustpilot
2 months ago
3 weeks ago