👟 Step Up Your Shoe Game!
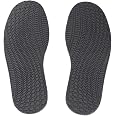
The ackgermFull Soles Rubber Replacement DIY Repair offers a high-quality solution for shoe maintenance. With a classic pattern design, these durable rubber soles are anti-slip and customizable to fit any shoe size. Measuring 325*125mm with a thickness of 4.5mm, they provide both comfort and safety, making them an essential accessory for any footwear enthusiast.
J**S
replacement soles
great price came quick great quality
M**C
Works great with a little effort
I love my Asolo hiking and approach shoes. New the shoes are $130, but I wore them almost every day for 12 months and the sole just wore out and I could see through the vibram sole. I looked into getting them professionally repaired by Asolo, but it was over $100 before shipping....ahh nope! I hate to toss out good comfortable shoes if I do not have to. So for the $10 for these soles and a can of contact cement(follow directions on the can) they work great...almost like new shoes.The details....You have to grind or sand the old rubber sole flat so that you have a lot of contact for the sole/cement...better results in the end. I used my bench grinder to remove any of the remaining tread and it took about 5min per shoe. Use a marker to trace the outline of the shoe on the new tread. It is better to leave a bit extra vs cutting directly on the line to allow for the curving of your shoe...sandles will not matter.Do not use ShoeGoo if you have access to the contact cement as the contact stuff is much stronger. You will also need about 5-8 clamps to squeeze the sole to the shoe, more is better and I used a 4"x10" piece of wood between the clamps and the sole to help even out the clamping pressure. I used a small block of woo on the inside of the shoe for the heal area and it worked well. I did one shoe at a time and let each shoe sit for two days before removing the clamps. It is worth your time to go slow and get a good bond.The end result is good adhesion with no gaps and the soles work and do the job...new shoes for $10.
M**C
Perfect For Boots
My Hiking Boots tend to wear quicker on the outer bottom sole then the inner bottom sole. It's the way I walk. I cut pieces of these outer soles and rubber cement them to the worn areas of the bottom of my boot sole for longevity of the boot. Works great! Soles are even again and the boots last and last.
M**E
It's purposely oversized so you can trim it. 3mm of rubber with another 2mm in the tread.
This works well, but you have to know how to use it. This review is mostly in review to the lady who added a video and a laughing review of how comically large the sole was compared to her size 8 ladies boots.I purchased this to fix my daughter's extremely poorly made Steve Madden boots. She loves the boots, but the sole is made of cheap foam. The soles cracked in half from walking within 2 weeks of purchase and we thought maybe they were just a bad shoe, so we had them exchanged for a new pair, and a month after, they cracked again! This time I fixed the sole with Aquaseal SR (similar to Shoe Goo). But then two weeks later ... the soles cracked yet again AND the heel and the ball of the foot part were worn down unreasonably for the usage.So I decide to try to add this product to her boot, as she loves the look, but the soles are garbage. I figured that these soles will stop the cracking and add much more durability. Her boots are size 8.5 ladies.I've taken some photos of how I repaired the shoe and, though I did an amateurish job, you get the idea. One reason for the crappiness of my repair is that I used more Aquaseal SR, to fill in gaps left by the fact that the original sole wore down badly and unevenly. This sole can also be used if you remove the original outer sole and replace with with this sole. I'm not that skilled and so I just glued this sole on top of the old sole, after trying to fill in the dents and holes of the original sole.So the steps I took, and accompanying photos, though they might not be in order.Steps I took;- Scuff up original boot sole and the back of the new sole with course sandpaper- Clean both surfaces with soap and water, and then followed up by rinsing and then wiping with rubbing alcohol with a lint-free cloth. Let dry- Place boot onto sole, since the boots have a stepped heel, I had to cut a piece to use as the heel. I marked where to cut the new sole and did so with a very sharp new utility knife blade. The rubber is 5mm thick, though that is 3mm of flat rubber with the tread adding 2mm. It wasn't super easy to cut, but I started with a used blade and it worked much better with a new blade. After cutting it, I found bits of the tread hanging on, but scissors easily cut the sole apart.- Trace the outline of the boot onto the rubber sole with a pen, this is a rough gluing guide. Ie; it tells you where to spread glue.- Use CONTACT CEMENT. I used Weldwood brand, but apparently "BARGE CONTACT CEMENT" is what a lot of shoe repair places use. Weldwood was also recommended and I found it at the local hobby shop, so that's what I used.- Spread the contact cement all over the old boot sole, make sure every part of the surface to be glued is covered.- Spread the contact cement all over the new sole, using the pen tracing to figure out how much you need. I overlapped the glue over the pen lines, knowing that I might have some alignment hiccups when I glued them together.- Let the cement dry. Weldwood said "Dry longer than 15 minutes, but no more than 2 hours" in the instructions. I let it dry for 30 minutes, when the glue was tacky, but did not come off on my fingers when I touched it.- Taking the heel piece, I aligned the front (the flat part) of the heel to the heel of the boot and then put the heel piece in contact with the boot heel. Once they make contact, they WILL NOT SEPARATE, so you MUST align them well, you cannot slide the piece around after they touch! (NOTE, if you use AquaSeal SR or SHOE GOO as an adhesive instead of contact cement, you might be able to move them around after they are put together ... if you are strong)- After the piece is in contact, I used a hammer and smacked the new sole into the boot heel, I smacked it quite hard and all over, and then I pushed down on the piece too. Contact cement works by drying onto each of two surfaces and them the cement bonds with itself when you put the two pieced together and SMACK them together.- I repeated this process with the front part of the boot and the front part of the sole. NOTE: You don't need to use the full sole, a lot of people would be OK, just adding the sole to the front part of the boot/shoe sole. In my case, I was trying to repair and protect the entire sole because the boot's original sole is made of a very poorly chosen material and if I didn't cover the whole sole, they will crack where it's not covered! So use as much as you need for your application!- Now I have the comically oversized new sole on the boot. I have to trim them. I put the boot down on top of cardboard and a kitchen cutting board and I basically used a very sharp utility knife to trace around the original boot sole. This requires some effort. I personally couldn't trim the thick sole like they do in youtube videos where they trimmed the rubber off with a knife cutting the full thickness of the rubber. I had to trace the sole and push deep to score/cut the rubber on the cutting board. I then was able to cut again the rubbe, having scored it. I used scissors too at some point.Now I have the soles amateurishly, but satisfyingly attached and trimmed to the boot! Again, I had to fill some gaps in with Aquaseal SR/Shoe Goo because the original sole was no longer flat due to the excessive wear of the poor material.Repeat with the other boot!So TLDR;- Clean your shoe and the new sole, scuff with sand paper- Apply contact cement to both surfaces and allow to dry as per cement instructions- Attach sole to shoe, and HAMMER them together all over- Trim off excess rubber soleIf you don't use contact cement, you could probably use Aquaseal SR/Shoe Goo or ES-6000. I would think that ES-6000 would work best because it is the least viscous of the three. They are pretty much the same thing, but AS SR and Shoe Goo are very thick. If you use these though, they have to cure for 48 hours. That means you have to clamp the parts in place for 48 hours before the soles are ready to trim. Do you have clamps? If not, go with contact cement, once the parts are together, that's it, they are ready to use. One thing about AS SR/Shoe Goo/ES-6000 is that they will fill gaps and irregularities in the old sole. So your choice. I did not try that, I used contact cement.Anyway, thanks for reading and good luck!And sorry, the photos are out of order.
R**N
Glued these to my slippers and extended their life.
My Sorel slipper uppers were in great shape but the rubber sole was wearing through. Shoe-Goo'd these to the bottom and now they're more durable and their useful life has been extended greatly.
A**R
You don't have the clamping equipment to perform this operation
This should only be offered to a shoe repair professional with the clamping equipment to perform this task
S**B
Repaired slippers
These worked well to replace a sole on slippers. Others that reviewed gave good tips - did section repairs and was able to manage better.
S**E
3 stars.
It's heavy duty but the biggest problem is using a shoe glue to attach it to the bottom. You need to have serious clamps fo the glue to stick because once it dries up, there will be gaps and won't look good. I failed at using clamps and used painter's tape to wrap it fully, basically turning it into a mummy. High quality rubber but no way of making it look pretty once glued.
Trustpilot
2 weeks ago
2 months ago