


🔑 Unlock Style & Security!
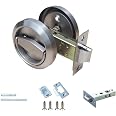
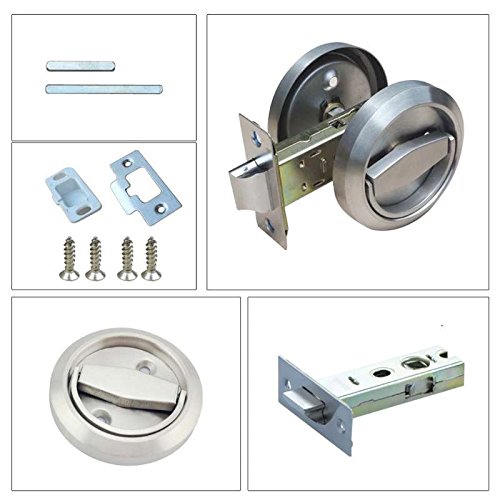
The Stainless Steel 304 Corridor Lock is a keyless, durable solution for securing cabinet doors and sliding doors. Designed for door thicknesses between 1.38 to 2.2 inches, this sleek, recessed lock offers a modern aesthetic while ensuring robust security. Made from high-quality stainless steel and zinc alloy, it combines functionality with style, making it a perfect addition to any contemporary space.
| Manufacturer | LEICHI |
| Part number | LEI_002 |
| Item Weight | 500 g |
| Manufacturer reference | LEI_002 |
| Color | Brushed Stainless Steel |
| Style | Simple |
| Finish | Brushed Stainless Steel |
| Material | Stainless Steel |
| Shape | Round |
| Item Package Quantity | 1 |
| Number Of Pieces | 1 |
| Handle Material | Stainless Steel |
| Cutting Diameter | 75 Millimeters |
| Special Features | Keyless |
| Included components | all |
| Batteries Included? | No |
| Batteries Required? | No |
| Item diameter | 75 Millimeters |
J**Y
Looks good, install was frustrating though.
Sides are independent from mechanism, neither side is attached to the activation arm, so things are sliding around back and forth as you try to attach. Will need a second set of hands. Also, short post is too long for a thin door and you will need to trim it. Find it binds while assembled despite my best efforts.
S**T
Chicago screws included helped minimize mods for this non-north american latch.
Although mods were required that complicated the replacement of hall closet door knob, this style is unavailable in USA. I contacted Quikset and Schlage to request production of a similar knob, they completely blew me off, they are big companies that could care less. So let's get to the mods.My package contained the Chicago screws required to make this work that others mentioned in their reviews. My door was not much thicker than width of latch plate that came with lock, so the Chicago screws had to be shortened quite a bit (I think I cut 4 'sections' off each screw). I did this by holding screws in vice and using my Dremel tool with a metal cutting disc. zip, zip, done. These screws will go through holes in latch mechanism, and when the 'knob' halves are sandwiching the door, these screws will hold the whole thing together without manufacturing crescent shaped blocks other reviewers have done to put on top of and bottom of doorknob hole.The Dremel tool also came in handy cutting the square axle that runs between both sides of the 'knob'. I put the post between the 'knob' halves and held up to edge of door to mark how much material I would have to cut off (in my case, maybe a quarter inch. First I tried my bench grinder. Was taking forever. Then put it in vice and used my Dremel tool again with metal cut off wheel. Went through like quite quickly, but have a cup of water to dunk in when done, it will be so hot it sizzles getting dunked in water. I then used bench grinder to clean up burrs around cut edges and make it nice, not really required, but I had grinder, so why not.Now, the new latch mechanism wasn't fitting into round latch hole from previous latch, as it has a rectangular profile. Dremel tool to rescue. Mine came with a spiral wood cutting bit. Looks like a bit like a drill bit, but is not. I held latch up to hole and marked where I had to cut away wood blocking insertion. Shaved wood away very quickly with Dremel tool. Once I got latch inserted, I could see it was being blocked from full insertion because mechanism was hitting wood on far inside of existing round knob hole, so again Dremel came to rescue to shave a little wood there to obtain full insertion of latch.I had a set of wood chisels, so I was able to lengthen mortise for latch plate and strike plate to proper length. Bottom line, I would not recommend this product to a north american customer who has a pre-cut door knob hole unless you are comfortable with extras steps outlined above. I also would not want to do this without my very useful Dremel tool. This being known (as it was to me by reading reviews), I gave this product 5 stars, as finish and operation are excellent. Looks and feels like quality. I'm not going to ding it a few stars like some have done just because they didn't educate themselves as to what must be done to make this work. And now we aren't constantly bumping the old doorknob, and in one case smashing a wristwatch crystal.Tools required:Dremel tool with metal cutting disc attachment and spiral wood cutting bitWood chisel and hammer for mortise adjustmentsbench vice or vice-grips to hold material when cutting2 phillips head screwdrivers for Chicago screw, one for each sideHelpful:marker to make cut lines on materialrazor knife to trace latch and lock plates on door for mortise
J**N
Works great
I had two doors that were back to back and the knobs kept hitting each other, so I bought this to replace one. It took some Time to install because the holes were not the same, but once I did that it has worked great!
T**K
but I was pleased with the results
This was a complicated process for me, but I was pleased with the results. I have a narrow bathroom door, so the regular doorknob was a threat to everyone’s hip bones! I can’t believe there are so few options for a low profile doorknob. I had to order from overseas and wait weeks for delivery. From the other reviews, I knew I was going to have to get creative installing it in a door that already had another unit installed.Instead of looking for long Chicago screws, I basically tried to fill in the missing wood. Using a hole saw and a drill, I made a round plug of wood from a board that was very near the width of the door. Then used a dremmel and a grinder to make two pieces that fit above and below the new mechanism. I glued the wood pieces in place with liquid nails adhesive and stuffed a rag in the hole to keep them in place so it could dry overnight. Note that this does not have to look pretty because it will be completely covered by the new doorknobs. I was working with small pieces of wood, and moderately large screws, so splitting the wood was a problem with having to do this modification. One of the wood pieces cracked down the middle, so I replaced it with some plastic trim that is designed to look like wood. The lesson you need to take away is this: Predrill everything!Other problems I encountered: This comes with two different axels to put between the doorknobs. The smaller of the two was still a little too long, so I had to make a wooden one to measure what length was going to work. Then I cut the metal one down to size with a band saw, and then carefully grind it down to the exact size needed. Another issue was that the new mechanism was larger than the one being replaced, so there was drilling and dremmeling to make the hole in the side of the door bigger. I also had to drill just a fraction of an inch deeper into the door because the new mechanism was just slightly longer. I did get lucky that the doorknob axel hole was in the same spot as before, so the new doorknobs are almost exactly in the same position as the old ones. I also had to use an oscillating tool with a saw blade to countersink the new rectangular plate into the side of the door. Glue wooden toothpicks into the old screw holes so you can drill new holes where you need them. I did once again get lucky by being able to use the old strike plate in the door frame. I didn’t have to swap out that metal piece, or drill out a bigger hole in the door frame. Make sure to vacuum all the sawdust so your new mechanism doesn’t get clogged. They do rattle a little bit, but they seem to be rugged enough to hold up.So in the end I’m glad to have low profile doorknobs for the narrow doorway. They do not lock from either direction, but that’s ok for now. I thought about using the original doorknob on the inside, and just replacing the outside doorknob (which was the one causing the problem in the tight space) but that would have been a bigger headache because the screw holes on the old doorknob didn’t quite line up with the holes on the new ones. Installation would have been very much easier if those holes had lined up.If I had to do it again, I would probably try to just use a couple of wooden blocks with holes drilled for the doorknob screws on each side.
J**S
Not made for American doors
This looked like exactly what I needed to replace my standard door handles for a low profile handle to allow for better clearance.It LOOKED like that.It isn't.By a long shot (or maybe by an infuriatingly short amount)In order to fit snugly to a 1 3/8 inch door the spindle must measure in at 50.5 mm. The spindle that is provided measures 60mm.Which means frustratingly close adjustments with a very good Dremel tool to trim away the extra 1/4 inch to get it to fit the door.(Oh, by the way Amazon does not provide any 50.5mm spindles for replacement that I could find.)The latch is also too wide for pre drilled doors, which means that you will need to figure out some way to expand the hole by another 1/4 of an inch without chewing up the door, and you will need to fill in the screw holes that held in the previous latch, because those holes are off by another 1/8" each (naturally).And you will need to chisel out the seating hole in the door to accommodate a flush mounted latch, because it is too big as well (again off by 1/4").Apparently measurements aren't as big of a deal in China or Chinese specs for building materials is just slightly off from US Standards.So if you want to spend an ENTIRE day doing what should be a 20-minute job, by all means, go for it.I certainly wouldn't recommend it, though.
Trustpilot
2 weeks ago
1 month ago