Elevate Your Outdoor Experience! 🌟
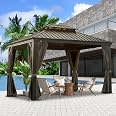
The Domi Outdoor Living 10’ X 12’ Hardtop Gazebo combines a ventilated double roof design with a sturdy aluminum frame, ensuring comfort and durability. With a unique drainage system, included netting and curtains, and versatile ceiling hooks, this gazebo is perfect for outdoor gatherings, relaxation, or even as a car shelter.
S**S
Well-engineered stout, attractive and affordable with high quality mosquito netting and curtains
For starters the build is somewhat difficult but I was able to completely constructed it by myself with the exception of 2 minutes of help holding up the third leg. As I was building on a slope so having three different sized ladders helped considerably. As others have noted it came very well packed. My 12x18 gazebo came in five roughly 90 lb boxes. Before starting build I recommend you do a check off on inventory on the part list on enclosed instructions. While you might not want to completely unwrap the longer braces and legs you will want to give them the feel test for hidden dents and dings. One of my main leg upright braces had a sizable ding and the leg nestled with it had a smaller one. Customer support wanted to send replacements out immediately but as I was well into build and had time constraints I decided to merely fix it and go with it and it works fine no leaks. I placed that brace on back side of gazebo. The instructions are picture graphs with numbered steps to be taken with virtually no fine detail put a very doable with a little bit of thought. Best to leave all bolts and nuts loose during construction with the exception of the legs and upright leg bracing bolting to the top plate which would be the only bolts you will not be able to reach after everything is finished. Unless of course you take a hacksaw to an Allen key and radius the edges of it and attempt to tighten through a very tight space with very limited turn. Ask me how I know that. I also recommend you tighten the steel roofing panels behind you as you go leaving the trailing edge loose until you reach a corner as they are hard to reach with a ladder afterwards. Every other nut and bolt is reachable and should be snug down only after construction. The kit includes a tube of what seems to be a high quality silicone which is a caulk - sealer not a adhesive. Use it. As you are assembling the steel roof panels I would get underneath and look for any hints of daylight in which case use the silicone there and possibly where they meet the top section cross members even if you cannot see daylight there. As I had to construct a deck platform for gazebo I recommend that you keep it to the exact size of the gazebo if possible as mine extends a few inches out on all four sides and has got a tendency to catch rain water and flow it into the gazebo floor . I intend to make an eighth of an inch caulk ridge on gazebo floor about 6 in from curtains on all four sides to act as a water dam. On my 18x12 gazebo the curtains are easy to set up as they are all zipped together there are four long pieces and two short pieces The short pieces attached to the center side legs. The main curtains go over the outside track mosquito netting on the inside trackUp a week or so rode through a week of monsoon like weather with flying colors. A 5***** Purchase.
C**S
Great Gazebo
Purchased 12x14 in brown. I will give this product a 5 star rating, as the gazebo itself is an excellent choice. However, we had issues with delivery (almost 3 weeks total), which the company compensated us for, and assembly was a complete nightmare! Instructions are terrible. Basically pictures that are hard to follow and understand. My husband assembled and he’s finished an entire basement with a lot less issues than assembling this. Getting the pre-drilled holes to line up was very difficult. He had to cut 4 roof panels that were too long and would not fit the roof??🤬. The roof took 7 hours-but mostly due to pieces not fitting. Total assembly was 12 hours with 2 people. Warning-have a lot of patience!But once assembled, we love the gazebo. It’s on our 16x16 deck and provides complete shade. If we close the curtains, it’s like having an outdoor room. Seems very sturdy and waterproof.Customer Service does not have a toll free number, you have to email. They respond quickly and probably would have gotten parts sooner but was shipped from CA and I live in MI. Fed Ex needs much improvement on their shipping system!
A**R
We love it - so far
I did quite a bit of investigating similar gazebos before I selected Domi. I had debated whether to get one made of cedar but opted for this one that is metal with the look of wood. We've already had compliments regarding the wood "look" and we are very happy with it. Since I previously stated I did quite a bit of investigation, the one fact for almost all of the gazebos in this category (metal roofs) was how difficult it was to assemble. I would say it was challenging mostly because of the amount and different nuts and screws required for the assembly. Some of the directions were a bit confusing but if you take the time to read all of the instructions before starting, then read and reread each step before jumping in, you should be OK.I am 71 years old and my wife is 73. Except for the help of our neighbor for 10 minutes to put the roof supports up, we assembled this gazebo entirely ourselves. It took us about 5 days to complete but that was working only about 4 - 5 hours a day. Except for 2 missing screws (out of over 400 and which supplier replaced within a week) everything was extremely well documented and referenced within assembly instructions.Now for the most important recommendation I can give anyone assembling this gazebo. It is not mentioned in the instructions and I only realized it after I completed steps only to go back and redo the steps. As you assemble this gazebo, DO NOT tighten all the nuts and bolts. As I put things together I found I was struggling to get the final pieces to fit together. I went back and loosened the pertinent nuts and bolts and sure enough, it fit together perfectly. I found this out specifically when putting the roof structures together and then also when putting the roof partitions on. Once that happened, I started to not tighten any of the roof nuts and bolts for a side until finished. That worked fine until I realized the difficulty holding the bolts toward the top of the gazebo. Couldn't reach them. Here's is another trick I discovered. Instead of trying to crawl on top of the roof of the gazebo to hold the bolt while someone tightens the nut on the inside of the gazebo, I found that by using my impact drill with a socket on it, I could tighten the nuts from the inside of the gazebo without having to hold the bolt in place from the top of the roof. Anyway, I hope these suggestions can help someone in the future.Overall, we love the gazebo so far. I don't intend taking this down during the winter as we did our previous one and it looks like it is very sturdy and well built.
Trustpilot
2 weeks ago
2 weeks ago