🚲 Elevate your ride, save your space, own the garage.
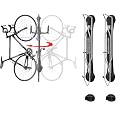
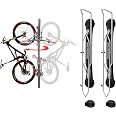
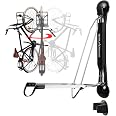
The Steadyrack Classic Vertical Wall Mount is a robust indoor bike storage solution crafted from carbon steel and UV-treated polymer. Designed to hold bikes up to 77 lbs with tire widths up to 2.1 inches and wheel sizes between 20-29 inches, it features an innovative pivot mechanism for maximum space efficiency. Easy to install with included hardware for masonry or stud walls, this rack transforms cluttered garages or apartments into sleek, organized bike sanctuaries.
| Material | Carbon Steel, ABS Plastic |
| Color | Black |
| Special Feature | Space Saving Pivot |
| Product Dimensions | 4.33"D x 3.94"W x 26.18"H |
| Shelf Type | Hanging Shelf |
| Number of Shelves | 2 |
| Room Type | Garage |
| Finish Type | Chrome Plated |
| Assembly Required | No |
| Mounting Type | Wall Mount |
| Recommended Uses For Product | Storage Rack |
| Included Components | 2 x Classic Rack, 2 x Installation Kit, 2 x Warranty |
| Item Weight | 2.2 Kilograms |
| Brand | Steadyrack |
| Style | Classic 2 Pack - Chrome Plated |
| Shelf Weight Capacity | 35 Kilograms |
| Is Customizable | No |
| Global Trade Identification Number | 19339859000366 |
| Indoor/Outdoor Usage | Indoor |
| Item Package Dimensions L x W x H | 28.35 x 8.86 x 6.69 inches |
| Package Weight | 6.44 Kilograms |
| Item Dimensions LxWxH | 4.33 x 3.94 x 26.18 inches |
| Brand Name | Steadyrack |
| Warranty Description | 1 Year Manufacturer |
| Model Name | B-SCSR02-004 |
| Number of Items | 2 |
| Manufacturer | Steadyrack |
| Part Number | B-SCSR02-004 |
J**J
Great Product, high quality, built to last, easy to install.
I bought the two pack for two road bikes and the separate fender pack for two cruisers I had taking up too much space in my garage. Prime shipping was fast and these shipped via UPS. The packaging was compact and easy to open with a box cutter. I had been following this company since they were a kickstarter and had seen their videos so I knew what to expect when I received their product. The steadyrack themselves are well built and you can tell a lot of thought has been put into everything from the design, the packaging, the instructions, their website and so on.Before you get started you need the following items: a box cutter, a tape measure, a pencil, a Philips screwdriver, a socket wrench, a spirit level, a 13mm socket, and the instructions call for a 10mm and a 8mm drill bits, but I used 1/4" and 3/16" drill bits. I also purchased a studfinder from Amazon to ensure I got my holes just right.Steady rack has an excellent installation video on their website at steadyrack.com/video, but their instructions are fairly clear as well and are written using metric as well as imperial measurements.It is very clearly stated that you must mount the Steadyrack into framing studs or masonry or it will void the 12 month warranty. You should not fix the Steadyrack directly to drywall.Installation took about 10 minutes per rack.Overall, this is a high quality item and worth the price paid considering I foresee this lasting many years to come. It frees up valuable space, holds the bike without damaging or putting stress on the tire or frame, and is very easy to load/unload. This is also a great company with excellent customer service who backs their product 100%.
3**Y
Worth every penny
This is a great product.Our family of five has a variety of bikes, three children's & two adult - in different sizes. I looked at several systems and read reviews (noted that children had difficulty hooking bike tires, between spokes & balancing, etc), ultimately deciding to spend way more than I had planned on the Steadyrack. It was a slam-dunk. Steadyrack does not disappoint. This product is all that is cracked up to be and in my opinion, worth the money.I bought a four-pack for my family, and an additional fender-style for my retro bike. The area where all bikes are hanging is 71" wide. It holds three mountain bikes, my huge & heavy beach cruiser, and a child's 20" bike. I spaced them approximately 13"-15" apart from one another.There would be no way to catch a stud for all these bike racks, so I had the lumberyard cut a piece of plywood to size, and mounted a ledger-board to the wall. Then I had a solid surface attached to the studs. This allowed me to install the racks with more confidence that they would be secure.I'm in the United States & believe that the origin of this product is Australia. This may explain why the installation instructions are in millimeters. It was easy enough to find a conversion online, but I did have to be cautious not to make a calculation error. Measure twice, drill once! The only other note, was that in my haste - and without giving it much thought - I used the wrong fastener to hang the first rack. The racks come with both lag bolts & truss-head wood screws, which I dumped out on the workbench, and by the time went to hang the first rack, my son handed me the screw and it stripped going in - quite easily. Oops! I should have known better - so I'm mentioning it for those who do not know better. The rack should be installed with the "hex" headed lag bolt. (Google it, if you're unsure what that is). The guidelines were easy to follow & logical.As for hanging the bikes, it's as easy as it seems. My youngest is about 54" tall & 50#. Getting the bike up into position was a challenge for a couple of days. We tried different ways to hold the hand brake & use the seat to leverage on her thigh - and soon enough she was able to do it easily.I attached a photo showing all five bikes on the wall. They do rotate easily out of the way and don't fumble into each other as bikes are placed on & off. I felt like I pushed the limit on how close you would want to hang bikes of this size - and there is still plenty of room to get them on & off without interfering with other bikes.I have a lot of confidence in the longevity of this product. It's rock solid.
T**1
Works well, easy to install, planning is the hard part
So I have 5 bikes that I want to fit into a space 78 inches wide, and about 9 feet tall. I've been looking at all types of racks for over a year, and almost none of them will work for many reasons.Steadyrack is the only thing I've found that will do the job. The primary feature that lets you pack bikes in tightly is the entire system allows the bike to pivot so it does not have to be perpendicular (90 degrees) to the wall.The instructions are minimal. I recommend going on YouTube for the manufacturer's installation video. In the pack you are provided 4 lag bolts for installing in studs, and 4 companion anchors if you are installing into masonry.The hardest part is planning your installation. In a limited space, I can almost guarantee you will not find a stud where you want to put at least one of the bikes. Rather than try to gin up some sort of board that bolt into the studs, which is messy and will look terrible, go to your hardware store and use expandable metal anchors, which will hold up to 80 pounds each. You put four of them in the wall to fasten the Steadyrack, and it will more than hold the rack & bike, especially since the Steadyrack is only rated for up to 110 pounds.The rack itself is attractive, it folds up when you're not using it, the "beak-like" lip in front catches the wheel and lets you push it easily into the rack, and the front wheel is locked in.So how did I get 5 bikes on the wall in such a tight space? Put the widest, tallest bike in the center of the wall, about 2 inches off the ground. Put a bike on either side as wide as you can fit, and raise them 3 inches up, that way the handlebars clear each other. Then the two last bikes are between the center bike and the adjacent bikes, placed about 30 inches off the ground. To get higher bikes in and out, you pivot the lower bikes out of the way.
Trustpilot
3 weeks ago
1 month ago