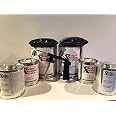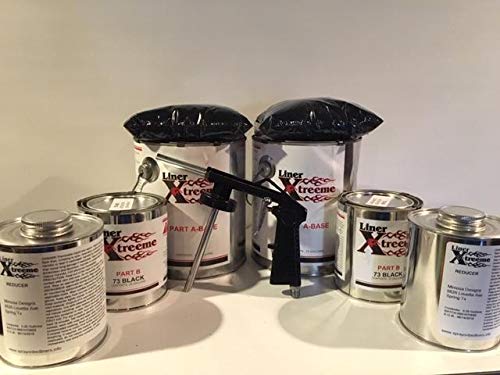


Spray on Bedliner Kit 3 GAL Black w/GUN 12 LITERS !
| Brand | LinerXtreeme |
| Color | Black |
| Finish Type | Semi-Gloss |
| Size | 9 Piece Set |
| Item Volume | 3 Gallons |
| Special Feature | Rust Resistant |
| Unit Count | 384.0 Fl Oz |
| Paint Type | Spray |
| Surface Recommendation | Metal |
| Indoor/Outdoor Usage | Outdoor |
| Item Form | Aerosol |
| Included Components | Applicators |
| Age Range (Description) | Adult |
| Is Waterproof | True |
| Package Information | Can |
| Color Code | #000000 |
| Coverage | 100 square feet |
| Water Resistance Level | Water Resistant |
| UPC | 633726019171 |
| Manufacturer | LinerXtreeme |
| Item Weight | 30 pounds |
| Item model number | AA1 |
| Is Discontinued By Manufacturer | No |
| Exterior | Gloss Finish |
| Manufacturer Part Number | AA1 |
| Special Features | Rust Resistant |
J**B
Compressor / psi output, weather, gloves
20 gallon plus compressor is a must, 100psi constant worked like a dream. Easy and simple. Gun is a one use item in my open. As long as surface area is prepped properly you should have zero issues with adhesion or durability.
P**E
My new favorite diy spray liner?
Im rebuilding a 63 chevy c10 for a guy. I just sprayed the under side and firewall on the cab. If this stuff is as tough as is looks this will be the only stuff I use from here on out. The gun worked great, the stuff mixed easily and sprayed perfect.Here are some tips:1. Turn your air up, I shot it at 80psi on the regulator. I'm not sure how good a small compressor would work. I have a 60 gallon, 6 horse and it was more than fine.2. Punch a hole in the top of the reducer can you are sparying out of with a screwdriver. This prevents a vacuum and lets the material move through the gun easier.(see pic)3. An electric mixer isn't necessary. The activator is like frozen molasses, but as soon as it hits the reducer it thins out. Just mix it for about a minute with a stir stick. It blended great.4. Sift your rubber. I had an old kitchen strainer and used it to separate all the big clumps of rubber. It just gives you a more uniform look.(see pic)5. Mask off twice as much as you think you will need. This stuff goes everywhere.6. Wear a respirator, face shield and throwaway clothes. You will get a little rebound spray.7. Short bursts from about 16-18 inches seemed to work the best, not constant long strokes like with a paint gun.8. Last bit I applied I back up to 24 to 36 inches, it evens out any imperfections.9. As always surface prep, wash with soap and water, clean, sand, wax and grease remover, sand, and wax grease remover again.10. You can buy mixing pitchers at paint stores, they have marks with the ratios printed on.I'm very happy with it, unless it flakes off or lifts I will buy it again. It truly looks better than my truck bed which was rhino lined. Great stuff so far.
A**R
Nice product + alot of hard work = Nice spray in bedliner.
The product itself is great, once it is on the truck. I think it looks great, and similar to the professional coatings. Once cured, it gets very hard. I will say, it is a lot of work to properly prepare the bed, and especially the tailgate. Also remember to cover anything within a half of a mile that you don't want covered in bedliner.There are alot of diy bedliners, and I've used a few. a number of years ago I tried some duplicolor, lava liner, and herculiner. None of these are even close to linerxtreeme.I used the supplied gun for under the bed rails, and on the first coat of the tailgate. Then I switched to a harbor freight drywall hopper gun for the rest.My complaints:- The supplied gun works, but is hard to fill. The mix, with the crumb rubber, is thick. It took forever to get the mix in the gun.- If I did it again, I would thin it out some. My bedliner is very rough, but I also wanted a fair amount of texture to keep things from sliding around.- I used half the kit on a 2015 supercrew F150, and you could see the factory paint in a few places. So I ended up using the other half. Now it has a nice thick coat. But, I don't think you could cover a 8ft box without at least another gallon (maybe two).- It was kind of a crap shoot with both the guns. The included bedliner gun needs alot of pressure, as it is a suction gun, and the material is very thick. If you have trouble where after a bit the material stops feeding, try punching a hole in the top of the can to allow air in as the material flows out. With the drywall hopper gun, I sprayed with high pressure as well (80psi), and I shouldn't have. I was tired, and forgot to turn the pressure down, and can only describe it like painting with a fire hose. Just about the time I was done, I realized that the pressure was too high. The hopper gun is much easier to fill, and puts the material on fast (really fast on high pressure).I have had a lot of compliments on the finished product. If we had a shop within 100miles of where we live, that would do it for ~$500, I would probably never do it myself. The one local shop wanted ~$650, and any reasonable shops are too far away.I estimate I had at least 25hrs into this job, and ~$350. So I figure I saved about $300.The end result was just what I wanted, but it wasn't easy to get there.
D**G
mis represented
Product is advertised as 3 gallon, kit came with 10qts... do the math not 3 gallonsI have purchase before and it came with 2-1 gallon cans and 2qt of harder and 2 qts of thinner
L**Y
Great product! shipped quick and arrived quick in Texas
Great product! shipped quick and arrived quick in Texas. I have used two other spay in products. Als liner and Raptor liner, and this is by far the best. The addition of the rubber granules makes all the difference for a rugged bedliner. If you are spraying a truck bed definitely use the rubber. the 3 gallon kit was plenty to do my 6.5' on my f250 and i put it on thick. I used a texture/hopper gun that i had bought with my als liner kit and that is the way to go. Also no matter what tape/cover the entire truck and any other vehicles around especially if its windy and you're doing it outdoors. Even though it's thick it has over spray. TRUST ME! I bough a 2 or 3 gallon bucket from store and mixed half the kit and sprayed first coat and then mixed second half and sprayed the rest. i like a rough texture so I spray mine far away for a bit smoother texture you can lower air pressure and spray a little closer. Hope this helps. I 100% recommend this product
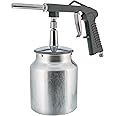
J**N
Very good product overall
Sprayed this I the bed of my 2014 Silverado. Looks very nice, and professional. If I spray anything else with this, I'm buying a better gun. The one that comes with the kit works, but there is an underbody sprayer on Amazon that looks like would work soooooo much nicer. Having a much wider opening on the spray gun to pour the mixed liner into would have made this job much easier. A worthwhile investment in my opinion. This makes a very professional looking bed liner. You will need a very large air compressor, just like you would to paint a vehicle. We tested different pressures, and decided to spray at 100 psi. Photos show prep and tape through finished product. Vehicle prep is a lot of work for any spray in liner.
Trustpilot
2 weeks ago
1 month ago