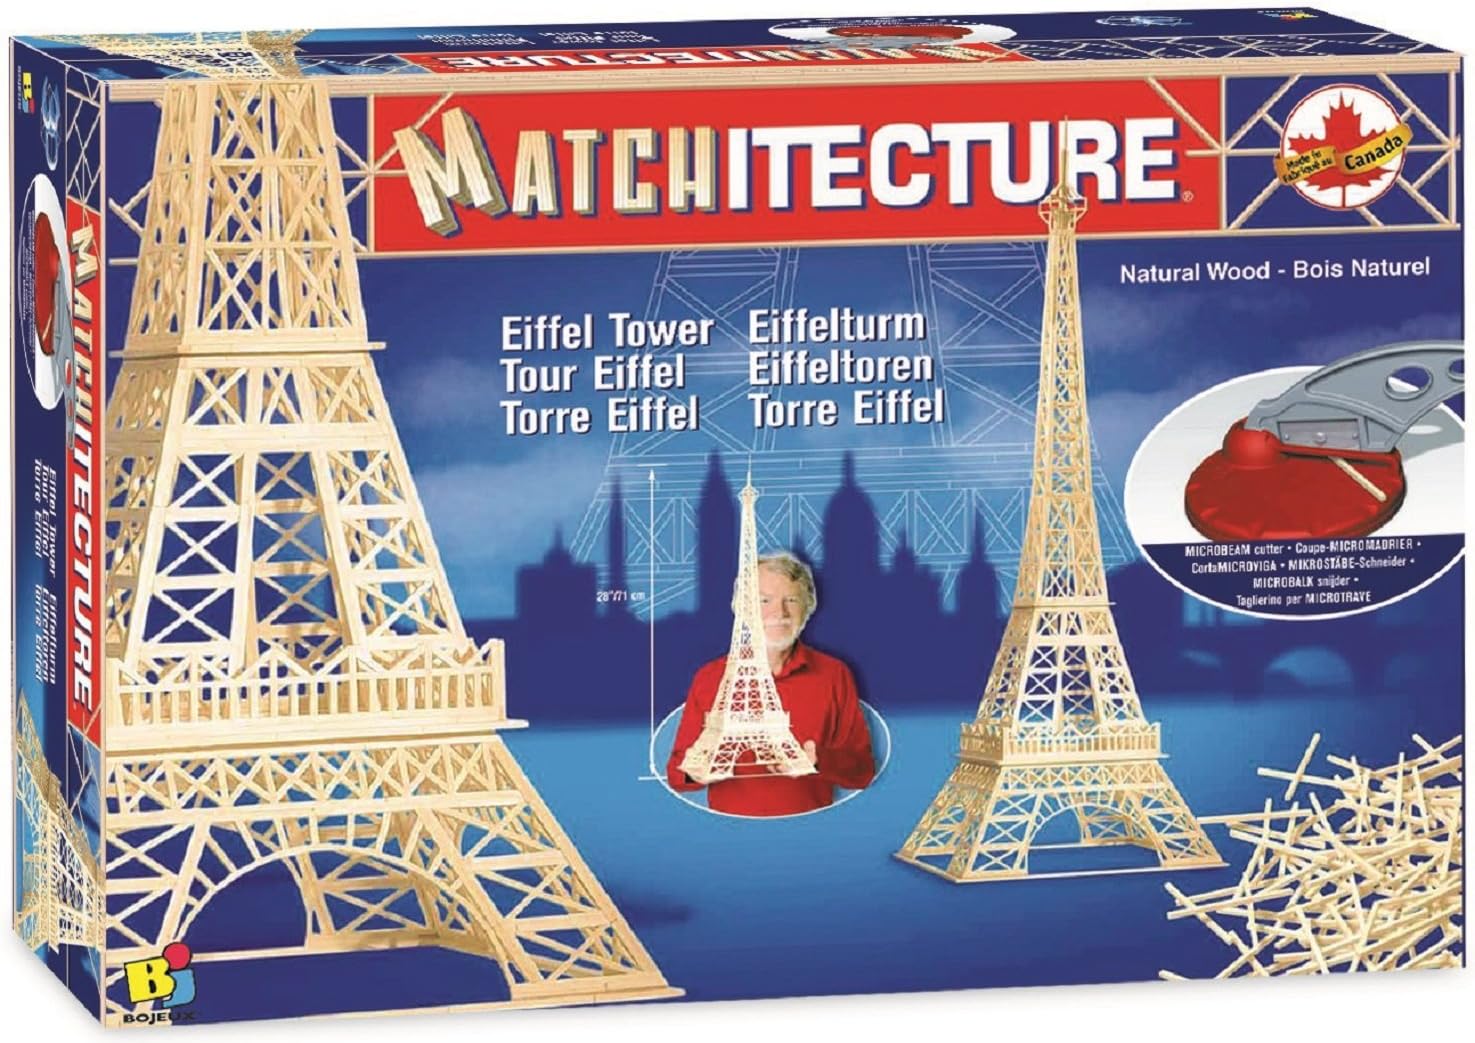
🗼 Build Your Dreams, One Beam at a Time!
The Matchitecture - Eiffel Tower Toy is an engaging model-building kit featuring 1,050 microbeams, a cutting tool, and detailed instructions. Ideal for intermediate builders aged 13 and up, this eco-conscious product from Family Games America allows you to create a stunning display piece that reflects your creativity and craftsmanship.
T**R
Throw them out and get a good pair of long-nose metal tweezers
I'm in the midst of construction, and loving it, but here are a few things I've learned which may be helpful to anyone else attempting this construction project.The tweezers in the kit are worthless. Throw them out and get a good pair of long-nose metal tweezers. You'll need them especially when working with the very small pieces in the lattice work.The cutter is OK, but I found that a plain scraper with a sngle-edge razor blade (the kind used for scraping decals off windshields) works very well for me, expecially with the small pieces. Be careful, though, to make sure your cuts are vertical; it's very easy to cut on an angle, and then the piece will not fit. Be extra careful not to cut yourself on the exposed blade. I've already done that once!If you cut the pieces according to the plan, you'll cut every single piece in the kit. The plans are drawn so that each piece is the length of a wooden kitchen match, not the length of the wood pieces supplied. I find no problem with using the longer pieces as they are, and cutting to fit with smaller pieces as I reach the edges. It saves a lot of cutting and a lot of waste. Next time you're in the supermarket or the dollar store, pick up a couple of boxes of the wooden kitchen matches; the wood is the same dimension, except for the length, and I've used them here and there just so I can say the "project is constructed with match sticks."Using the glue straight from the bottle will work, but I bought a set of syringes with long, blunt needles, which allow me to precisely put glue where and when I need. I bought these from Amazon {Duda Energy Syringepk010 Industrial Syringes with 15G x 1-1/2" Blunt Tip Fill Needle and Plastic Cover, 10 mL (Pack of 10)} but if you have access to medical syringes, they will work; just grind off the sharp tip of the needle. I find the glue goes a long way. I don't coat the wood with glue - a few drops does the trick. When two or more sticks are together, put glue on the parts that join, not just on the bottom where it sits on the plastic. Just for the heck of it I tried a couple of other glues, but the white glue works best. Elmer's Glue-All is just like the one in the kit.I used the provided acetate sheet for the first sheet of plans, but I picked up a pack of twenty plastic "page protectors" at WalMart for 88 cents. The plan sheets fit snugly inside, eliminating the need for the clips and board. I use a new sheet for each section I build. I slide out the plans, and set aside the sheets with the glued-up section still attached. After I get all the sections built, I'll start the assembly.Above all, be patient! This is a long-term project ideally suited for a senior citizen like me who loves to work with wood, but no longer has a basement and a shop full of tools. It's not noisy, it's not really messy, and can be worked on at home in spurts as time permits.I hope these hints are helpful. Good luck and enjoy!
G**Y
The Right Kit, the Wrong Tools
I chose the Eiffel tower model because it seemed the most dramatic and detailed for the price, and I think it is, but this review is more for the matchitecture system in general.First of all, anyone who's slightly interested in Matchitecture and has never worked with the system before needs to understand what they're getting into. Most models come in pre-made pieces ready for assembly and finish. Not so with Matchitecture. This is less a model kit and more a MANUFACTURING kit. You have to create all the pieces yourself from the raw material included in the kit. You get a set of wonderful blueprints, a large bag of raw materials (i.e. the matchsticks) which are all shaped identically, a rectangular slab of MDF board, four metal clips, a clear acetate sheet, a small bottle of white glue, and two cheap plastic tools--tweezers and a cutter. If I could rate these items separately, the ratings would work as follows:Instructions: 5/5 stars -- This the only REALLY indispensable component and the heart of the system. The blueprints breakdown the 3d model into a series of flat 2d panels. The proportions of the blueprints are 1:1, so you simply lay out the matchsticks over the blueprint, measure, cut, and glue. The clear acetate sheet lays over the blueprint as you work. Of course, it's the measuring and cutting that make this such a challenging project. The cuts require a significant level of precision of occasionally tiny pieces of wood.Matchsticks: 4/5 stars -- Longer than typical wooden matches and missing strike heads (of course), but real wooden matches would serve in a a pinch, so these aren't quite as vital as the blueprints for building the model. My bag had a few duds, but not enough to seriously threaten completion.MDF Board & acetate sheet: 4/5 stars -- standard hardware store/office supply stuff, but functional. MDF serves better than wood because its flatter and smoother than real wood. Only one sheet of acetate comes with the kit. I took one star off because I think at least two or three sheets would be better because they get pretty coated with glue after a while, but you can just pick up some overhead cells at an office supply store and have an unlimited supply.Metal Clips: 3/5 stars -- intended to hold the acetate sheet and blueprint to the MDF board. They don't clip nearly as tightly as they could and allow the blueprint to move a bit. Probably could be replaced with spring-loaded clips found in office supply stores.Glue: 3/5 -- Typical white glue. You'll have to really skimp on glue to make the tiny bottle last on a larger kit. No worries, though, easily replaceable.Tools: 1/5 -- Nearly worthless. This is where the real disappointment can kick in. The tweezers are cheap but at least adequate. The cutter, which is really just a razor blade screwed to a plastic lever hinged to a small plastic base, was the bane of my existence. It's terrible for making precise cuts. At first I'd have to cut pieces three and four times until I finally wised up and ditched the cutter, replacing it with an inexpensive flush cutter like this one: Xuron 170-II Micro-Shear Flush Cutter. (Although I've seen it cheaper on other websites.) This permitted the precise cuts and perfect angles needed to get the model done quickly and beautifully.So out of 6 pieces of equipment, the kit scores 20 out of 30 possible stars, or 3.33 stars on average, which explains my three star rating for the total system.One last point. The other reviews mention patience. BELIEVE IT! Many will find this system tedious. I've had this kit for years and still haven't finished it. Now that I've got the flush cutters, my progress will be much faster, but still, be prepared for a long haul.UPDATE (6/24/2015): After nearly SEVEN YEARS of working on this model off and on, I've finally finished it. I'm sure someone with more free time than me will finish much more quickly, but there you go. I wanted to include a photo and to upgrade the model my review to four stars instead of the original three. While my critique of the tools still stands, the finished model is more graceful and inspiring than any other kit I've ever assembled, not to mention that fact that the entire structure was 100% hand-crafted by yours truly. Few other kits can boast that accomplishment.
G**N
Tips to help build
I built it in 9 days but I am retired. Some tips I found by trial and error. Use half inch spring clamps to hold down the acetate and 3D work. Utility Knife works better than the cutter supplied for angle cuts. I used a wire stripper for cross cuts. I used needle nose pliers instead of the tweezers. I ran out of glue but Elmer's Glue-All works fine except it takes a little longer to dry. I had 376 (yes I counted them, I'm retired) sticks left over so discard any curved or splintered sticks. Measure the cuts first with a metric ruler and then mark the sticks for the cut. These tools I had so it was no extra cost to me. I could only find extra acetate sheets in the quantity of 50 so I have to fine a working stiff to grab one from his office. This is a great hobby. I am now staining the sticks to build the tower again. UPDATE Staining did not work. I used oil base stain and the glue did not stick. I built another and spray painted it black. It looks great.
A**Y
Not for the young!
This is NOT for young children. Requires immense patience, hand-eye coordination, and extra tools at times. Warning not visible on website photo.
Trustpilot
1 month ago
2 weeks ago