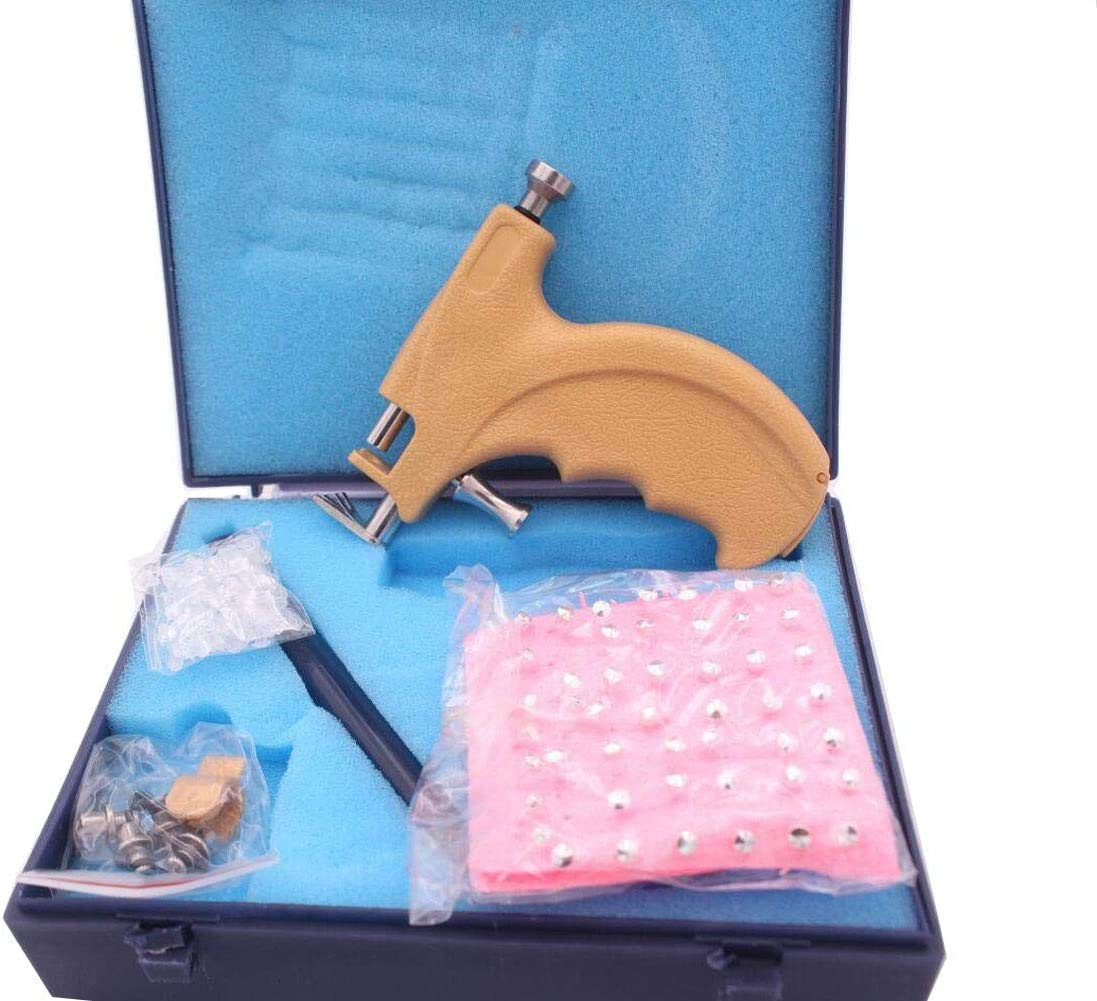
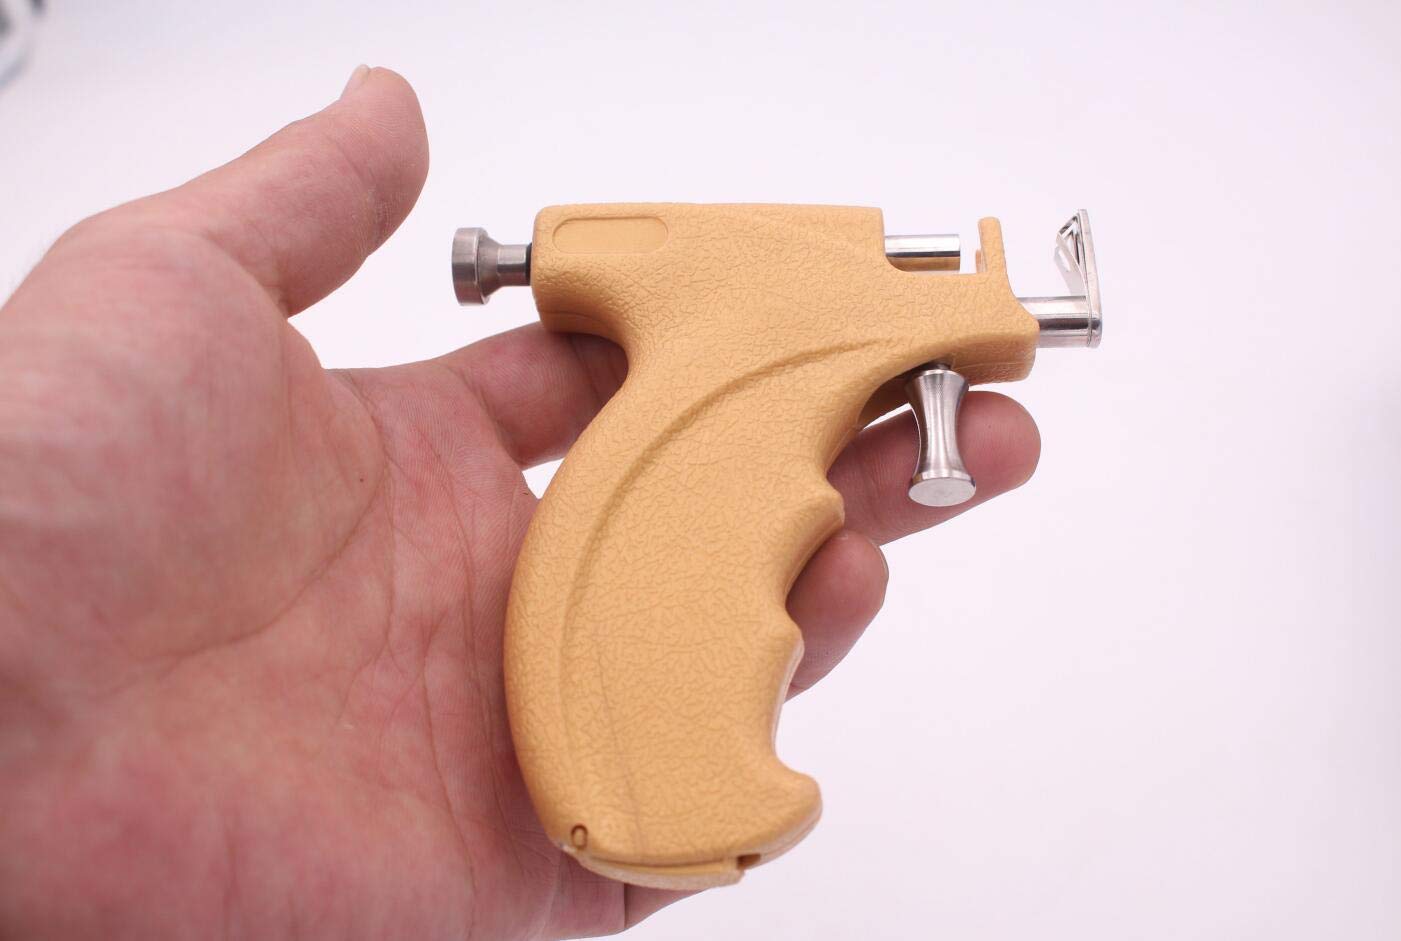


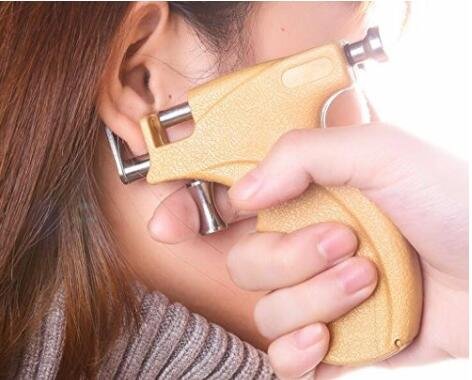
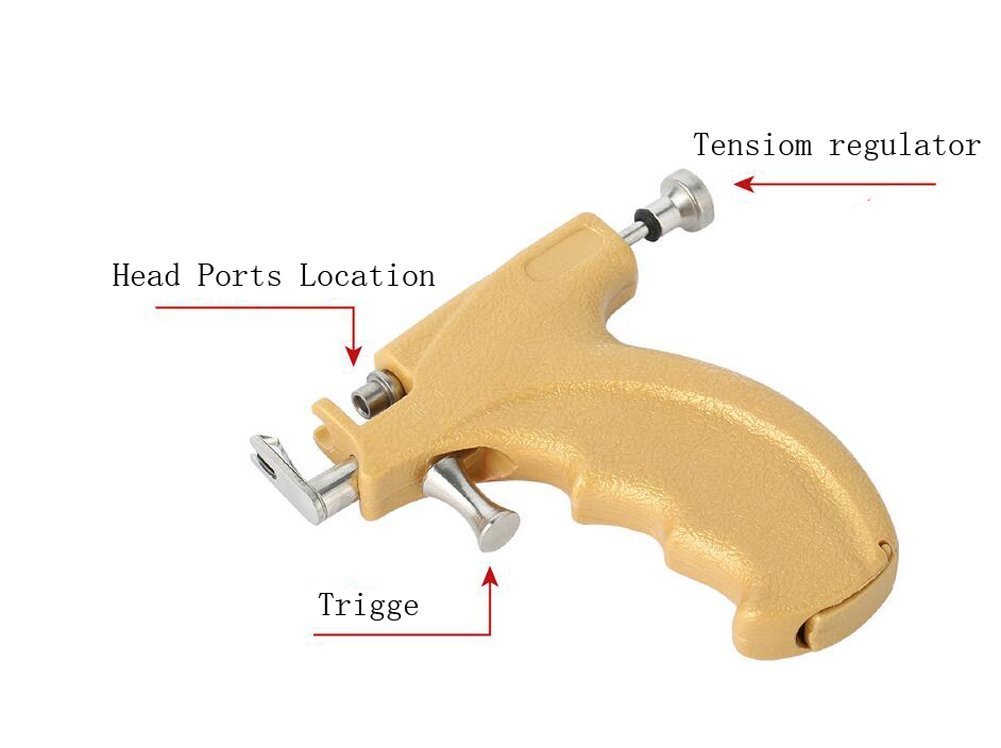
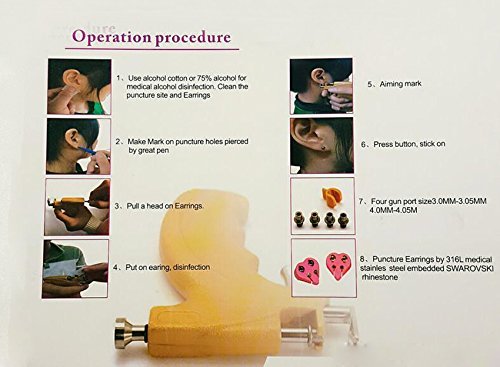
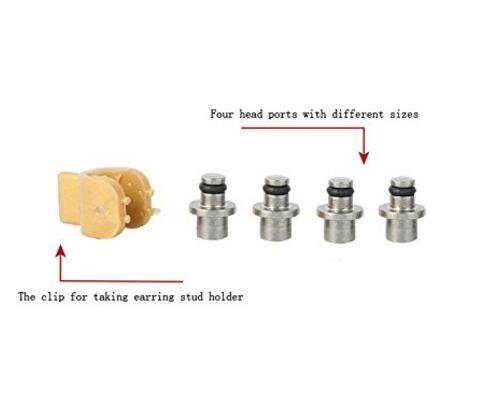
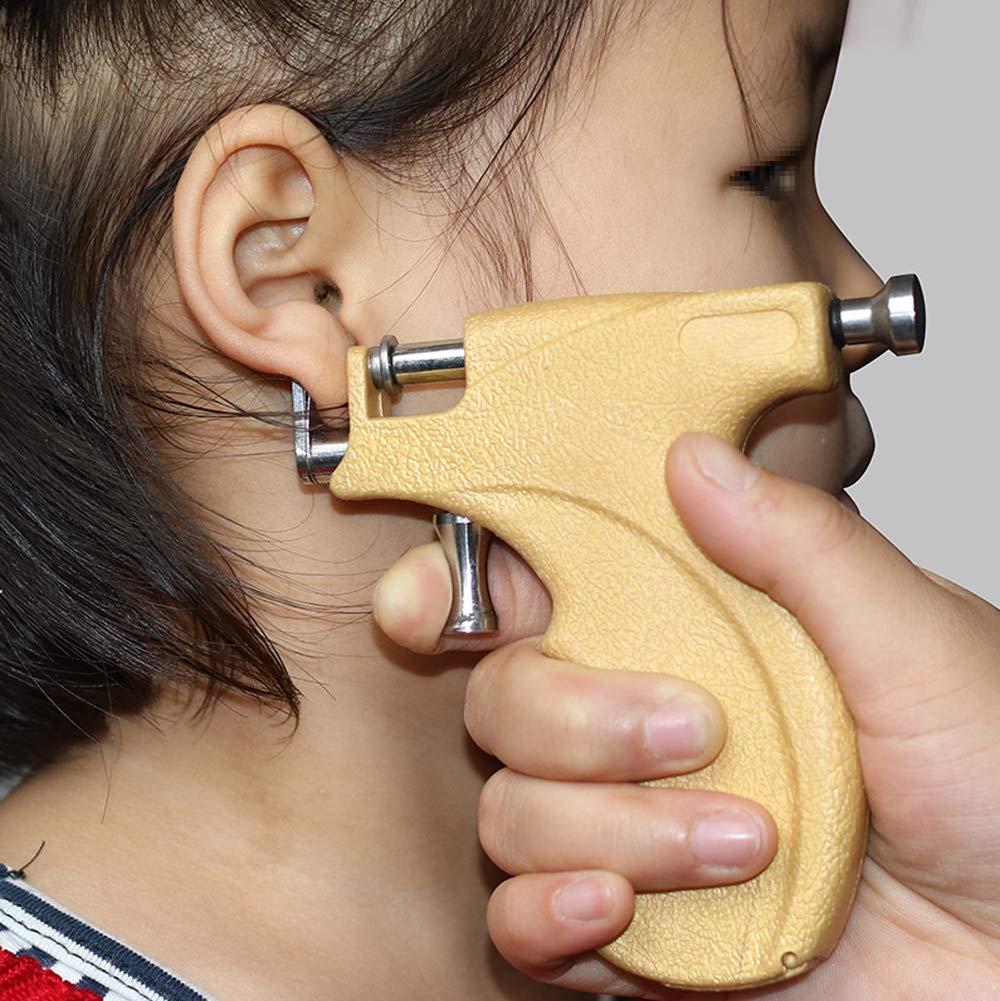
Specification:Ear Piercing Gun- Material:Steel- Color:as photo shown- Package:1 x Piercing gun;1 x Marker pen;108 x studs;1 x Storage CaseFeatures:- Innovative shaped head of firing pin provides improved vision when piercing- Clasp guard allows gun to retract from ear more freely after piercing- Suitable for both of ear nose lip or naval piercing- Can eliminate cross-contamination and inflammation that may occur during ear puncture.How to use:1. Place a piercing stud in the ADAPTER hole.2. Pull back the TENSION REGULATOR.3. Pull the TRIGGER, the aiming slot is used as a guide for aim, please make sure the point of the stud is straight going to the aiming slot.4. Press FIRE, forcing the stud through the flesh.Note :1. It must be kept away from kids2. Removal of the piercing studs if signs of infection develop
C**T
Great gun if it came with directions and a working sterile pen.
It came with no directions. The sterile marker was dried out. For that I took two stars off. Also the piercings given are *only* for ears in this unit. You will need to purchase nose lips piercings. *please do not use the ear earings to do a nose or lip piercings. The gauges are different sizes.* Hey what do I know lol. I'm a Tattooist.How to use:1st: Sanitize machine (preferably wearing gloves and a clean spot)2nd: wipe earlobe with alcohol and wait until fully air dried. (Just like when you get your blood drawn and need to let alchohol dry, because it will burn when puncturing. ***Go to step 3 while wating.)3rd: also with gloves grab the correct earing and sanitize it.4th: then replace it to fit in the little bit that came in a little plastic bag.5th: you will now pull the lever in the back of the gun back.6th: now you will place the bit with the earring you connected in 4th step into the front of the lever and be sure it is secured into hole.7th: mark where you will like your earring to be, "without" touching it with your gloves. (*do not use a regular marker or pen if yours is dried out like mine. It is a sterile pen for a reason.)8th: line the earlobe marked area to the end of the earring.9th: when in position, pull the trigger.10th: re-pull lever to release gun from earing. *without moving the gun connected to earring.*11th: (thinking you sanitized already) place the back of the earring on. ***be sure to remember not to put it close to ear. Being a new puncture the ear will have its natural inflammation. Therfore you will want to give room for this in the healing process. ***12th: clean from and back of ear again with alcohol.13th: sanitize equipment again!. (You may not see the droplets of blood splatter but it does! I am a phlebotomist, a tattoist and also a crazy person in learning about spread of pathogens after working in the hospital laboratory. Many droplets you can not see with the naked eye.)14th: turn ear clockwise and counter-clockwise daily to tell the area of tissue that there is a area not to be closed (your body is made to heal punctures). Also clean with fine sea salt and a q-tip 3× daily.I am not a doctor or a nurse, just giving a guide of directions of my way. Doctor or nurse would advise to go to a professional lol. But we didn't and this is why we purchased this product lol.Best wishes and hope this was able to guide you a little at least.
G**R
Perfect piercing!!
This piercing gun is perfect. I was able to pierce three holes in my ear back to back without error!! Perfect size, very sturdy, and makes you feel like a piercing pro!! I highly recommend this product!! Very professional tool.
D**C
Not a good quality product - hurt - leaves slight scarring.
I will be honest with you guys. This is not the same kind of device you see used at shops. It is flimsy. The first time my fiance pierced my ear it went smoothly.. so what happened the other 3 times? The other 3 times hurt my hear and pinched the lobe. I have never experienced pain when getting my ears pieced with a gun. My fiance tried to gently press on the trigger and it still clamped on to my ear and it really hurt to try to remove the gun from the earring.The earrings are terrible. They are "steel" (not sure how).. if you have sensitive ears, do not use these earrings. I wore these for months while I searched for earrings to switch out and have to change them out every week because they turn black and make my ears hurt. What ever this metal is, is terrible. How is someone supposed to wear these for 8 weeks before switching out to new ones? My ears are STILL healing from this and I bought this product in January..It is cheap, but this is the only upside to this product. I tried to give this product a fair chance and tried to take care of the earrings and clean them etc. but not matter what I do they just turn black and end up hurting my ears which impedes healing. It looks like I have slight scarring on my lobe. I would stay away.
A**J
Easy to use but, don't use the plastic earring backings
Don't use the plastic pieces that go on the back of earring. I tried one but it fell out within minutes and I had to push the earring back in which hurt more than piercing my ear.Gun is built to have a "push back" or "butterfly backs" they slide into the gun and when you pull the trigger it pushes the earring into the push back and you are done. The push backs won't fall off.I suggest testing it and pulling the trigger with a push back installed, making sure the earring slides inside the push back a few times, before using on your ear.Gun itself is well made and easy to use.
A**R
Good value but...
The earrings they included are not right. I wish they had put the sets of studs that are on the plastic mount so that you dont have to touch the earring to get it into the gun. Also, the studs are super bright silver and look cheap when in the ear.
Trustpilot
3 days ago
1 week ago
