✨ Elevate Your Cleaning Game with Ease!
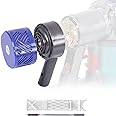
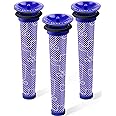
The Motor Rear Cover + Post HEPA Filter is a premium upgrade for your Dyson V6 vacuum cleaner, compatible with various models including DC58, DC59, DC62, and more. This replacement part enhances suction and filtration performance, ensuring a cleaner home environment. With easy installation tools and dedicated customer support, upgrading your vacuum has never been simpler.
Brand Name | WYWY.Wide |
Item Weight | 6.2 ounces |
Product Dimensions | 3.54 x 7.87 x 1.97 inches |
Color | Grey |
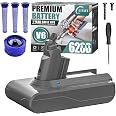
Compatible Device | Dyson DC58, DC59, DC62, DC72, DC74, V6, SV03, SV04, SV05, SV06, SV07, SV08, SV09 |
Material Type | Foam |
Batteries Included? | No |
Batteries Required? | No |
C**G
Dyson v6 Hepa conversion
Great quality, fair price with easy install video. Came with 2 tools to aid with install.
D**N
Adds a replaceable filter where none exists
Dyson doesn't tell you there is a filter on the end of the vacuum. This part adds a replaceable filter to the end. Easy to install.
E**C
Seems fine.
Fits fine and seems of good quality. Doesn’t really make the machine any quieter tho. So don’t buy it for that reason. I do like the upgraded filter.
D**R
Perfect fit
This item was inexpensive, fits well, and got it the day after I ordered it. I don't know what else to say except it was a good purchase for me.
K**R
Easy peasy
My vacuum was making the intermittent running noise and while searching for the clog I tried cleaning the cone filter by taking it apart and discovered the rear filter. It turned into a gummy wad so found this solution. I also assumed since my cone filters are washed they were clean but the first one was solid gunk and got tossed and replaced with new. I kinda tore it up taking it apart anyway. My spare cone was successfully taken apart and also had stuff in it. I did manage to clean it for spare backup. This thing though was super easy to install for someone that might be older in some circles.
L**E
Yay – My Dyson V6 now has an easily replaceable HEPA filter!
As another reviewer stated, it probably isn’t necessary to remove the cyclone to complete this retro-fit. Even with the included tool, I found that the cyclone was impossible to remove without breaking and I ended up breaking off a piece of the plastic ☹. The good news is that I was able to successfully reattach the cyclone during reassembly despite the small piece of plastic that broke.The rear handle/motor cover was also a bit difficult in getting it to do that initial “pop” but once it happened it was fairly easy to use the little included crowbar tool to fully remove the rear motor cover.Perhaps the difficulties I experienced with disassembly is because this V6 vacuum is over 8.5 years old? Better yet, it’s probably because Dyson doesn’t want you to be able to fully clean their vacuums with a goal towards long-term use (instead they would prefer it be more of a “disposable” appliance so you have to fork out hundreds more $$ for a new one).Anyhoo - I am flabbergasted Dyson thought the original flimsy piece of sponge pad that was in the rear motor cover would hold up for any length of time. One touch of this sponge and it just disintegrated. This vacuum should have had the ability to easily replace this filter from the get-go.I got everything put back together with the new upgraded rear motor cover (which took a bit of wiggling to get the battery lined up and screwed back in) and attached the new HEPA post filter. The vacuum is working great on both Regular and MAX modes.Apparently, that old sponge pad filter was restricting suction/airflow more than I realized. I re-vacuumed an area I had just done the day before with this same V6 (before upgrade) and was amazed at how much more the vacuum picked up (after the upgrade).I’m happy I came across this listing to upgrade the V6. Overall, it’s been a good experience and I’m looking forward to using the upgraded V6 vacuum for many more years to come.I’ll update this review should anything change in the functioning of the upgraded vacuum.
J**T
Hand held vacuum is back in service.
My old motor started smoking and finally gave up. I purchased this one, second hand, and it works great. My purchase saved me from having to throw away all the attachments and battery and buy a whole new set.
T**T
Hopefully this review fills in the gaps.
I keep telling myself I'm not going to order from these companies with weird names because *there's always something amiss* with their posts. This one is no exception.To be fair, first, all the promised parts arrived. The packaging was in great shape.But, the deflector that's shown in the video for the Dyson V6 is *not* included with this particular product. Someone asked about it in the Q & A section. The vendor told them "We also sell kits that include deflectors, in another other option of this listing." There is *no other option* for a kit with a deflector in this listing. For those who are going to order one because they want to protect their Dyson's motherboard, as the vendor says is the purpose for the deflector, here's a listing that includes it: https://www.amazon.com/gp/product/B0BDF1F6SF/ref=ox_sc_act_title_1?smid=AWNHI5EP0CL97&th=1The video the vendor uploaded to disassemble and reassemble the Dyson V6 is absolutely helpful, but it skips the difficult parts. For instance, the back of the handle does not come off with a gentle push on the back of the vacume. The clip that's inside and at the bottom of the handle has to be released first. There's no easy way to get it to release, just plan on bending the handle cover.The old sponge filter cover doesn't come off as easily as the video describes. To get that to release, you have to find and release the interior clip at the *top* of the filter cover. Then you can release the filter cover by gently prying on the sides. While the tool the vendor provided was somewhat helpful, I found a tiny pen screwdriver fit into the tight seams better.Don't assume that the Max button is right side up when you're trying to attach the new HEPA filter. Mine wasn't, and it took a few minutes of trying to screw the HEPA filter on and it not matching the threads on the new back for me to realize this. The button being upside down doesn't seem to impact functioning, though.The video totally skips reattaching the battery, so a couple pointers for that - First, know that the 2 screws you've removed from the V6 are 2 different widths. The thicker one goes in the handle. So if you've tried to reattach the battery and you can't get it go flush to the bottom of the handle, you've put the thinner screw in the handle and that's what's allowing the battery to stay low. Remove that screw, get the battery flush with the handle and insert the other, thicker screw.Beyond that, there's the normal disassembling and reassembling the Dyson V6 challenges. Which you know how to navigate if you thoroughly clean it a few times a year.A last note - the sponge filter on my V6 was almost perfectly clean, because I do disassemble and thoroughly wash the prefilter, cannister and screened-in vortex sections 3-4 times a year. So I'm not sure I needed this HEPA filter attachment, but I do prefer to have HEPAs on my vacumes, so I'll keep it.
Trustpilot
1 month ago
3 weeks ago