🔔 Upgrade your doorbell game—wireless freedom, wired reliability!
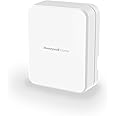
The Honeywell Home DCP917S is a compact, white wired-to-wireless doorbell converter kit powered by a 3V lithium battery. It effortlessly transforms your existing wired doorbell into a wireless system with a robust 200-meter signal range, combining modern design with trusted Honeywell reliability.


| Manufacturer | Honeywell Home |
| Part Number | DCP917S |
| Product Dimensions | 50 x 50 x 50 cm; 17.3 g |
| Batteries | 1 CR2 batteries required. (included) |
| Item model number | DCP917S |
| Colour | White |
| Style | Converter |
| Power Source | Batería |
| Voltage | 3 |
| Item Package Quantity | 1 |
| Number of Pieces | 1 |
| Measurement System | Metric |
| Included Components | no_components |
| Batteries included? | Yes |
| Batteries Required? | No |
| Battery Cell Type | Lithium |
| Item Weight | 17.3 g |
Trustpilot
1 month ago
5 days ago