Desert Online General Trading LLC
Dubai, United Arab Emirates
Desert Online General Trading LLC
Dubai, United Arab Emirates


🔧 Power Up Your Productivity!
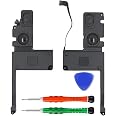
The iFixit A1398 A1618 Battery for MacBook Pro 15" Retina (Mid 2015) is a high-capacity replacement battery designed to enhance your device's performance. With a capacity of 8800 mAh and a watt-hour rating of 99 Wh, this battery ensures longer usage times. The included repair kit comes with all necessary tools and adhesive for a hassle-free installation, making it the perfect solution for DIY enthusiasts. Plus, it’s covered by a 1-Year warranty for added assurance.


R**D
Great buy, not an easy install, so far so good though
*** 6/17/21Here's a how I did it. Got a cheapie MBPro 2015 retina 15" with a 672 cycle battery (yikes!), and "battery service required" error message when checking battery status. Flipped it over, took out the screws using tools from this set, and began the operation. Watched youtube videos and visible instructions to get familiar. Do that before you begin this; I've taken macbooks apart for years (2011, 2007 mbpros) but this really required some effort.Drain the battery down to ZERO before attempting this.I did NOT remove all the stuff like you are supposed to (at my risk) only removed battery and trackpad connection (steps 1-6 in ifixit's instructions). I also took out the SSD as a precaution. I def was not going to screw with the wifi/bluetooth 3 connectors, nor the speakers etc. I did this at MY risk; I could have easily ruined stuff.You need to tilt the machine up maybe 1½" - 2" to get the glue remover to go under the battery when working on each side, though I had trouble with the nozzle, i had to cut it open to make a small hole. Despite my best efforts, I spilled some of that magic juice on things "local" to the battery, but wiped it immediately (it's like acetone so it evaporates quickly). Literally within 10 or seconds, the glue was loose enough to begin pulling away. I used a spudger and the credit card shaped card to dig away gently. ***One criticism is the glue remover nozzle is just way too big for the small space between battery and speakers (and since i didn't remove the speakers—i didn't care if they were ruined actually—the space was even smaller).*** But if you follow instructions and remove each side and carefully use the glue remover (and you literally only need tiny amounts; add more after 15 seconds if the glue doesn't move), the battery will come out. Since it is in big pieces, it might seem weird to pull it out. I used the case the new battery came in, to store the used battery (same shape!).You'll probably want to remove the rest of the nasty glue remnants stuck to the case. Just do it carefully with glue remover, spudger (scraping), and the card. It all will come off. Dry this thoroughly.I took the top plastic off of the new battery first and placed it where it fit to see. Then I took the bottom plastic off and set it in. Be real sure you know where it goes because even setting the new battery down gently will stick to the case. I pressed down hard and it stayed (see note below). Put back SSD ,Re-attached connectors to trackpad and battery (in that order; battery should be first thing and last thing you connect), and it booted fine with new life!Follow instructions to properly calibrate: charge it to 100%, drain it to ZERO, then charge it to 100% and leave for 2 hours. Get Coconut Battery app.Maybe took a half hour to do; kept iPhone on with youtube instructions just to be sure.**** I will update. ******* 6/22 After a few days, i have gone from 1 cycle to 3 cycles, and my capacity dropped to 99.8% according to Coconut Battery. I started at about 103% on first day of capacity, but now after a few days, it has stayed at 99.8%, 8584 mAh (design capacity 8600 mAh). I think this is reasonable. Battery life seems fine. I have yet to time it to see how long I can work.**note from above about battery sticking to case: One thing I noticed today is that the battery may have de-attached from the case in a spot because it seems loose when I moved it up suddenly. I'll check on that next time I open it.
D**R
Great kit and instructions - suggest you read up before purchase.
My 4-year-old MacBook Pro had the swelling battery problem. It not only swelled but became defective about the same time. I decided that with an engineering degree and some experience in an instrument shop this would be a piece of cake for me. The kit comes with everything needed and the instructions are very good. They are online also - a good idea to read before you tackle the job. All that said, this is an intricate job that will challenge you if you haven't done it previously. Some of the little connectors that Apple chooses to use in their electronics are as delicate as they are tiny - clearly designed for little or no service after the unit is sold. Their goal is compactness, not serviceability, so you will end up removing a lot of stuff to get at the battery. A liquid similar to acetone is used to loosen the battery adhesive (yes, it's glued in!) It's not pleasant and it will still require some maneuvering to loosen the battery. If I remember correctly the battery came out in 6 parts. The replacement fit perfectly and the rest of the process was just the reverse of disassembly. I'd rate the pucker factor at about 5 out of 10.
C**G
Not the cheapest option
Not the cheapest option, but cheapest is not always the best. The included tools along with their instruction video make this a relatively easy install. Now the old Mac is like new. We are very happy with it.
R**G
Working well so far
Almost every cell of my original MBP battery had swollen -- to the point where it would not sit flat on a table -- and OSX was showing "battery service needed" errors. Honestly I would have just pad Apple the $200 to replace it for me, but I couldn't get a workable appointment time at any of the three Apple stores in my area; so DIY it was.Installing this was a fiddly process, but that's not iFixit's fault. The kit contained all the necessary tools, which were good quality and can be used again.Based on user comments in the iFixit Guide, we opted not to remove the speakers and motherboard from the computer, which saved a ton of time (40-ish steps in the guide). Since the old battery was puffed up, it had already pulled away so we were able to separate it from the computer case without using the solvent. Then it was just a matter of cleaning up the leftover adhesive with goo gone, installing the new battery, and screwing it all back together.So far, the battery works fine and holds a charge as expected. No more battery errors. We didn't save a *ton* of money vs the Apple store, but we got it done on our timetable without having to take time off work. Most Batteries Plus Bulb stores will recycle used lithium ion batteries, so that's what we did with the old one.
V**D
Disappointed
I purchased my MacBook Pro in mid-2015, the original battery lasted 8 years. I purchased this battery on March 9, 2023, installed it shortly thereafter, and you would think that a new batter would last as long as the original battery, but it is showing signs of degradation. Several months ago, I started noticing how quickly the battery would drain, and even though I could charge it to full capacity, the battery continues to drain fast and the health continues to decline. I contacted the company and received a full page of information on how to fix this issue, I followed their instructions and saw that the battery health went back up to 97%, then two weeks later, the battery is now down to 87% and continues to drain faster than normal.
D**.
Battery's Fine but the Packaging of the Kit Not
The battery appears to be fine and was easy to install (only time will tell how good it is, of course). My complaint is with how they packaged the kit. Everything was nicely contained in plastic bags except the one thing that needed to be, namely the liquid adhesive remover. It of course leaked and went everywhere and made opening the other items a big blue sticky mess. If they had just put the liquid in a plastic bag and nothing else all would have been fine and would have given 5 stars.
Trustpilot
1 month ago
2 weeks ago