We remain fully operational. Our teams are working around the clock to ensure your deliveries continue safely.

DOWNLOAD THE APP


Customer Services
Copyright © 2025 Desertcart Holdings Limited
DOWNLOAD THE APP

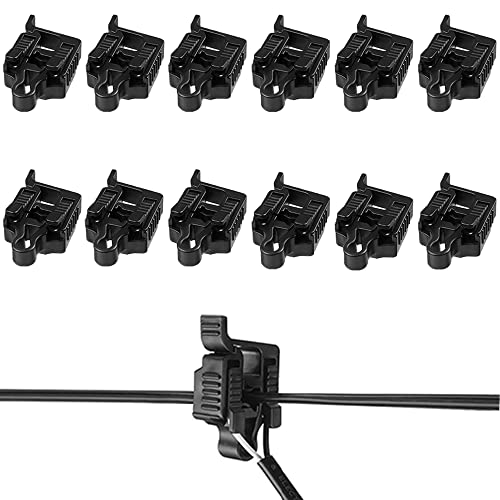
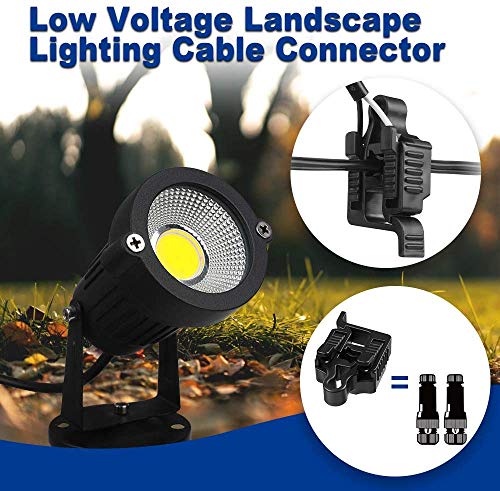
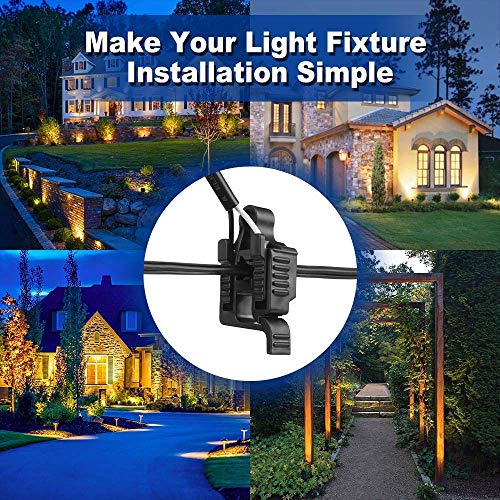


💡 Snap, Lock & Light Up Your Landscape Like a Pro!
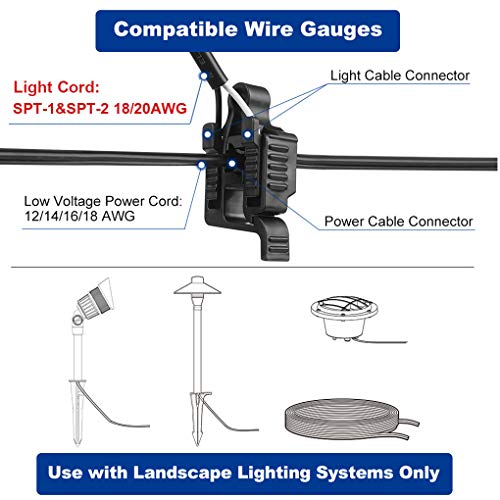
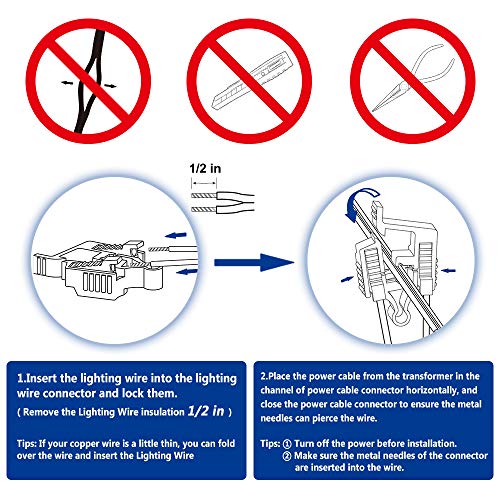
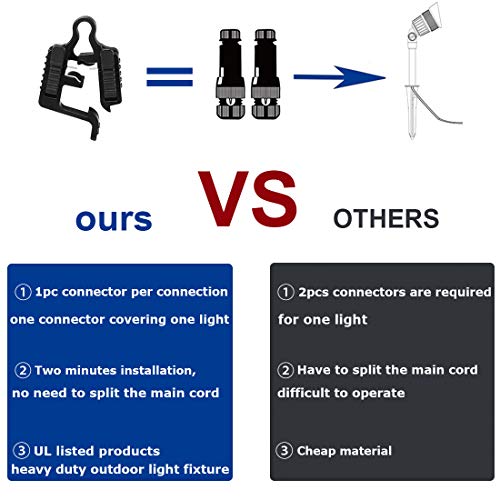
These UL-listed, waterproof low voltage wire connectors are engineered for quick, tool-free installation on 12-18 gauge landscape lighting cables. Each pack includes 12 connectors, enough to cover 12 lights, offering double the coverage of typical kits. Designed for durability and ease, they ensure secure, weather-resistant connections ideal for pathways, patios, and gardens.


| ASIN | B085DZFG7D |
| Batteries Included? | No |
| Batteries Required? | No |
| Best Sellers Rank | #110,529 in Tools & Home Improvement ( See Top 100 in Tools & Home Improvement ) #229 in Landscape Spotlights |
| Brand | AizzKry |
| Color | Black |
| Connector Gender | Female |
| Connector Type | Snap Plug |
| Contact Material | Plastic |
| Customer Reviews | 4.4 4.4 out of 5 stars (762) |
| Date First Available | March 3, 2020 |
| Included Components | 12 Low Voltage Wire Connectors |
| Insulation Material | Polyvinyl Chloride (PVC) |
| Item Weight | 7.1 ounces |
| Item model number | M |
| Light Direction | Up/Down Light |
| Manufacturer | Antrees |
| Material | Plastic |
| Maximum Voltage | 12 Volts |
| Number of Items | 12 |
| Number of Lights | 1 |
| Package Dimensions | 5.47 x 5.16 x 2.05 inches |
| Part Number | M |
| Plug Format | A- US style |
| Power Source | Corded Electric |
| Shade Color | White |
| Shade Material | Plastic |
| Shape | Reflector |
| Special Features | 2-way switching |
| Specific Uses | Pathway |
| Specification Met | UL |
| Style | Modern |
| Switch Installation Type | Wall Mount |
| Terminal | Spade Terminal |
| Type of Bulb | Low Pressure Mercury Discharge |
| UPC | 077063334847 |
| Unit Count | 12 Count |
| Voltage | 12 Volts |
| Wattage | 120 watts |
S**N
Landscape lighting attachment
Watch video review posted. Works great with my 12 gauge wire, I would recommend, fairly straightforward, just snap it closed onto the main wire, and push down on the individual wires. I hope you found this review helpful
N**R
Easy to install
I seldom write reviews on products. However, this product saved me from a nightmare so wanted to take the time to pass along some info. I purchased a set of outdoor LED landscaping lights (not from Amazon) that were affordable for me. Though I am very pleased with the lights the electric clips were either broken OR broke when I tried to close them. I needed to replace all the original clips . Found these clips and because of installation instructions were listed with the product info I purchased them. The are very sturdy and installation is easy. The instructions suggested bending the end of the light fixture wire over before inserting when this wires is very thin. This tip was worth its weight in gold...doing this helped me make the connecting much more secure. I'm not very strong so used pliers to close the clips around the light fixture wires. Clamping this clips over the power cord is easy and pretty much a no miss. I do recommend this product
K**S
One piece per fixture. Easy to use.
I did a lot of research on LV lighting connectors, and am happy with these. The clamp onto the LV wire (12-16g) is very easy -- the connection to the light fixture is always a hassle. This has nifty clamp-shut connectors (with a spike) for each of the two lighting wires. They're hard to see in the pictures. It expects them to be round. My choice was either the square 18g wire that came from my fixture, which I could try to strip down, and shove in there. Or, I ended up using a pigtail and wire nuts. Not a great solution - I was looking for an all-in-one solution. But it really depends on what you have coming from your light fixture. I had thin wires (like bell wire) and so I had to use a 6" pigtail/adapter and wire nuts. If I had a light fixture that had 18g "low voltage" wire, it would have fit right in, and I would be done in 2 seconds. So, overall, I am satisfied -- this is much better than some of the other solutions. At about $3 per connection, and with the convenience - I couldn't find anything cheaper.
B**N
Easy to use (mostly) unless your low voltage and fixture wires are of different gauges
Super easy to install as they only require three snaps. I purchased these for low voltage landscape lighting and selected the 16 gauge size to fit with my low voltage wire. Out of my 16 lights there are 3 or 4 that occasionally go out as the 2 terminals for the light wires themselves are oversized for my lights. Maybe I should have ordered a size down but then I’m unsure how these would fit the low voltage wire. With the move to LEDs I’d suggest to reduce the size of the 2 female terminals and/or improve the width of the contact points to accommodate thinner gauge wires.
T**R
Robust connector easily snaps on low voltage light installation
I used this plastic snap on connector to quickly install 16 low voltage outdoor lights, onto 2/14 paired twisted strand low voltage cable. They also easily unsnap if you want to change the location, or remove it. The cable insulation, though pierced, is not damage beyond the piercing and the flexible insulation seals it back up. Since the snap on connector can accommodate larger sized cables, I had to be careful that the knife edged connectors that pierce the cable insulation were lined up at the center of the cable, because the smaller cable can "twist" a bit in the slot and the knife edge connector can miss the internal conductor. Easy fix if it does miss; just unsnap and reinstall carefully. For the light leads, which were already tinned, I cut the exposed conductor back to 1/2 inch, so that conductor fits and the insulation stays within the connector insertion point. I then dipped the conductor end in silicone connector grease to assure good connection and waterproof against any corrosion; then snap the connection closed. The connection is secure with moderate tugging on it.
S**S
Easiest Landscape Lighting Connectors I've Used
I bought these for a large project (45 lights) and they have been a massive time saver. In other reviews I've seen some complaints and some workarounds to these complaints. I don't think either is warranted. Here is my experience: 1. Do all your prep work at the bench. Don't try to assemble and clip everything together in the field. Before installing outside, you should have the connectors attached, bulbs inserted, and the lights tested. 2. I agree that on smaller gauge lamp wires (like in the pictures I've attached) the connector can be finicky IF you do not prep and place the wires correctly as described below. 3. There is little chance that a connector is "bad." Its simply a metal pin that pieces both the lamp wire and the feed wire to connect them together. As long as the wire is pierced and the clips are tight, there is not much else that could go wrong. 3. The lamp wires should not have exposed ends and they should be cut to the same length. 4. The lamp wires should be straight going into the connector. If not, this is a chance for the tap pin to miss on the smaller gauge wire. 5. When clipping onto the feed, simply make sure the left and right sides of the wire are aligning with the pins in the respective location. I'm making this sound harder than it is. It was easy enough that after about 10 lights, I was doing this with one hand. 6. I like to keep the main feed energized when I am installing the lights. When I put the clip on I can instantly see if the connection is good. If you do this, make sure that your feed cable is not exposed at the end to prevent shorting. Just give it a clean cut at the end.
C**E
Poor connections with this type of connectir
You can only crimp these down one time and then they cannot be reused. Avoid this type of connecter, it doesn’t make contact half the time and can be very glitchy.
A**R
Most versatile connector I found
This is the first connector I found that can use my #12 gauge main line and excepts my #16 gauge landscape lights. I think that they are as waterproof as they say, so I rubber tape and plastic tape to ensure continuity for a long time. A little silicone grease may also work to unsure no failures. The connector is rather large, but if it works over the others I tried, I am sold. Better than soldering connections.
A**R
They are expensive but they work extremely well and saved me a ton of time over having to cut the main power cord in numerous places and then individually connecting the two wires from the low voltage lights to the main power supply. This method only took a few seconds and they have been working excellent all summer. I’ll definitely purchase them again.
L**S
Exactly what I was looking and which was not available locally through hardware or electrical stores.
C**S
Great product easy to use fantastic way to connect low voltage lights work like a charm would recommend and buy this product again
G**E
Product used to put low voltage lights in our backyard
M**R
Easy, no tools, just add to your system.
Trustpilot
4 days ago
1 month ago