We remain fully operational. Our teams are working around the clock to ensure your deliveries continue safely.

DOWNLOAD THE APP


Customer Services
Copyright © 2025 Desertcart Holdings Limited
DOWNLOAD THE APP

🔴 Trigger the power, own the cut — don’t get left behind!
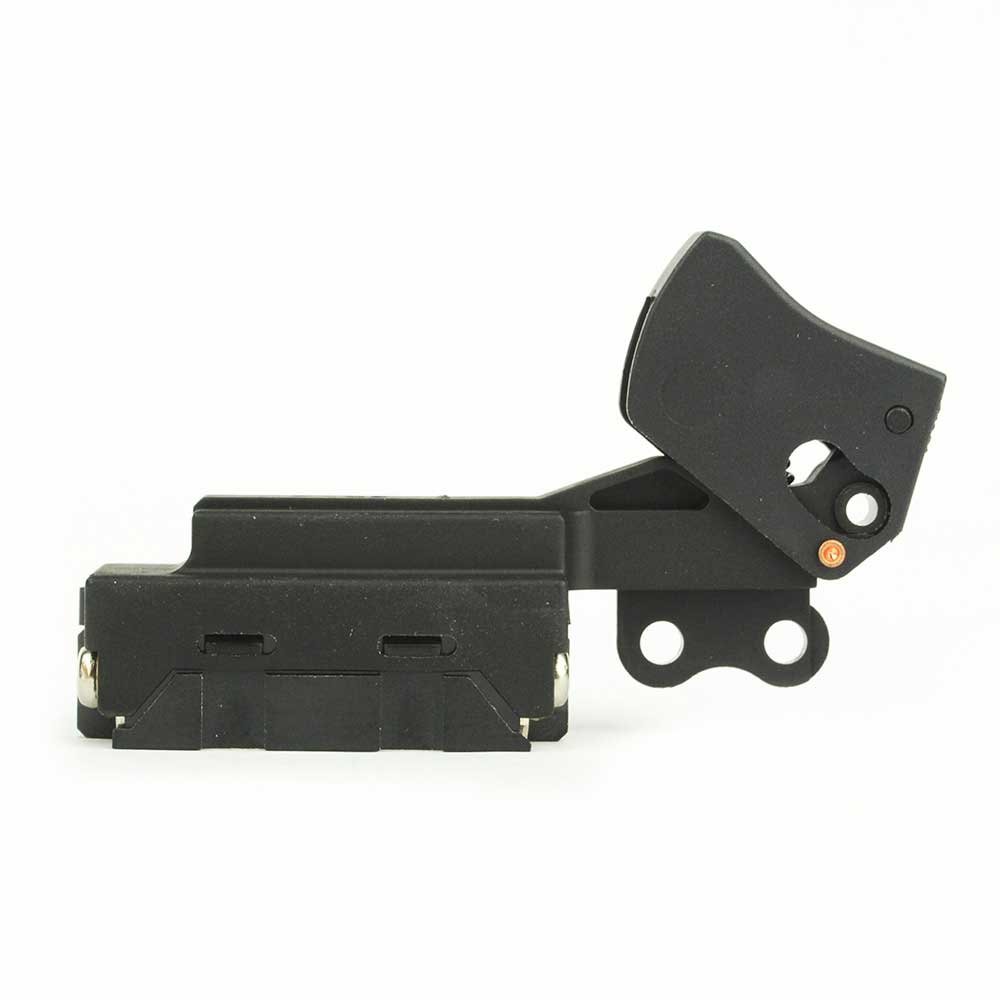
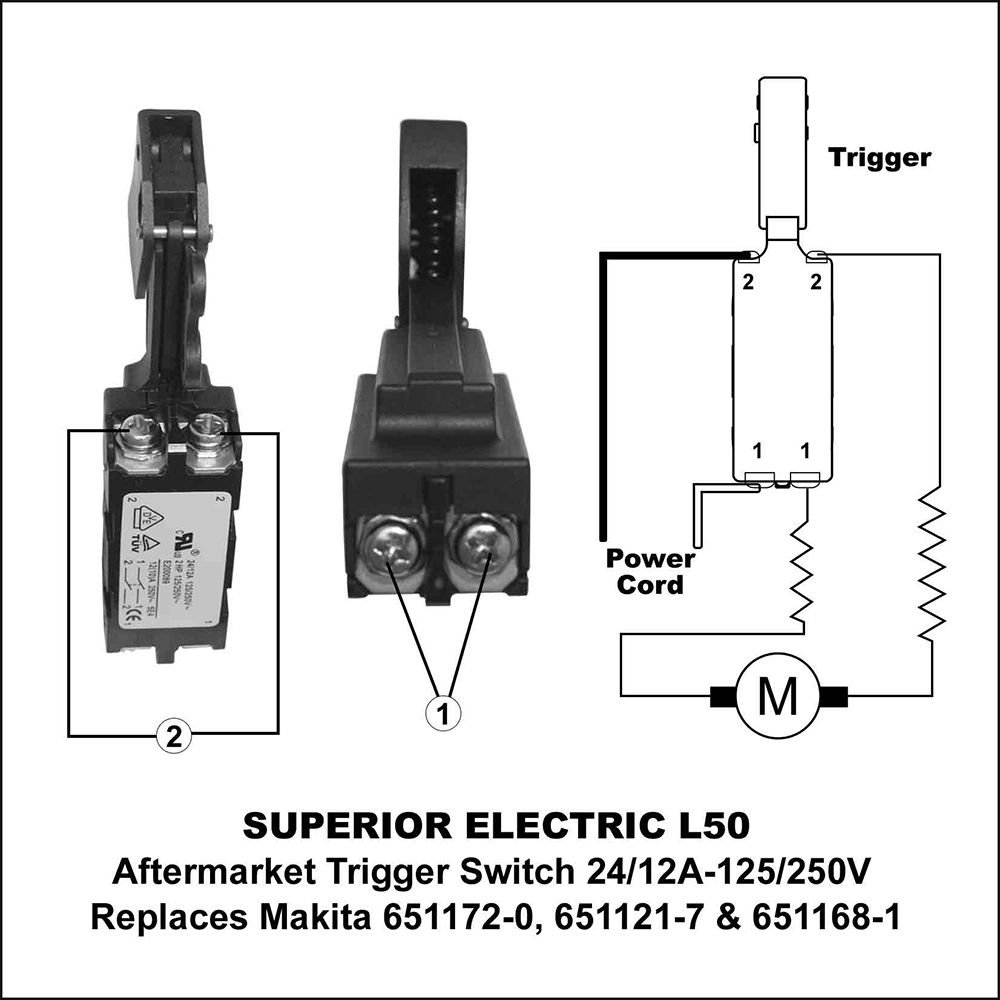
The Superior Electric L50 Trigger Switch is a high-quality aftermarket replacement designed for Makita circular saws and grinders. Rated for 24A/12A at 125/250V, it supports on/off, variable speed, and electric braking functions. Its durable construction ensures reliable tool performance, making it an essential upgrade for professionals seeking cost-effective, OEM-compatible power tool maintenance.
| ASIN | B011L3TLUY |
| Actuator Type | Trigger |
| Batteries | 1 Lithium Ion batteries required. |
| Batteries Included? | No |
| Batteries Required? | No |
| Best Sellers Rank | #570,430 in Tools & Home Improvement ( See Top 100 in Tools & Home Improvement ) #7,800 in Power Tool Replacement Parts |
| Brand | Superior Electric |
| Circuit Type | multi-way |
| Color | Red |
| Connectivity Protocol | X-10 |
| Connector Type | Screw Terminals |
| Contact Material | Copper |
| Contact Type | Normally Open |
| Control Method | Touch |
| Control Type | on/off and variable speed |
| Current Rating | 12 Amps |
| Customer Reviews | 4.0 4.0 out of 5 stars (555) |
| Date First Available | July 14, 2015 |
| Global Trade Identification Number | 00099461748811 |
| Included Components | Power tool Replacement part |
| International Protection Rating | IP541 |
| Is Discontinued By Manufacturer | No |
| Item Package Quantity | 1 |
| Item Weight | 1.44 ounces |
| Item dimensions L x W x H | 1 x 1 x 1 inches |
| Item model number | L50 |
| Manufacturer | Superior Electric |
| Measurement System | Imperial |
| Number of Items | 1 |
| Number of Positions | 2 |
| Operating Voltage | 250 Volts |
| Operation Mode | ON-OFF |
| Part Number | L50 |
| Power Source | Corded Electric |
| Product Dimensions | 1 x 1 x 1 inches |
| Terminal | Screw |
| UPC | 099461748811 |
| Unit Count | 1.0 Count |
| Wattage | 6000 watts |
M**E
Works perfectly in DeWalt DW358 circular saw but must change the wire positions
This works perfectly in my DeWalt DW358 circular saw, but you must change the wire positions. The original switch has poles on opposite ends. The new switch has each pair of poles on one end and the other end. However the most simple way to put it is this: The original wiring had both a black and white wire at each end of the switch. However to wire the new switch, you need the white wire at one end and the black wires at the the other end.
E**T
Good switch, great price.
The switch fit my old black & decker reciprocating saw perfectly, just had to lengthen one wire due to power in/out being side to side rather than back to front. Switch is as well built as the stock switch in the saw, and even if it only lasts a year for the price it worth it.
C**B
Fit and Worked (Eventually), but with Backwards Wiring
The switch fit perfectly and was easy to install into the saw. However, there was no wiring instructions. Almost every switch like this has the input at one end and the output at the other end. That's the way the one I took out was. I wired this one up the same way and the saw would not work after assembly. I thought maybe it was a bad switch. I had ordered 2, so I was going to try the other one. Then I thought I'd test the other one with my meter. NOTHING. I was about to fill out the return, when I had a thought to test the switching across the two terminals at the same end. Sure enough, that worked. These are wired so the one in-an-out is at one end and the other in-and-out is at the other end. So, after re-wiring, it worked perfectly. I had to kind of stretch and rearrange the wires inside the handle in order to get them to reach like that, but managed to make it work.
S**N
Is not made to fit 5007NB!
Is not made to fit 5007NB! Had to grind the plastic on the switch back and on the trigger to get it to fit inside the housing. Got it wired the same way the original was, put it back together, plugged it in and pulled the trigger. It immediately tripped the breaker. The original wiring was white and black power feed on one end, two blues for the motor on the other end. This switch has to be white or black and one blue on one end, other power feed and other blue at the other end. The only trouble is that you have to add about 1 1/4 inches of wire to the white or black for it to reach the far end of the switch. If you have a 5007NB find another switch.
J**S
Replaces 1970's Sears Circular Saw Switch Without Mechanical Modifications
The Superior Electric L50 trigger switch can be used as a replacement for the 1970’s era Sears 315.11850 circular saw. The original Sears circular saw has a switch with 4 wires. However, the white wires are “pass through” only and do nothing, whereas the black wires are connected to the internal SPST trigger switch. The Superior Electric L50 trigger switch has the DPST configuration with two sets of terminals at each end of the switch. The Superior Electric L50 trigger switch fits inside the Sears circular saw without any mechanical modifications. After removing the old switch simply connect the white wires together and protect them with a small wire nut. The black wires connect to one set of switch terminals; the other set of switch terminals is not needed. Once installed the old Sears circular saw springs back to life. Just be sure to check the wiring before applying power.
L**R
Good value for the money, but READ REVIEW to ensure it works for your device.
I bought this to use in a Rockwell 034-010 Power Miter from the 1970's because OEM and 3rd party equivalents are no longer made. Looking at it in the pictures it was roughly the same outline as the one I had and evidently, from both the official description and from some other reviews, it works in many other devices with springloaded triggers that pop on and off rapidly to minimize arcing. This is not surprising since many manufacturers use elements from the same set "off-the-shelf" parts already available... or in some cases tweak them slightly for copyright or other purposes, but leave them basically the same. It DOES FIT my saw PERFECTLY but does not work exactly like the original, requiring slight modification. WHAT YOU NEED TO KNOW: This is a double pole single throw switch, meaning it connects/disconnects two input leads (wires) which is what most of these devices use for rapid, sure starts and to completely disconnect the unit from both common AND hot for safety when off. If your device is double pole double throw, like SOME units that automatically use electrical braking might have, then this will NOT function the same... though you might get it to turn the unit on, but not kick in the brake. HOWEVER: This trigger switches from the two leads on one side to the two on the other!!!! Meaning that one lead at the top and one lead at the bottom on one side are routed to the corresponding upper and lower leads on the other side. My miter saw and many other devices have their wires cut to length and routed to be switched from top to bottom instead of left to right as this one does. Example diagrams: This switch, the L50 Aftermarket Trigger Switch, looking at it from the rear. in__on | | | | | | |____| ih oh ic=input neutral (usually a white wire) from wall cord. ih=input hot wire (usually black) from the wall cord. oc=output neutral wire going to the device when on. oh=output hot wire going to the device when on. Or if you are used to electrical diagrams the L50 Aftermarket Trigger Switch is like this com ___/ ____ hot ___/ ____ MY OEM switch was internally wired to switch from top to bottom like this: in__ih | | | | | | |____| on oh So, before you buy you might want to see if both of the wall cord input wires are on the top or bottom like mine... or both of the input wires from the wall cord are attached to one side like this switch. If you want the least trouble and yours are top/bottom like mine... then you might want to order a different switch. However, if you don't mind doing a little wire splicing, you can easily adapt this switch if it fits physically and it should work okay like mine did. If the information provided isn't enough to figure out how to adapt it and your unit is clearly switched top to bottom, you might want to just skip it and try to find one wired the same. If you really want to try, basically you'll need to lengthen either the left or right of the two wires on the top to reach the bottom and lengthen the bottom wire on the other side to reach the top, then connect them to where the other lengthened wire had been. So, if you lengthened the left top wire, you'll lengthen the bottom right wire and then the top left wire will be connected to the bottom right position and the old bottom right wire will be connected to where the old top left wire was. Believe me, trying to explain it is a lot harder than doing it. You just need to remember that you have to make your input wall cord wires both hook up to either the right or both hook up to the left... while your output wires have to both hook up on the other side. AND IF YOU DON'T KNOW WHAT YOU'RE DOING THEN DON'T DO IT. I'm not responsible for your work and have provided this as a good samaritan to the best of my knowledge. I have proof read it a few times, but I CAN and may have made a mistake. Plus, I DO NOT know machines other than the one I worked on. So, make sure YOU verify everything to your own satisfaction for your own personal safety. YOU ARE RESPONSIBLE FOR YOURSELF!! I DO NOT ACCEPT RESPONSIBILITY.
T**S
Replacement for Craftsman Wormdrive.
It is not an exact fit, but it is so close that it works great. Saved me from throwing the saw away as parts for some Craftsman power tools are becoming obsolete. Cheap fix and well worth it.
G**P
Saved an old sander
I inherited an old Rockwell 305 sander. The sander is a powerful heavy duty sander and I just didn't want to throw it away due to a discontinued switch. This switch needed some modifications to the handle and wiring but works perfectly.
J**S
I used this for an older GREY miter saw. I almost threw the saw out but thought what the hell. It worked perfect.
J**Z
Es lo que esperabsuy bien
H**Y
Used for black n Decker sawcat..fit perfect and works great..heavy duty
F**S
On this switch you connect the 2 white wires to one end, and the 2 black wires to the other - unlike Makita’s original that had one black and one white on either end. Also I had to shave off a bit of the plastic in order to fit in a Makita grinder, after that it works perfect. No lock-on button either, which I like.
L**S
Ne fonctionne pas sur l'outil
Trustpilot
3 days ago
1 week ago