
Desert Online General Trading LLC
Warehouse # 7, 4th Street, Umm Ramool, Dubai, 30183, Dubai
Desert Online General Trading LLC
Warehouse # 7, 4th Street, Umm Ramool, Dubai, 30183, Dubai


💻 Cool down, level up! Your CPU deserves the TOUGHLIQUID touch.
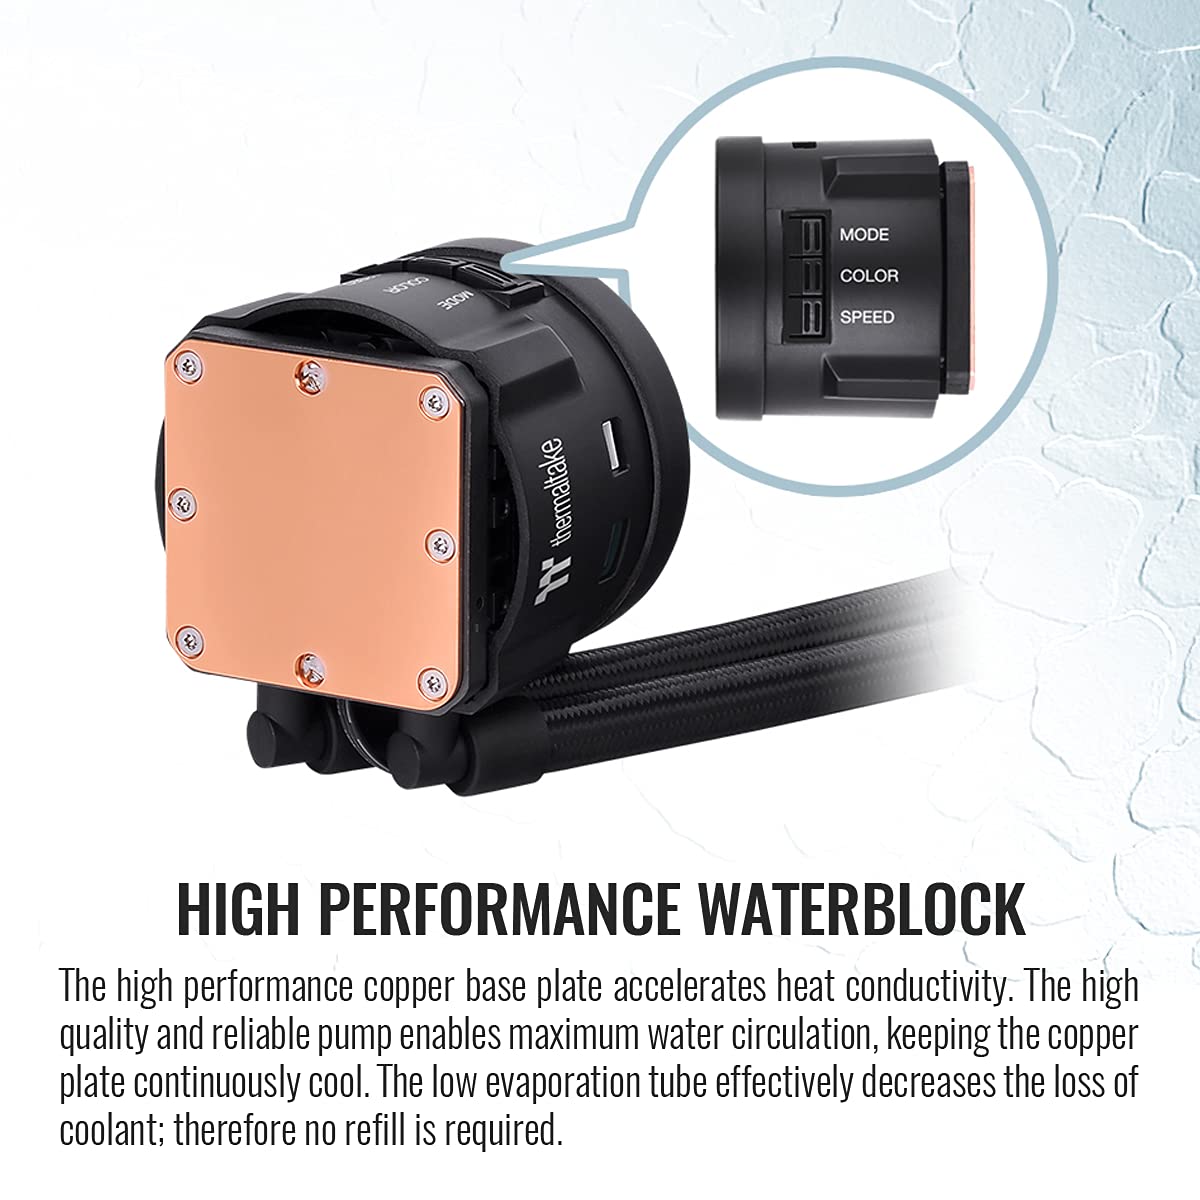
The Thermaltake TOUGHLIQUID 240 ARGB is a high-efficiency all-in-one liquid cooling system designed for both AMD and Intel processors. With a 240mm radiator and TOUGHFAN 12 operating at 2000 RPM, it ensures optimal cooling performance while adding a touch of customizable ARGB lighting to your setup.
| Brand | Thermaltake |
| Manufacturer | Thermaltake |
| Package Dimensions | 45.39 x 28.5 x 14.81 cm; 1.94 Kilograms |
| Item model number | CL-W319-PL12BL-A |
| Voltage | 5 Volts |
| Wattage | 1.44 Watts |
| Manufacturer | Thermaltake |
| Country of Origin | China |
| Item Weight | 1 kg 940 g |
M**L
Good quality
Took time to reach destinationgood value for moneygood product
M**
Five Stars
so far im happy with this product very nice temp im getting almost reduced to the half
A**T
... time with a radiator RGB fan is been selling great like the design and the nice idea
This the first time with a radiator RGB fan is been selling great like the design and the nice idea , nice to buy valued product
S**L
Does not comes with LGA 1700 kit
The product description is wrong, It doesn't come with any LGA 1700 upgrade kit.
S**E
Let's see
Bought this for my RYZEN 7 2700X.Idle at 35-40 degrees.Full load : 68 Degrees. (Prime95 for 1 hour straight at 68c)Pretty decent !!
B**B
Decent AIO!
The media could not be loaded. The AIO is decent, especially at the $130 sale price. However, I encountered two notable issues. Firstly, the tubes are extremely stiff, making it more challenging to work with compared to Gigabyte's Aorus Waterforce X 360s—exercise caution in this regard. Secondly, I had to download an older version of TT RGB Plus because the newest version failed to recognize the pump under the lighting tab. Expect potential software issues similar to other LCD AIOs. Finally, depending on your fans, they won’t screw in all the way. I had trouble screwing in my Arctic P12’s on the radiator, opting to use the ones Thermaltake provided. Other than that, it’s a good AIO when on sale.
E**A
Well constructed and works well
With regard to "Thermaltake TOUGHLIQUID Ultra 360 AIO Liquid Cooler", the cooler is made well, is quiet and works well -- holding CPU temperatures to about 15DC over ambient with the fans rarely spinning over about 500 RPM. It was easy to install and is easy to maintain. I haven't any of the issues that have been cited in the other reviews though the there are a number of minor drawbacks.This is a well constructed 360 AIO, the radiator worked well front mounted in an "Antec P10 FLUX" case (with room for an optical drive). The hoses were just long but another 20mm of length would have been good. I have seen other AIO units where there was a twist in the hoses (making routing more difficult) but not this one, it's overall very well constructed.I connected the the USB port on the pump to an available port. The display defaults to showing the liquid temp. The pump display is reported as "ID 264a:2328 Thermaltake AX" but I haven't bothered with the TT software since my case has opaque panels so no point in the graphics though I can see the default temp display through the rear mounted exhaust fan when (rarely) needed.The provided "Thermaltake ToughFan 12 Turbo PWM" fans are stylish, sturdy, quiet and can produce considerable free air flow but they are not ideal radiator fans. The fans have decorative/contoured surfaces that leave large gaps between the radiator mounting surface and the fans. Consequently the fans don't really work very well in push/pull (the gaps allow the fan pressure/vacuum to leak).I overcame this with "Noctua NF-A12x25 PWM" fans which have flat mating surface *and* provide a gasket to insure that the fan does not leak past the radiator mount surfaces. The Noctua fans work well in push/pull directly into the radiator fins without leaks around the border (all the fins get air flow). I used the TT fans as case fans.I didn't like the TT thermal paste provided, it didn't really work that well so I used "Thermal Grizzly Kryonaut" thermal paste which is much better (I got about 4DC improvement).Overall, I like this AIO cooler, it holds the CPU temps to about 15DC above ambient, is quiet and well constructed. It is a bit more expensive than the other AIO's that I have tried (Lian Li, Enermax, and EK) but it is better constructed that those and very easy to install IMO.I would buy it again.
N**R
It keeps my overclocked CPU nice and cool
I have a 7700K and have been using a Hyper 212 Evo for the last 2 years. My CPU and GPU always ran at no more than 67C while gaming. Over the past few months my CPU started getting as high as 80C. I decided to delid and add this cooler. I am currently overclocked at 5.0Ghz at 1.330 volts and my idle temps are around 28 to 30C and my highest spikes while gaming are at 68C.The product seems to be good quality. It was pretty easy to install. I have a Corsair 780T case so I was able to mount the fans directly under the mesh cover at the top of the case. I mounted the radiator under the metal frame below the fans. I was able to use the supplied screws to go through the fans, through the metal frame and into the radiator. The fans are in a pull/exhaust configuration out the top of the case.The instruction sheet is terrible. The one I received looked nothing like the instructions I pulled up online. One side was for Intel and the other side was for AMD. According to the picture it told me I should be using the backplate that was more of an oblong shape. It did not match up to the water block at all, not even close. I emailed Thermaltake asking about this. To this day they have not even bothered to respond to my inquiry! I disregarded their inadequate instructions and went off a youtube video instead. I should deduct a star for this but the cooler works really well so I won't.This does not have any RGB lighting at all. I looked at the other models that have lighting but they all require plugging in a cable to a USB port on the motherboard. I don't have an extra one so when I saw this model of cooler I liked that it was straightforward with just the plugs for the fans and the pump.I have read many ways to make these connections for proper operation. I ended up plugging in the fans (with the included 3 way splitter) to the CPU fan header. I plugged in the pump to the AIO pump header. The AIO pump header will supply full power to the pump so it runs at maximum speed all the time. Apparently monitoring software will only report half the actual pump rpm so you have to multiply by 2. Mine reads around 1750 which means I am getting 3500 rpm which is within the rated speed. I am controlling the fan speeds through BIOS and set a custom curve. The fans run at a minimum of 40% and ramp up to 100% at 75C. They never spin much higher than the 40% while gaming and I am surprised this works so well with the fans at such a low speed. I did turn them up to around 75% speed to see how loud they would be and they are very loud. If you need to run the fans at a high rpm to keep your system cool you might not like the amount of fan noise.The hose were long enough to reach the top of my case with room to spare. I do worry about springing a leak which would destroy my 1080ti but that is a risk everyone takes when using water cooling. The pump is silent. I can't hear it at all. I can feel a vibration when I touch the hoses. You can definitely feel the heat being exhausted through the top of the case. I also noticed my GPU runs a little bit cooler since the heat from the CPU is now being exhausted out of the case instead of the Hyper 212 Evo blowing hot air around inside the case.I did notice the fan cfm rating is in the 90's. Other coolers from different manufacturer's rated the cfm at less than 50.Overall if you are ok with no RGB lighting and have the room for a 360mm radiator this is a good choice. It got excellent reviews from the few you can find online.
S**E
GReat Cooler, Software not so good...
This cooler is great keeping my 3700x at a nice 27℃ idle, when just watching videos around 42℃, and while gaming 45℃-50℃.The fans are really quiet and aren't to loud when the processor is in use and heats up.About the software however.The TT RGB 2.0 Plus Software needs a lot of work, I don't bother using it even though I'd like my CPU temps displayed rather than the default Liquid temps, But I'll need the tool in order to view the CPU temps etc. Why I don't have it installed anymore and uninstalled it here is why;The tool takes up 37%-47% of my CPU that is something the needs to be fixed, hell NZXT Cam never took up that much CPU usage at all but TT RGB 2.0 Plus will, sometimes even higher CPU usage, Now I've upgraded from a 240 Cooler Master MasterLiquid Cooler, I've had that since my 1500x and a year later when I got my 3700x it wasn't cooling it enough anymore pump still worked and was still liquid inside, my guess is just build up overtime.So If you get this cooler, don't install the software unless the high CPU usage issue has been fixed, if you do install it please use an uninstall tool called "Revo Uninstaller," you cannot uninstall the software without it if you just use windows to uninstall it may do it somewhat but you'll still be stuck with it in the root folders and will still use up your CPU. (So I see it as a form of malware at this point...) Either use the Revo or Re-install Windows to get rid of it entirely.If you have the icon on your desk top just put Revo in Hunter mode and drag the green targeting icon over it and it'll hunt every bit of that application and ask if you just want to completely remove it.
R**E
Incredible cooling performance
This unit works perfectly, and it drops the temperature radically.I installed the 360mm version in my media server this morning and then ran the Intel Processor Diagnostic Tool to see how it fared.SERVER INFORMATION:Intel i7 4790k processorASRock Z97 Extreme 6 board16 GB Ripjaws PC3 12800 RAMCorsair RM850X power supplyMSI GeForce GTX 1070 video card10 hard drives (9 internal and 1 external)Pioneer BDR-209DBK Blu-ray driveThermal take Water 3.0 Triple Riing RGB 360 water coolerPERFORMANCE:--- IPDT64 - Temperature Monitor Results--- Temperature Test ---...Version 1.0.12.64b.W...57 degrees C below maximumTest Result - PASSExpected Greater than 1 degrees below maxReceived 57 degrees below maxThis result is amazing, and I cannot say how happy I am with it. The cooler was purchased for my media server that is used for transcoding 1080p video. Before adding this cooler, I could get over 200F when transcoding multiple streams with the processor NOT overclocked. This was unacceptable, so I sought out a better solution. With this cooler, my maximum reading (on only one core) has been 170F when transcoding multiple streams AND overclocking the processor to 4.7ghz.I have been stress testing the server this whole afternoon with the processor overclocked and the temperature has never gotten above 176F. This result was with all cores of the processor pegged to maximum.INSTALLATION:Installation is not terribly difficult, but it does take a bit of time. You will need to remove the fans from the top of your case, to prepare for the install. The radiator comes without the fans attached, so you can choose to push or pull air through it. You will need to attach the fans to the radiator, then I would recommend installing the radiator to the case before connecting the pump to your processor. Attaching the pump to the processor is simple, as the unit comes with clever brackets that can be configured for basically everything. You will attach a backplate on the back of your motherboard; it attaches with sticky tape. You will need to choose the proper ring for either Intel or AMD, then follow the directions for setting the width of the screw holes. Select the proper thumbscrews for your processor, and press them into the holes on your connector ring. Once you have the connector ring set up for your processor, remove the protective cover from the pump and carefully attach it to the connecting ring, then put the locking ring over it to secure it in place. The pump comes with thermal paste already properly applied to the face, so you can now put the pump up in place, locating the screws into the screw holes in the backplate and screw the pump down securely. Simply connect the pump to your CPU fan connector, connect the light/fan controller to another CPU fan connector on your board, then connect the fans to the controller.This process took me about 20 - 30 minutes, as I was careful, and took my time. You should be able to do it in about the same time if you are careful... faster if you are in a hurry. :)I cannot recommend this cooler highly enough.FIVE STARS
Trustpilot
2 months ago
2 weeks ago