We remain fully operational. Our teams are working around the clock to ensure your deliveries continue safely.

DOWNLOAD THE APP


Customer Services
Copyright © 2025 Desertcart Holdings Limited
DOWNLOAD THE APP


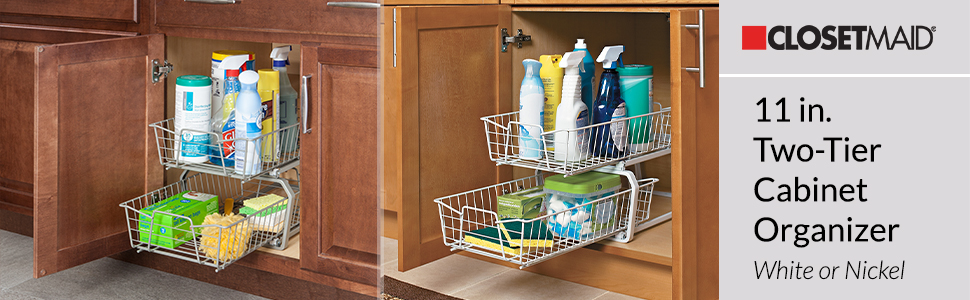
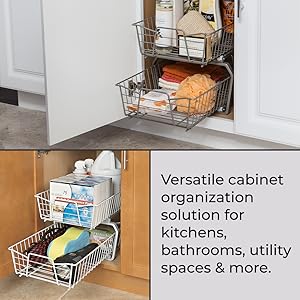
⚡ Transform your cluttered cabinet into a sleek storage haven!
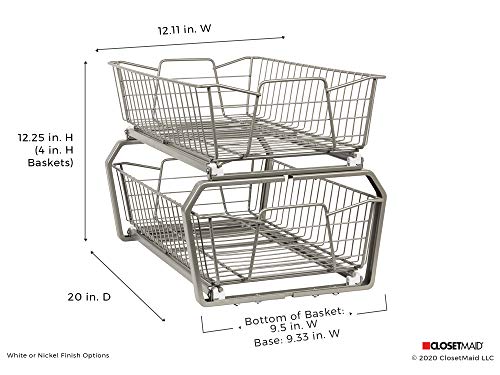
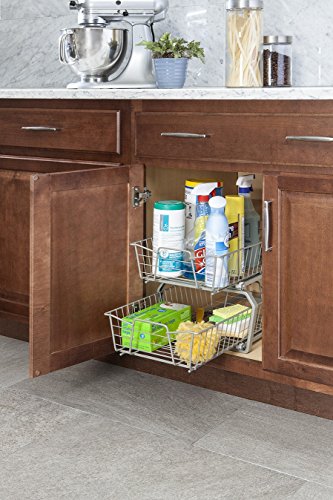
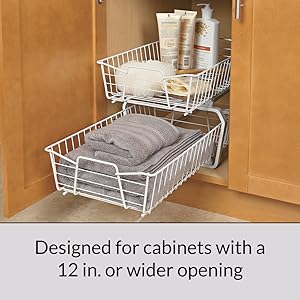
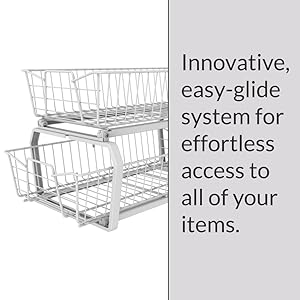
The ClosetMaid 3088 2 Tier Cabinet Organizer is an 11-inch wide, adjustable, nickel-coated steel unit designed to optimize cabinet storage with durable construction and smooth roller frames. Ideal for millennial professionals seeking a blend of functionality and modern style in kitchen or bathroom organization.

| ASIN | B071671VHW |
| Brand | ClosetMaid |
| Capacity | 1400 Cubic Inches |
| Customer Reviews | 4.3 4.3 out of 5 stars (428) |
| Date First Available | 19 May 2017 |
| Global Trade Identification Number | 00075381030885 |
| Is Assembly Required | Yes |
| Item Dimensions LxWxH | 30.7 x 50.8 x 31 Centimeters |
| Item Model Number | 3088 |
| Item Part Number | 3088 |
| Item Weight | 4 kg 310 g |
| Manufacturer | 0 |
| Number of Items | 1 |
| Shape | Rectangular |
| Shipping Weight | 4.45 Kilograms |
| Special Feature | Adjustable |
| UPC | 075381030885 |
L**S
Rather expensive for what it is but it’s sturdy and appears well made. Quite satisfied despite the price. Installation was fine but initially thought it was a free standing unit as I didn’t want to place screws into my cupboard.
1**N
This is a well-made product, and the painted coating was properly done. It comes in eight pieces (the wire baskets the two roller frames, and the exterior support brackets). Fortunately, it also came with the appropriate wood screws for mounting the bottom roller frame and the exterior frames as well as machine screws to mount the top roller frame to the exterior frames. The instructions were a bit weird to read, as instructions go, but once I got past the first picture frame I figured out the operating mechanism. In your cabinet make sure you measure the dimensions fully, and don't just go by the footprint of the product. The footprint is about 9.5 inches but the exterior frames protrude out, so if you have any supply or drain pipes under say your kitchen or bath vanity sink you'll want to ensure full clearance all the way up and all the way back. Also note that you need a lot of manual dexterity to assemble this into place. You'll have to physically mount the exterior frame and bottom roller frame to the cabinet. This is no easy task if you have a tight space or if you have physical dexterity issues. I'm very mechanically inclined and it took me 3x longer to install than anticipated because of the tight space I had to work with. When they suggest you give 1.75" from the cabinet edge to the front of the frame, make absolutely certain you do so. A quarter inch off will potentially impede your ability from fully closing your cabinet door as the basket protrudes out a bit past the foot print. I suggest mounting the front of the drawers first. You'll have four screws to install--one on each end through the exterior frame and then the innner-most holes which secures the exterior frame and roller frame together. Once the front is secured, then proceed to mount the back set. I suggest starting from the front and then the back to fully ensure your 1.75" spacing remains accurate. Again, a quarter inch off and you'll be hosed. Now that you've assembled the eight bottom wood screws to the cabinet, then proceed with mounting the top roller frame to the top part of the exterior frames with the machine screws. Again, a lot of dexterity will be needed. Pop one screw to each of the four top corner assembles. This will ensure everything successfully lines up (similar to replacing a wheel on a tire you changed). Apply your phillips screwdriver to the top of the screw with one hand and hold the nut on the bottom part of the screw with your other hand, then twist the screw one. Don't even try to twist the nut on as there's not enough clearance, even with the smallest of fingers. Once all machine screws and corresponding nuts are assemble to about 90% maximum tightness, go back and tighten each one by hand until secured--but not overtightened. The basket assemble can be tricky. You'll see that while the front and rear of the baskets may appear similar, they are not. The rear of the basket has two bars on the bottom running perpendicular to the basket. This is the rear part of the basket assembly. Both of those bars have to go into the roller frame slots. You'll have to raise the top of the basket about 25-35 degrees to fit the bars through. SPECIAL NOTE: There's this tiny piece of plastic on the outermost perpendicular bar. For some reason the plastic piece moved on one of my baskets, and thus it impeded the ability to slide this into the roller frame slot. It was easy to move back into position and the basket slide in lickity split thereafter. Overall, I like this product. I've spent hours and hours searching for shelf pull-outs. I liked the steel gray color as it makes it look less cheap and goes with the brushed nickel decor of the bathroom fixtures. It's pretty sturdy, considering it cost less than $30, and well worth the money--as long as you have the mechanical dexterity to assemble this. For the sake of other people, it would've been nice if they had suggested to pilot drill the screw holes and what size drill bit to use, but that would've complicated the instructions and require yet another tool on the needed tools install list. You should always try to pilot drill into wood, sheet rock, plastic, or metal, first, for significantly more easier installations.
S**R
This review is for the Size: 11-Inch Two Tier model. I was little bit disappointed with the railing system and installation process, but overall I am happy about this purchase. I was under the impression that this set has a smooth railing system but instead it is just the wires sliding in hollow metal. First of all, the design made the installation process little bit difficult due to spacing issue it was very difficult to put the screws on the cabinet. They didn’t think or didn’t care about the ease of the installation process. Because of the frame top part working with screwdriver or a drill was challenging and time consuming. You have to tilt the screwdriver and you lose the grip on every turn and screwdriver slips from the screw head. For easy installation I suggest you guys to mark the wholes where the screws need to go and use a drill to make wholes for the screws. Use a small drill bit so you won’t make the whole too lose, then position the frame and secure them with the screws. This way struggling with tilted screwdriver is going to be easier. It has fair amount of storage as there are 2 tiers on this model. We are finally able to find the things we need under the cabinet without making a huge mess. If you think this review was helpful, please don’t forget to vote!
S**N
Do yourself a favor and stay away from the 2-tier product (namely the 11-inch item) if you plan to install it in a tight narrow space. It will fit (if you measured correctly) but installation is a b*$&#. No, but really! This is the fourth of these slide out type drawers I had installed and it was by far the most painful experience. It doesn’t include an installation guide to mark drilling holes or to help with lining up the placement correctly. It relies on your matching the holes on five separate pieces, while keeping everything straight and equidistant. If you’re in a tight narrow space you have to be Gumby or a contortionist to line up the holes and drill them into place in the back. I was planning to install this same product on two shelves of the same narrow cabinet but after the work I just went through installing the first I am seriously reconsidering. I will say if you are installing this product in a space with more wiggle room, or even the 2-tier 14-inch product in a tight space, you will have a much easier time!! If you are a masochist and plan to install this one in a tight space regardless, I would make your own installation guide mat and/or at the very least mark and pre-drill the holes. Use a manual screwdriver and/or one meant for narrow or odd-angle spaces. Then after lining up, marking, and pre-drilling screw into place the two back brackets first THEN the two screws for the back frame and then proceed as directed.... and may the odds be ever in your favor.
C**Y
Many of the reviews I read are for the single tier model and I imagine they are fairly easy to install. However, it is very clear that not a single person at ClosetMaid has ever installed one of these two tier units using their own instructions. As you can see in the photo from the instructions, there is no way that screw is going in that hole because the horizontal screw that is part of the frame is in the way. So, you have to get a little creative and install the outer brackets and then the base - all while using a very short screw driver. Once installed, the drawer system works well with little to go wrong. It is certainly not as nice as the more expensive models with ball bearings and gentle returns but for the money it seems like a reliable organizer.
Trustpilot
2 months ago
2 weeks ago