Desert Online General Trading LLC
Dubai, United Arab Emirates
Desert Online General Trading LLC
Dubai, United Arab Emirates


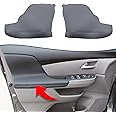
🚗 Elevate your ride’s style and comfort—because your Odyssey deserves the best!
The KBH Auto Door Panel Armrest Cover is a premium microfiber leather replacement designed exclusively for Honda Odyssey models from 2011 to 2017. Featuring waterproof and scratchproof protection, reinforced double seam stitching, and a foam-padded backing, it offers both durability and comfort. This easy-to-install pair of armrest covers transforms your vehicle’s interior with a sleek, OEM-quality look while safeguarding against everyday wear and tear.


| Manufacturer | KBH |
| Brand | KBH |
| Product Dimensions | 43.51 x 27 x 5.99 cm; 90.72 g |
| Item model number | SKU |
| Exterior | Textured |
| Manufacturer Part Number | SKU |
| Special Features | Easy to Install, Durable |
| Item Weight | 90.7 g |
Trustpilot
1 week ago
2 weeks ago