Desert Online General Trading LLC
Dubai, United Arab Emirates
Desert Online General Trading LLC
Dubai, United Arab Emirates


| Shipping Weight | 0.25 Kilograms |
| Item Model Number | FBA_LD-0220-50SC |
| Item Part Number | FBA_LD-0220-50SC |
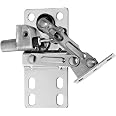
| Is Assembly Required | Yes |
| Number of Pieces | 1 |
| Weight | 227 g |
| Manufacturer | 0 |
Z**K
Excellent product - tricky install
Felt compelled to write review as this product is abundantly better than the set I bought from Menards.With that said, let me first say the instructions included with these were nearly useless, and were quickly discarded. Before my review, here's my written installation tutorial:------------------INSTALLATION:Hardware eventually attaches to both the drawer front and the face frame (assuming you have a face frame cabinet); the order in which they are installed does not matter. These instructions will mostly be for attaching to the frame first.1) with drawer front panel still installed (or aligned to desired location), use pencil to lightly mark the perimeter on the front of the face frame. [If installing hardware on the drawer front first, from the inside of the cabinet, trace the interior perimeter of the face frame onto the back of the drawer front panel.] Now remove drawer front panel.2) take the two pieces of tilt hardware, and denote which one is L and which one is R. Take one and place it on the appropriate side of the face frame. Align it so that the bottom is resting on the face frame, and the front is flush with the front of the face frame. With a pencil, trace the locations of two mounting holes (you can use any two) onto the frame. NOTE: I recommend not using holes that are ~too~ close to the top or bottom edges of the face frame, as this will make drilling difficult/inaccurate. Repeat the same process for the other side.3) Drill (with 3/32 drill bit) the two holes into the face frame. Attach hardware with screws into these holes (I believe instructions called for the provided flathead screws; though I discarded and used my own hardware). Repeat for other side. A 90° drill/driver attachment is useful for this step4) once hardware is mounted to the face frame, place drawer front panel against the face frame in the desired location (using your previously traced perimeter). From the inside of the cabinet (I did it by feel as I'm not the most flexible) mark the mounting hole locations from the hardware onto the drawer front panel. Remove panel and ~carefully~ drill (3/32 bit) the mounting holes. BE SURE NOT TO DRILL ALL THE WAY THROUGH PANEL (drill bit stop collar is helpful here).5) install drawer front panel to the hardware. This can be tricky, but can be done either from the inside of the cabinet with the hardware 'closed,' or from the outside of the cabinet with the hardware 'open' though the angle may present challenges. Tip: do not fully tighten screws until all four are in place.6) test function. You may have to slightly loosen the screws and nudge the panel over to get it to close flush or evenly.-----------------------------Review:Great product, as stated previously. However, installation can obviously present some challenges due to the tight angles and fairly tight installation tolerances. Lack of helpful instructions can further exacerbate these challenges for many other buyers.Functionally, these are incredibly smooth and close with the right amount of force. Compared to the previous set (different brand) that I had installed, these are night-and-day difference in terms of smoothness. Also for the fact that the previous set SLAMMED shut to the point where it would make a good impromptu nutcracker. I still rate this product as 5-stars due to the great functionality, though engineering improvements to ease installation would be a good place for the manufacturer to focus in the future.
C**R
Very good quality
It is a little hard to install but they work very good, what we like the most was the soft close, the items look high quality
P**H
Highly recommend this one
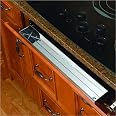
Amazing item to use on the blank space under the sink now I have a functioning unit that surprises everyone that sees it
D**M
So much better than the Bang!
Got nice high end cabinets, the sink tilt out drawer would slam shut, even with bumpers. I thought there would be something like this out there and low and behold it's nearly identical to the other Blum tilt out spring loaded hardware so all the holes even lined up.Got this installed before the sink went in, so much easier!I cannot believe these didn't come on the cabinet already.I got sets for my pantry and bar sinks too.The last thing you want to hear is a bang when you put your sponges and bottle cleaners away, then find they have been catapulted into the far reaches and dark depths of your sink cabinet.These do have a shock that sticks out further than standard Blum spring loaded tilt outs so if you have a zero clearance sink on the sides of your cavinet, you need to check dimensiocabinet, to see if it will fit.I've got an inch on either side between my sink and cabinet so I was fine.These work great, install perfectly vertical or tilted with the top angling back into the sink area slightly for the best tilt out face position.
M**L
Over priced & no instructions, see photos!
It’s a good idea. But a template that lined up would be a good start point at This price! And some basic instructions as well !Like mark inside of draw 1st, 2nd mark bottom of draw on cabinets so you know where to place hinges, 3rd pilot hole and screw test depth! 4th only put 1-2 screws in & test positions !
Trustpilot
3 weeks ago
5 days ago