


Kinkajou Bottle Cutter-Katey
Product ID: 44303751
Desertcart purchases this item on your behalf and handles shipping, customs, and support to Romania.
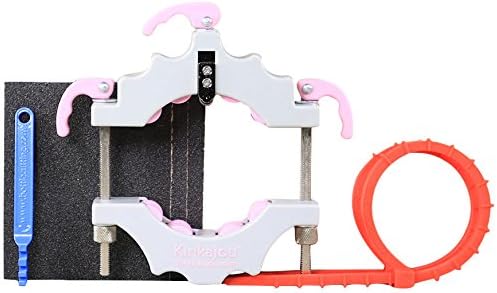
The Kinkajou Bottle Cutter was designed to be the ultimate hand held bottle cutter. The cutting wheel is made from high quality tungsten carbide steel that lasts over 200 cuts. The Kinkajou adjusts to fit round bottles with a circumference ranging from 43 to 102mm. Our bottle cutting process consists of 3 main steps: scoring, separating, and finishing. Scoring Process: Insert a bottle into the Kinkajou so that the cutting wheel lines up to the desired cutting location and adjust the screws until the Kinkajou grasps the bottle firmly but still allows it to easily turn. Engage the cutting wheel and rotate the bottle one complete turn ONLY. You will hear our signature “Kinkajou Click” once the rotation is complete. Separation Process: Place a separation tie on each side of the score line and pour alternating streams of boiling and cold water to stress the glass. The Kinkajou can handle thick and thin bottles just fine however thicker glass may require more cycles of boiling and cold water to force the separation. Finishing Process: Your Kinkajou kit includes 3 sheets of 80-grit sandpaper. This sandpaper will easily remove any sharp edge but if you’re looking for that gorgeous, polished edge, we highly recommend our Saber Tooth Diamond Sanding Pad Kit. We tend to cut bottles with attractive painted labels because preserving paper labels is a challenge. The variety of bottles is endless, and so are the projects you can create with the Kinkajou Bottle Cutter. Please note the instructions above are a quick summary. Refer to the Instruction Manual included in your kit for safety and operational procedures.
R**N
My favorite bottle scorer by far
This is my third bottle scorer kit, and it works much better than the first two. I say "scorer" because it is not a "cutter".I have used this on beer bottles, whiskey bottles, and wine bottles.The user uses the clamping device to score the bottle with the blade. The most important and difficult part is to get the score line to make exactly one complete revolution around the bottle and to meet up exactly where it started. Pay attention! Get this right, and you're in the money. It takes some time to play around with the tightness of the clamp to get a good grip, and also allow the bottle to rotate.I'm not a big fan of the three quick clamps. It is difficult to tell which position the blade is in with the middle clamp. I think it is spring loaded. Don't forget to retract it (and keep it retracted) after scoring the bottle! The blade makes a nice score of the bottle with one pass. Far better than the other scorers I used.Then, follow their technique for ~4 cycles of near boiling and ice water. This is great because it limits the glass stress to a 1" wide area, instead of the entire bottle. This does mean that you have to be about 1" from the edge of the bottle and the bevel. Otherwise, the end rubber band will slip off. If the glass hasn't broken after 4 cycles, I just dip the bottle in boiling water, then to ice water really quickly. That does the trick. All of the stress is on the score from the pouring technique with the rubber bands. Then, it gets hit with that final drastic stress.The kit includes a glass nipper to help remove any imperfections. I only had to use that the first time I used this. It was really helpful. It also includes different grit sandpaper to smooth the edge. You will need to fine your own fine grit sandpaper, however. I would also recommend using a flame on the edge after sanding it, to give it that glossy glass look. But, allow it to air cool slowly, and be mindful of burning the label!If you pay attention, read and understand their well-written instructions, you'll get this. I've done a few bottles already and all of them worked out. I've made ash trays, flower vases, and hanging lamp shades.I recommend learning on bottles that you don't care about, but I am yet to fail at this. Knock on wood.It takes time and focus to get this right, but every time the bottle finally falls away, I look real quick to see how the edge looks, and I do a little dance!Enjoy and good luck!If this review was helpful, please click Yes. Thanks!
J**N
Great! Works well if you do this...
This cutter seems to work very well, and the instructions are pretty simple. I took my time getting it adjusted and set up on my first wine bottle and got the tension tight enough to make one complete circle score. I only did one time around, slowly, making sure I could hear the "scratch" of the cutter on the glass as I rotated the bottle. I was able to get a clean pop the first one and have done a few more with the same results. Couple tips -- Use a candle to heat the glass instead of boiling water.- Use a few ice cubes and water in a pitcher or bowl big enough to dip your bottle into.Heat the glass score you made using a candle. Hold it horizontally over the tip of the candle flame and rotate the bottle in the tip of the flame for a few minutes to get it really hot. It should heat the glass in that score line till it's *hot* but in my case it didn't heat the rest of the bottle, in fact I had to tap and feel the glass to see how hot it was on the score line. After 3 - 4 minutes of slowly rotating the score line directly over the tip of the candle then dip the whole bottle into the ice water.You may hear it *crack* or not, if not just give it a few seconds and take it out. Sometimes it cracks and falls away, but most of mine have just popped apart when I give them a slight turn. Use care, the edges are sharp at that point and all mine have been pretty clean breaks.The sandpaper works great to smooth the edges. Any good ol' sandpaper will work when the ones they provide are gone. You do get pretty much everything you need in the kit. I recommend taking your time and having a few bottles ready for the first time and just have fun with it./jr/john
G**2
Extremely happy
After reading the reviews on this, I had mixed feelings about my purchase. It arrived quickly and all the pieces were there.Not sure of the quality of the product’s functionality, I tried it out on a test bottle. Keeping in mind the warnings of keeping a straight line and using extreme temperature waters, I followed the instructions to a T. I boiled water in a kettle in preparation for the project and tossed a bowl of water in the freezer to get the “extreme” differences. After marking what I thought was a straight, I got my googles and gloves on, and started alternating between hot and cold water. After the third cycle there was a loud *pop* and the top of the bottle removed itself from the body. The line was mostly clean, and the one part that looked jagged (of which you need a magnifying glass to see) was easily smoothed out with the sandpaper provided.Excellent job, love the product. 10/10
S**N
Not for the Novice Bottle Cutter
As stated, bottle cutting takes practice to get right. A lot of practice. This bottle cutter is very effective at scoring bottles. However it is not the best choice for the amateur bottle cutter. You have to get a feeling for how to cut bottles to use this bottle cutter effectively. If you are new to bottle cutting or are just looking to cut a few bottles for decoration I recommend a different bottle cutter that can support the bottle better and make consistent cuts relying less on user skill. As I said, this is an effective bottle cutter, jut not the best choice for a beginner.
D**B
This works...kinda
I watched the videos and tried this many times. It looks so simple for the bottle to break apart easily but after trying on many bottles of different thicknesses I gave up. Going back and forth between the hot/boiling water and the cold water really requires a lot of patients to get the process right.I tried my best but at the end of the day I won't use it.
Trustpilot
1 day ago
3 days ago