🏡 Elevate Your Outdoor Aesthetic!
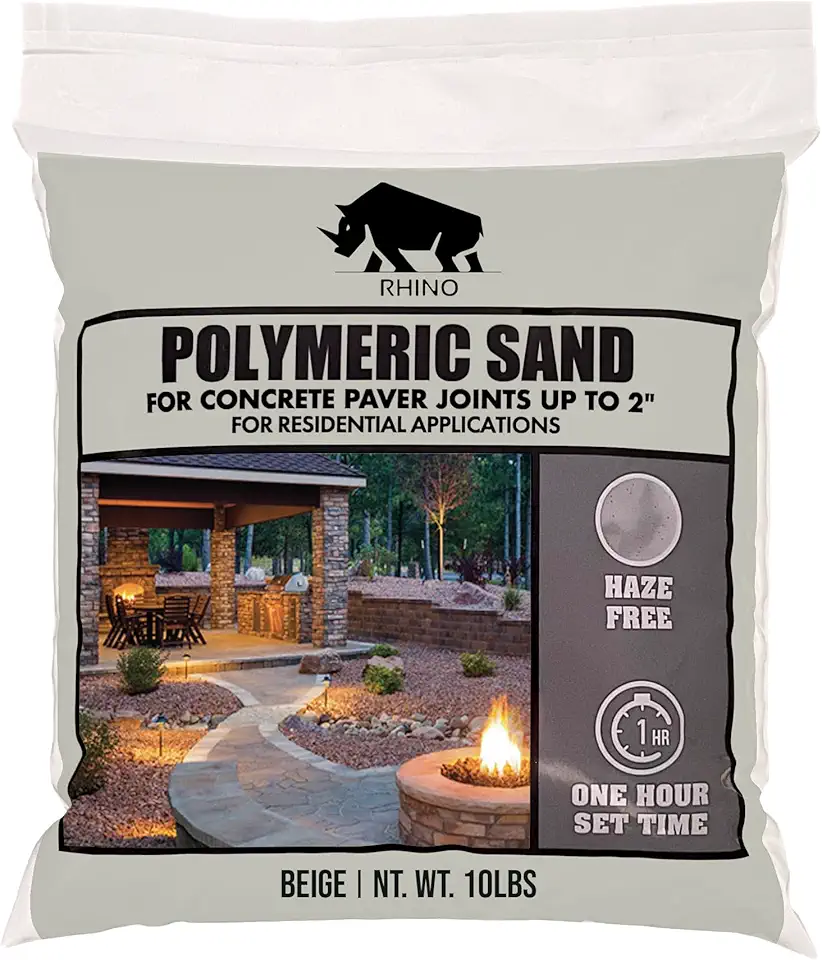
Rhino Power Bond Plus is a premium polymeric sand designed for securing pavers and stone joints up to 2 inches. Weighing 10 pounds and available in a stylish beige, this sand is perfect for various applications, ensuring durability and elegance in any weather condition.
Item Weight | 10 Pounds |
Item Shape | Rectangular |
Item Form | Sand |
Color | Beige |
Material Type | Sand |
A**O
Follow the directions and everything will work out perfectly!
This is a great product. Just make sure you follow the directions!1. Pressure wash your pavers, including in between the cracks.2. Make sure you wash away the sediment from the pressure wash. If you have weeds, spray the cracks with weed killer. (even if the pressure washer took away the weeds, just pretend the root still exists and spray the cracks with weed killer after waiting 2 hours (so the water can drain away).3. Make sure the pavers are COMPLETELY DRY. (I waited 24 hours with no rain). Just because your pavers "look dry" does not mean they ARE. Trust me - WAIT 24 hours!4. The next day, in the morning, make sure there is no rain in the forecast. Scoop a 24 ounce pile of sand onto the pavers. Using an outdoor push broom, sweep the sand into the cracks. Do this diagonally! Do not brush the sand into the cracks vertically.5. VERY IMPORTANT - Make sure you sweep ALL the sand OFF the paver and INTO the cracks. DO NOT LEAVE ANY SAND ON THE PAVER!6. When done, use your hose and spray down the pavers - start from the top and spray to the bottom - following the line of water you are creating. You goal here is to wash away the SURFACE sand / dust that might still be on the surface of the paver and get the cracks very wet too. Water will drain down into the cracks with any sand residue. That is what you want. The water will "activate" the sand and start to harden it. At first, it will start like wet sand from the beach - very clumpy. (dont bother trying to sweep the wet sand - it will be a mess). *IF* you noticed an area where there was sand still on the paver, use a metal putty knife (for drywalling) and scrape it off. Also if you see problems in the cracks (sand piled up, not smooth, too much sand), you can use your finger, a flat head screw driver, the metal putty knife to smooth it out and make it look good. Within 30 minutes, the sand will get a consistency of paste. This is the drying and activation process and is completely normal. After 1-2 hours, the sand will start to harden. Again completely normal. You are now done for the day, and you should wait another 24 hours to the driveway to completely dry.7. Next day. (if you live in a hot zone, do this process around 4pm. If you dont, you can start in the morning.). Get your favorite paver sealer. I used a wet look sealer and only did one coat. If you want a true wet look, you will need TWO coats of "wet look" sealer (allowing 2 hours of dry time between the 1st and 2nd coat). If you want a satin look, only use one coat of "wet look" sealer. I also used a "solvent based" sealer, not a "water based". Why? For me, solvent base just lasts longer - 5 years. Water based only lasts 2 years. Anyway, I use a roller and roll on the sealer. Some people use a pump spray and spray it on, others use a pump spray, spray it on, then follow behind with a roller to ensure even application. I just use a roller. I have a large driveway - 22 foot by 40 foot. (side note: This bag of sand covered the entire driveway) . Start at the top, and just like the sand, roll on the sealer (using a paint roller tray) diagonally. You goal is to ensure an even coat/coverage across the pavers AND the cracks. I need 6 gallons of my sealer to cover my 22x40 foot driveway for one coat. When you are done, you will need to stake your area off so people/car don't go on it, clean your pump sprayer with mineral spirits (unless you want to buy a new one), or remove your roller cover from the roller frame and toss it (if the roller cover dries to the roller frame - you will need to throw away your roller frame too).8. note: anything that is on your driveway when you seal it - if it dries - will be there permanently. So make sure you pick up any stray leaves or debris as you roll.9. Let the pavers dry (and cure). You need 2 days before you can park your car on the pavers. You can walk on the pavers after 5 hours though.10. Remove the "keep off" stakes and enjoy your freshly sealed pavers!
T**S
Rhino Paver Sand - My Patio's Secret Weapon! 🚀⭐⭐⭐⭐⭐
Alright, folks, let me tell you about Rhino Paver Sand – it's the real deal for my patio project! 🙌🏼So, I'm no expert, but I decided to tackle a patio DIY adventure, and man, am I glad I chose this Rhino stuff! First off, the delivery was on point – bags showed up looking good, no mess, no fuss. That already got me pumped up for what's inside! 📦Now, I'm not the most patient person, but this sand made my life so much easier. It's like the perfect mix of fine and chunky, which meant I could easily level things out without feeling like I'm shoveling for ages. Saved me some sweat, let me tell ya! 💪🏼But wait, there's more! The way this Rhino Paver Sand binds together is downright impressive. It's like magic – once I spread it between my pavers, it locked everything in place like a boss. I ain't worried about them moving an inch anytime soon! 🧱Oh, and rain ain't got nothing on this sand! We had a serious downpour last week, and guess what? My patio didn't turn into a swimming pool! 🏊🏼♂️ Rhino's got some serious drainage game – no puddles, no mess, just dry pavers like it's no big deal.The icing on the cake? The color of this sand just vibes so well with my pavers. It's like they were made for each other, giving my patio that extra touch of pizazz. 💃🏼And listen up, eco-warriors, this stuff is environmentally friendly, so you can feel good about using it. Saving the planet while building a kick-ass patio – count me in! 🌿All in all, Rhino Paver Sand has been a lifesaver for my project. It's sturdy, easy to use, and keeps my patio looking fly. If you're planning a patio or any outdoor project, grab yourself some Rhino – you won't regret it! High-fives all around! 🙏🏼🎉
S**.
Works wonders…most of the time.
The media could not be loaded. I used about 200lbs of this sand to fill my back patio. All the cracks, 90% of the time it worked well and hardened up and filled the cracks. The other 10% it didn’t harden up well and eroded out. Which means I’ll have to buy more to try and fix the last bit.It’s easy to install just sweep into the cracks and follow the directions on watering it. Kind of expensive but the finish is nice.
M**L
Great Product
I repaired and reset a few brick pavers in my sidewalk and had previously bought a bag of poly sand from a big home improvement store. Apparently, it had been sitting outside in their garden shop and when I went to use the product it was wet and therefore ruined. I was in the middle of the project and my husband quickly ordered the poly sand from Amazon and it arrived the next day. What a great profuct. The sand was dry and poured beautifully. I was able finish the sidewalk with a few sprinkles of water and hopefully preserve it for a few more years. The quote for a new sidewalk was $6900! That's a lot of groceries I could buy instead. I'm so glad I decided to DIY it and this poly sand is wonderful! I ended up using about 2 1/2 bags as I rehabbed the remainder of the sidewalk. I am saving the rest for any touch ups I might need. It's definitely worth the cost to buy this quality product.
M**G
Bags are hit or miss!
I saw the mixed reviews, so I started with a test bag (10lbs) to use on a small paver section. The product from that bag worked great. It hardened up and is rock solid, and I am sure it will have long durability.After that success, I bought a 50lbs bag to use on a larger paver section. The product from this bag does not work. I followed the exact same process, and it did not harden. Not even a little bit. It is just loose sand that I can displace with a light finger rub.Buy with caution! I will add that the product from the 10lbs bag looked much different straight out of the bag. The 10lbs bag had many small black specs distributed in the sand. The 50lbs bag had much fewer and much larger black specs in the sand.
Trustpilot
1 week ago
2 weeks ago