
DOWNLOAD THE APP


Customer Services
Copyright © 2025 Desertcart Holdings Limited
DOWNLOAD THE APP

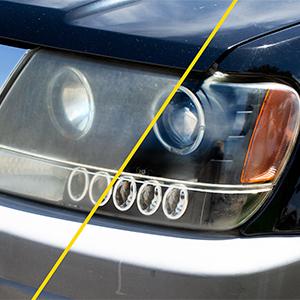
✨ Clear the way to flawless headlights and never blend in again!
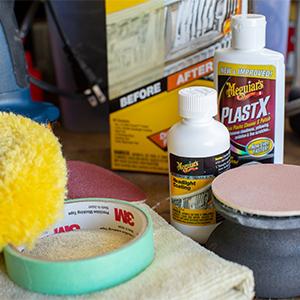
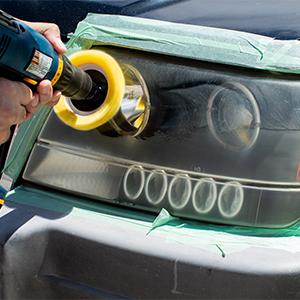
Meguiar's Heavy Duty Headlight Restoration Kit offers a professional-grade, drill-powered solution to remove heavy oxidation, yellowing, and cloudiness from headlights. Featuring a unique polishing compound and a protective coating that lasts up to 12 months, this all-in-one kit restores clarity, enhances nighttime visibility, and protects against future damage—perfect for DIY enthusiasts seeking showroom-quality results.


| ASIN | B01M2D763D |
| Best Sellers Rank | #135,924 in Automotive ( See Top 100 in Automotive ) #112 in Automotive Headlight Restoration Kits |
| Brand | Meguiar's |
| Customer Reviews | 4.6 4.6 out of 5 stars (5,426) |
| Date First Available | November 3, 2016 |
| Is Discontinued By Manufacturer | No |
| Item Weight | 11.7 ounces |
| Item model number | G2980 |
| Manufacturer | Meguiar's |
| Manufacturer Part Number | G2980 |
| OEM Part Number | G2980 |
| Product Dimensions | 10.62 x 4.61 x 2.61 inches |
| Voltage | 12 Volts |
C**S
Good kit
Last year I restored my headlights with a Sylvania kit and I have to say this Maguire's kit is quite a bit better in my opinion. At least the job went much better and easier but time will tell how well it lasts. The longevity of the job done with the Sylvania kit didn't impress me so I'm hoping this Maguire's kit will show it up. What's most notibly better with Maguire's kit is the last two steps: the polishing and the sealant. Maguire's PlastX polishing compound works good and allows you to see how nice the light will look (and it should look great) before finishing it off with the sealant. The sealant assures it will stay looking good, hopefully for a long time. The other kit relies solely on the sealant to create the transparent shine (no polishing) but by that time it's too late to fix any flaws you may have. Also the Maguire's sealant is thinner so it's easier to apply and it dries slower so you can check for and remove any junk that may have gotten in it before it dries. Another plus is that I still have plenty of product left after doing my Ram so now I can restore my daughter's headlights with it too. Overall I'm pretty impressed with the Maguire's headlight restoration kit.
J**S
Easy DIY - Beware of the Wool Pad 9.0/10
After finishing the project, I finally had the urge to make an Amazon Review for the first time ever in life. For the price, this kit is definitely worth effort for those who are looking to spice up the life of your Herby, Hot-Rod or my silver-colored Steele (like mine). My only complaint is the yellow wool-pad provided. It was a nuisance to deal with all of the extra wool residue that was left on the lights through the polishing process. I had to clean, clean and clean while trying to manage the power drill and the excess polish all over the headlights and hood. It took me around 2 hours to complete this project simply because I’m a perfectionist and I decided to do my fog lights after finishing my headlights. Unfortunately for me, I wanted to take the whole bumper off to properly take care of the fog lights. I was also listening to music and enjoying my day off – so sue me! The process that I went through for my headlights/fog lights was as followed: 1) Cleaned headlights with glass cleaner (I used Gyeon Glass for my windows, so I used that) microfiber cloth. I used around 4 microfiber cloths (2 for each side of the car) due to the excess of wool fibers and “white residue” from the lights. 2) Got a spray bottle with tap water and sprayed down the headlight & 1000 grit sandpaper. 3) Wet-sanded away for around 15 min in horizontal strokes (not exact time). I continuously sprayed with water and made sure that all of the white gunk was washing off the headlight after each pass. (you’ll see what I’m talking about) 4) I cleaned the headlight again with the glass cleaner before I repeated the same thing with 3000 grit sand paper. 5) I then cleaned the headlight once more with glass cleaner, and then started with the polishing. 6) I followed the directions to polish with the flat surface of the wool pad; however, the pad seemed to lose more of the yellow “wool” on to the headlight as it sprayed the polish all over the place. It took me a good while to finally get the wool pad “flat” and “soaked” with the polish to be able to polish appropriately. I did 4-5 passes to get every spot. 7) I then cleaned the headlight once more with glass cleaner before applying the Headlight Coating with applicator pad. For the fog lights, the process took 5 minutes for both since they’re small and I didn’t care much for them. I applied 2 coats of the Headlight Coating. It went well for one headlight; however, the other one ended up getting some wool strands dried prior to applying the second coat. I had to re-sand with 3000 grit over that area since it was hard to get off and then re-polish. Also, if you apply the coating in overlapping layers, be careful to not go over it again with a dried-up applicator pad or else it’ll create streaks. The coating starts to dry and get sticky after applying the first layer – please refrain from going over it again just for the heck of it (like a perfectionist would). You’re better off waiting for it to fully dry and then applying another coat. All-in-all, now I know how to learn from my mistakes. I’ll see if I can find a good polishing pad next time and apply the headlight coating evenly with caution to not get anything stuck on it. I may make a an update every 3 months, so stay tuned! Or not.
C**G
Great Product - Great Results!
The headlight housings on my wife's 14 year old Prius were so scratched and fogged up from years of exposure to the weather (it was never garaged) as to render the car useless for night driving. My local Toyota dealer's service department told me they could do a restoration for a few hundred dollars, but that I shouldn't expect too much. So I decided to opt for a $25 solution, and try this product. To say that it far exceeded my expectations would be the understatement of the century. I'm sorry I didn't take any "before" photos, but you can see from the photos I included with this review that the headlight housings now look almost new. Make no mistake: there is work involved, but with persistence and elbow grease, I got this result in less than 2 hours. Everything you need is included, except of course for the power drill, and the instructions are very clear and easy to follow. I can't comment on longevity, but I was pleased to find that there is enough polish and sealer to do a touch-up in a year or two if needed. This is one of the few products I've run into that not only lives up to its promises, but exceeds them. If your headlights are as bad as ours were, save yourself the expense of a new car, and use this!
B**N
Good
R**Z
Si vi resultados, esto fue hace tres semanas, la duración del resultado, aún no la se
G**L
Todo
Trustpilot
2 weeks ago
4 days ago