Desert Online General Trading LLC
Dubai, United Arab Emirates
Desert Online General Trading LLC
Dubai, United Arab Emirates


🔧 Power Up Your Productivity!
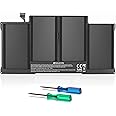
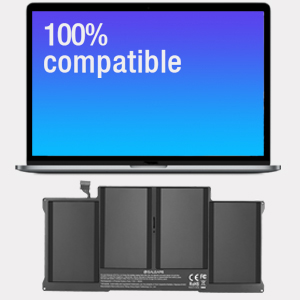
The A1466 Replacement Battery for MacBook Air is a high-quality, rechargeable lithium polymer battery with a capacity of 7200mAh and a voltage of 7.6V. Designed for compatibility with various MacBook Air models, it promises over 500 recharge cycles and a lifespan of 3-5 years, ensuring your device stays powered for longer. With rigorous safety certifications and a comprehensive warranty, this battery is the perfect upgrade for your MacBook.


| Battery Weight | 360 Grams |
| Unit Count | 1.0 Count |
| Battery Cell Type | Lithium Polymer |
| Recommended Uses For Product | Laptop |
| Reusability | Rechargeable |
| Battery Capacity | 7200 Milliampere Hour (mAh) |
| Voltage | 7.6 Volts |
S**I
So easy, I could do it.
This battery is working great and went in easily, though I did not pay much attention to the limited included instructions. Thanks to a youtube video on changing batteries in an older MacBook Air, this battery gave the computer new life. It went from discharging within an hour to holding the charge all day. If I can change it out, it isn't hard. We had the advantage of additional tools, which came in handy when the pull tab to remove the old battery pull completely off. Be sure to be mindful of static issues. Very happy with this battery so far, about a month after replacement.
K**N
Lifesaver!
This battery was a lifesaver.I was out of the country when my MacBook dies and had a visiting friend bring me this and saved me so much money and drama. VERY easy to install yourself. I’m not that tech-y but had no problem.
P**T
Works Great, For A Great Price
If you have bought a used mac air (got 2017 one for 300 in good condition), I highly suggest replacing the battery after 800 cycles. If you get one, or already have one, thats not retaining power, I especially suggest it. The replacement process was super easy (youtube videos galore, and they included screw drivers) and after you lift the lid the process is pretty self explanatory. There is a huge benefit to doing this yourself for anyone thinking of adding life to an old Mac air. If you take one to an apple store its 150 to replace, easy. I hear the newest macs don't even allow this much access which is a shame if it's true. Battery has been top notch so far, and I am glad I saved a Mac air from the electronic dump (use it primarily for apple situations). I am one of those tech people who believes in refurbs. I wish apple understood this more in its current designing process. I guess I don't want to be sucked into an eco system that evolves so much it requires upgrading every two years. Honestly the old tech works fine for most, and the new tech boasts change but doesn't really show it. Tech is all the same now. All people are doing is paying high prices for a name. The talent is in the user.
L**R
Good project + your old mbAir will get a new life.
The replacement battery looks just like the battery i am replacing. Pricepoint was amazing 30-45 dollars is normal variation. It is about 150 to replace it at the apple store.It is a reasonable project for someone without IT/hardware experience, as battery comes with necessary screw drivers.Items i recommend:Latex glovesCompressed air,Battery, and screw drivers (come in the kit)Step 1. Turn off your computer(shutdown).Step 2, remove the protective cover from your battery and use its stickiness to hold screws you will take out in place.Step 3. Remove the screws to remove the cover.Step 4. Use another screwdriver to remove 5 screws holding the batteryStep 5. Unplug the battery(pull horizontally NOT up)Step 6 l. Use compressed air to get junk out of your computer.Step 7. Remove old battery and place new batteryStep 8. Screw it in.Step 9. Plug battery inStep 10. Attach cover.Step 11. Charge battery completely (i left it in for 5 hours to endure full charge).This is where i stopped.Step 12. Full discharge of the battery so it accurately knows what 0% charge is.I will give feedback how long it lasts, if applicable. Its predecessor in my macbook air started going bad at 200 charges and was unusable at 250 charges.
S**R
Doesn't last
This is the second battery I have replaced. The first one was from a different company name, but when it came everything was exactly the same, so I suspect same company, different name. I got it in April, it worked well for about a month and then it started losing power quicker and quicker. Now I am back to having hardly any charge, most times I have to keep it plugged in. It comes with a warranty, but what good is that when there is no address or phone number? I researched it quite a bit and I can't find any contact information. Amazon was no help either. So, now I guess I am stuck again. I didn't pay a lot and it was easy to install, but what good is that when it stops working prematurely? If anyone knows how to get in touch with this company please leave the information. Thank you.Follow up: Contacted Amazon to try to get a phone number or address from them for this vender, they have no information either and no returns after 30 days. So buyer beware! They even confirmed that they offer a 24 month warranty and there is no way to get in touch with them.
F**E
Good for almost 2 years
I have a 2017 Macbook Air model A1466. I think I bought the computer in 2018. I bought this battery mid 2021. So the original mac battery lasted around 3 years, this one not quite 2 years. I do use my computer a lot. Like, a lot. Overall, it has been a good purchase. Nothing lasts forever.
C**A
Best price
Durabilidad
T**Y
Very Easy to Install despite no instructions from seller.
I bought this battery to replace the one in my Macbook Air A1466. The battery arrived promptly and was well packaged. The seller claims that it includes a "manual", but it's just a slip of paper with various warnings on it. There are zero instructions on how to install it.I found a video on YouTube and the installation is VERY easy. You remove 10 tiny screws from the laptop using the included blue screwdriver. Then you remove the back cover by lifting it up from the back hinge. Pull the little tape tab to disconnect the battery from the motherboard. (My tape tab just broke, so I pried it out with my fingernail.) Then remove the five tiny screws from the battery using the included green screwdriver. Be sure to keep the screws in such a way that you remember which one goes in which hole. (They are different sizes.) Then remove the battery and replace it with the new one. Pull all the screws back in. Plug the battery into the motherboard. Then replace the cover and put all those screws back in. You're done. Plug it in and let it charge up.I'll update this review after I've used the battery for a few days and let y'all know how well it's holding a charge.
Trustpilot
5 days ago
2 days ago